公开课回放地址:https://www.bilibili.com/video/BV1iC4y1g7eM
Flume 多节点海量数据采集解决方案
Flume是一种可配置、高可用的数据采集工具,主要用于采集来自各种流媒体的数据(Web服务器的日志数据等)并传输到集中式数据存储区域。
Flume 支持在日志系统中定制各种数据发送方,用于收集数据;并且可以对数据进行简单处理,将其写到可定制的各种数据接收方(如文本、HDFS、HBase等)。
Flume最主要的作用就是,实时读取服务器本地磁盘的数据,将数据写入到HDFS。

flume的特点
- 具有复杂的流动性。Flume允许用户构建多跳流,允许使用扇入流和扇出流、上下文路由和故障转移。
- 多跳流:Flume中可以有多个agent【JVM进程】。事件(Event)需要通过多个agent才能到达最终目的地,成为多跳流
- 扇入流:从一个源(Source)通过多个通道(Chanel)
- 扇出流:多个源通过一个通道到达Sink
-
具有可靠性:Flume的源(Source)和接收器(Slink)封装在事务中,可以确保事件在数据流中从一个点 到另一个点的可靠性传递。
- 可恢复性:事件(Event)存储在通道中,当Flume故障时,通道赋值恢复数据
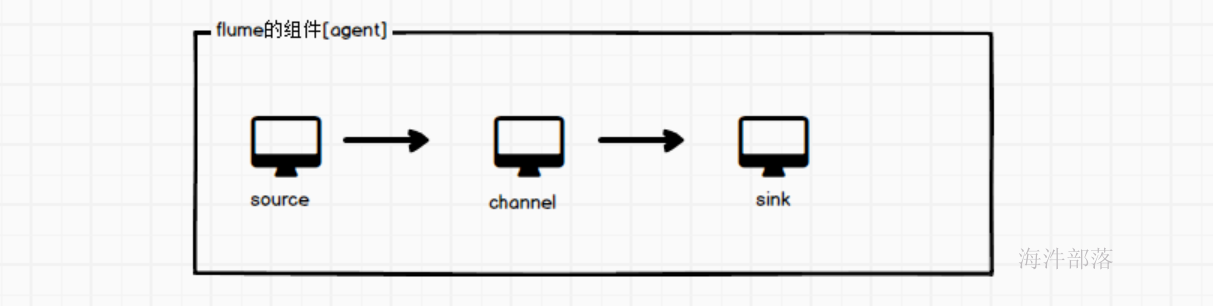
flume的组件结构
一个flume程序是一个agent,一个agent是一个JVM进程
其中agent分为三个组件单独运行,source+channel+sink,异步执行效率更高,耦合度更低,灵活度也更高
允许我们在不同的种类的组件间实现灵活搭配
Source简介
Source 是负责接收数据到 Flume Agent 的组件。Source 组件可以处理各种类型、各种格式的日志数据,包括 avro、thrift、exec、jms、spooling directory、netcat、taildir、sequence generator、syslog、httplegacy。
Slink简介
Sink 不断地轮询 Channel 中的事件且批量地移除它们,并将这些事件批量写入到存储或索引系统、或者被发送到另一个 Flume Agent。
Sink 组件目的地包括 hdfs、logger、avro、thrift、ipc、file、HBase、solr、自定义。
Channel简介:
Channel 是位于 Source 和 Sink 之间的缓冲区。因此,Channel 允许 Source 和 Sink 运作在不同的速率上。Channel 是线程安全的,可以同时处理几个 Source 的写入操作和几个Sink 的读取操作
Flume 自带两种 Channel:Memory Channel 和 File Channel。
-
Memory Channel 是内存中的队列。Memory Channel 在不需要关心数据丢失的情景下适用。如果需要关心数据丢失,那么 Memory Channel 就不应该使用,因为程序死亡、机器宕机或者重启都会导致数据丢失。
- File Channel 将所有事件写到磁盘。因此在程序关闭或机器宕机的情况下不会丢失数据。
Event简介
传输单元,Flume 数据传输的基本单元,以 Event 的形式将数据从源头送至目的地。
Event 由 Header 和 Body 两部分组成,Header 用来存放该 event 的一些属性,为 K-V 结构,Body 用来存放该条数据,形式为字节数组。
实验环境准备
本次实验以酷牛商城项目日志采集为数据源
首先看一下酷牛商城项目的整体组成架构
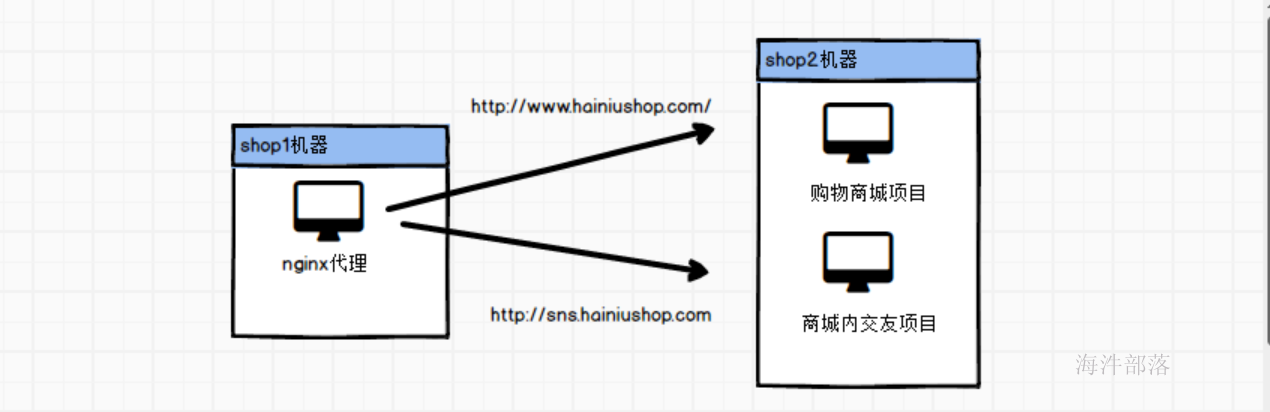
当用户使用浏览器访问shop1机器的nginx的时候会将数据转发到不同的网站服务
同时nginx也会打印出来用户的行为日志
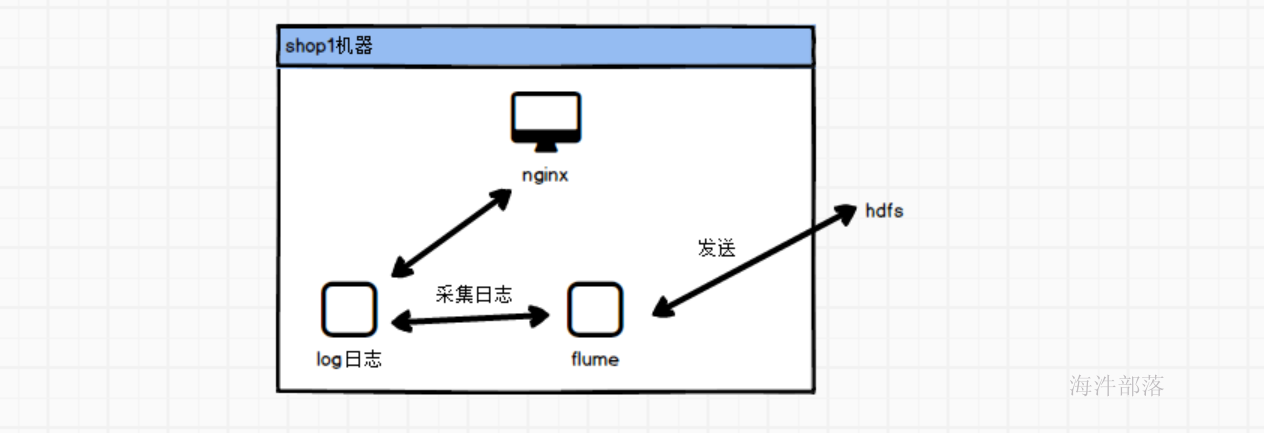
这个时候采集flume进行日志采集到hdfs中
首先打开酷牛商城镜像
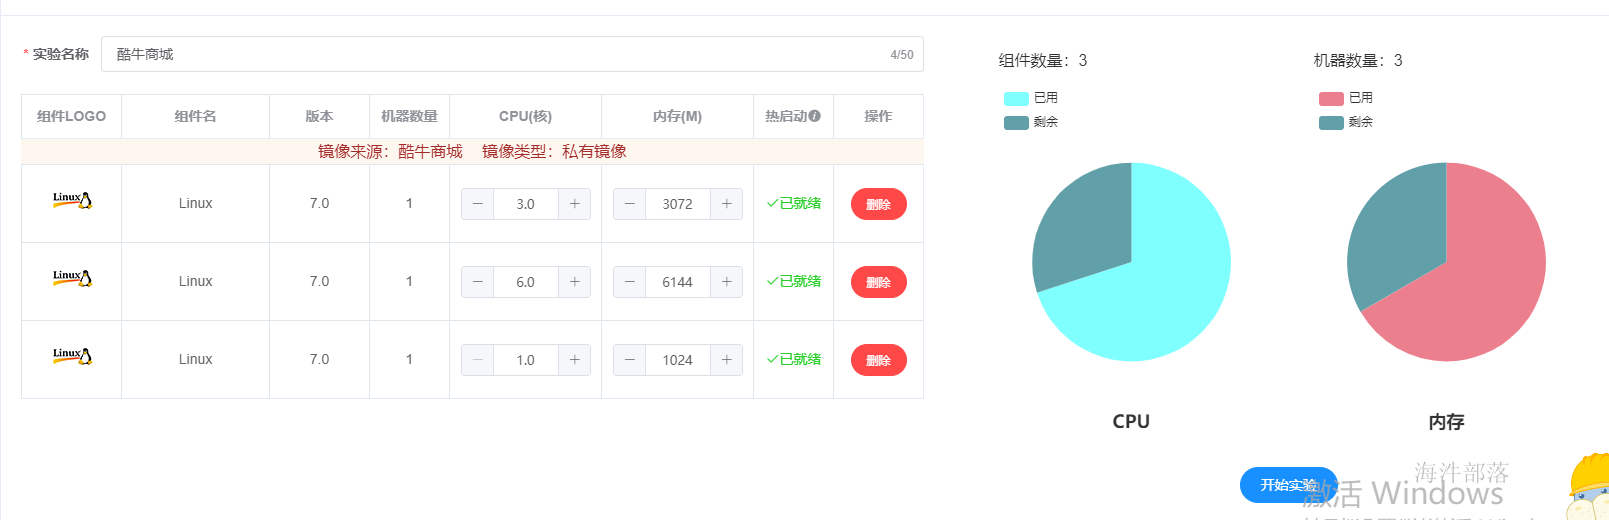
启动实验其中包含
- shop1中为nginx
- shop2中为商城项目和sns项目
- mysql机器中为mysql数据库
进入实验后启动实验镜像中的组件
# 进入mysql机器启动mysql数据库
systemctl start mysqld
# 进入shop1机器
/usr/local/nginx/sbin/nginx
# 进入shop2中启动所有的tomcat
/usr/local/apache-tomcat-image-8.0.20/bin/startup.sh
/usr/local/apache-tomcat-service-8.0.20/bin/startup.sh
/usr/local/apache-tomcat-shop-8.0.20/bin/startup.sh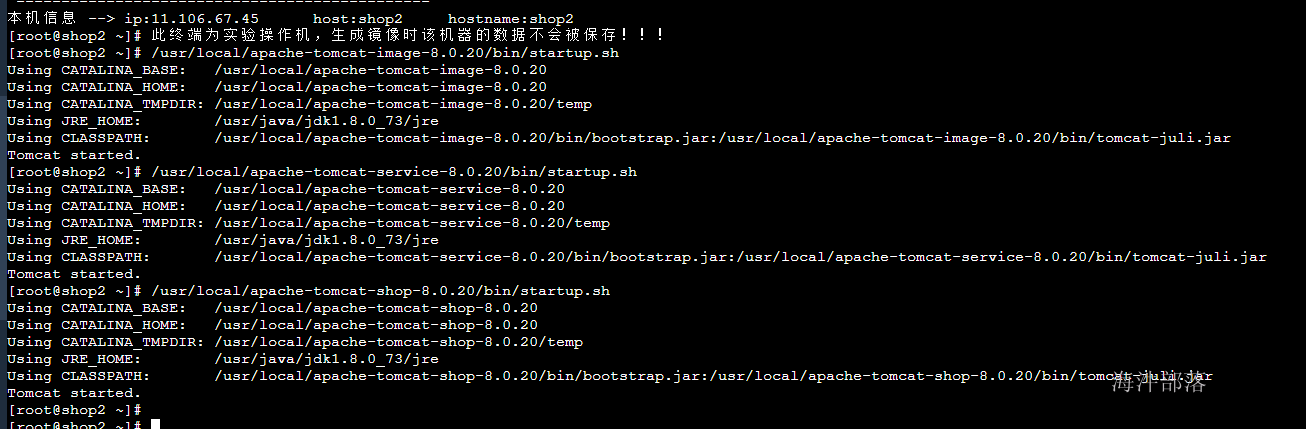
分别在三个机器增加nginx代理域名映射
其中远程桌面中也要增加内容
11.106.67.23 www.hainiushop.com
11.106.67.23 sns.hainiushop.com
11.106.67.23 sso.hainiushop.com
11.106.67.23 image.hainiushop.com
其中11.106.67.23为shop1的ip分别给三个机器的/etc/hosts中增加这个内容
这个时候在远程桌面可以访问酷牛商城
hdfs的安装准备
首先选择hadoop实验启动
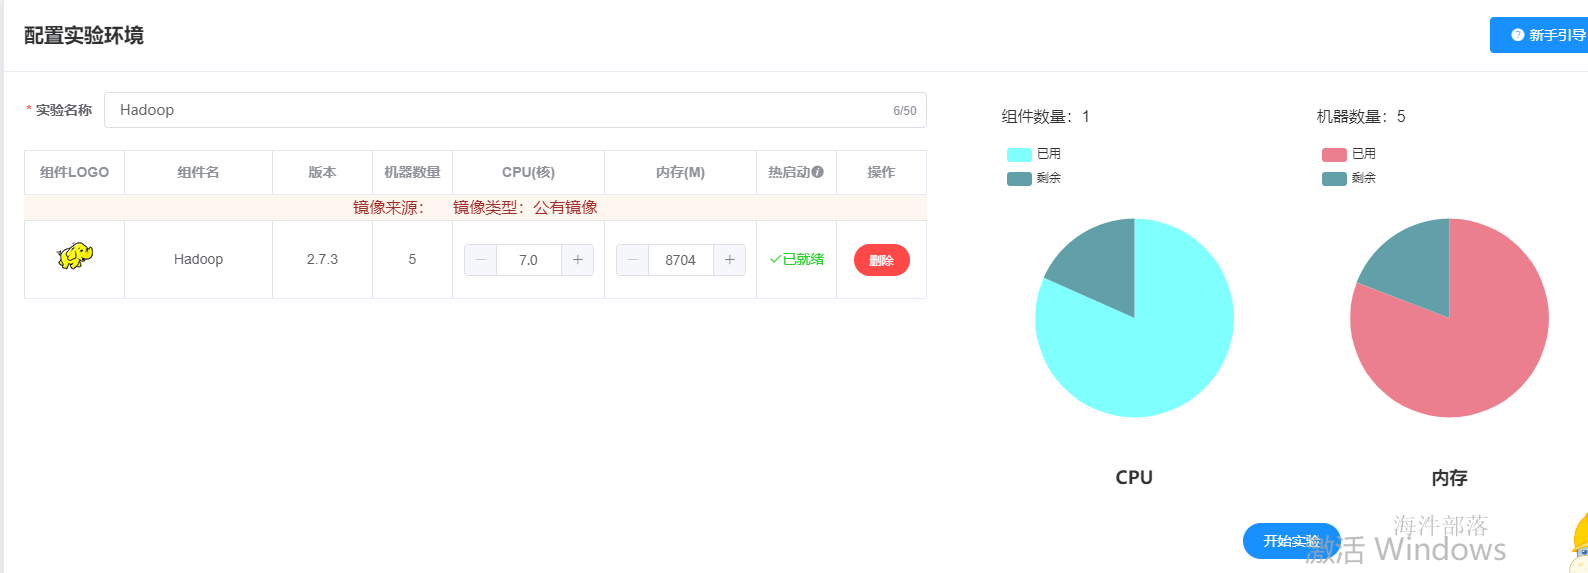
启动实验
将hadoop集群的配置信息分发到shop1和shop2中
# 首先进入到shop1和shop2中删除原本的hadoop配置信息
cd /usr/local/hadoop/etc/
rm -rf hadoop
# 然后进入到hadoop集群将配置信息发送过来
scp -r /opt/hadoop-2.7.3/etc/hadoop root@11.106.67.50:/usr/local/hadoop/etc/
scp -r /opt/hadoop-2.7.3/etc/hadoop root@11.106.67.51:/usr/local/hadoop/etc/
# 因为shop1和shop2要采集数据发送到hadoop集群,所以需要配置hadoop集群的ip信息
11.87.38.29     nn1-21637
11.106.67.1     nn2-21637
11.90.214.134   op-56185
11.106.67.24    s2-21637
11.106.67.60    s3-21637
11.90.214.153   s1-21637
# 将这些信息配置到shop1和shop2的集群中
到此环境准备完毕
flume的数据采集
首先我们演示的是taildir source
Taildir Source:监听一个指定的目录下,指定正则格式的文件的内容,作为它的数据源,并支持断点续传功能 ;
如何支持断点续传的?
有个文件,存储断点续传的位置。
用于实时抽取指定目录下的多个文件。
配置内容如下:
# Name the components on this agent
a1.sources = s1
a1.channels = c1
a1.sinks = k1
# sources类型
a1.sources.s1.type  =  taildir
#存储读取文件数据最后位置
a1.sources.s1.positionFile  =  /root/taildir_position.json
a1.sources.s1.filegroups  =  g1
a1.sources.s1.filegroups.g1  =  /data/hainiu_shop_access_log/all.log

# Describe the sink
a1.sinks.k1.type = hdfs
a1.sinks.k1.hdfs.useLocalTimeStamp = true
a1.sinks.k1.hdfs.path = hdfs:///user/hadoop/flume-taildir/%Y-%m-%d
a1.sinks.k1.hdfs.filePrefix = %Y-%m-%d
a1.sinks.k1.hdfs.writeFormat = Text
a1.sinks.k1.hdfs.fileType = DataStream
a1.sinks.k1.hdfs.rollInterval = 0
a1.sinks.k1.hdfs.rollSize = 0
a1.sinks.k1.hdfs.rollCount = 50

# channals file
a1.channels.c1.type = memory
a1.channels.c1.capacity = 10000
a1.channels.c1.transactionCapacity = 100
# Bind the source and sink to the channel
a1.sources.s1.channels = c1
a1.sinks.k1.channel = c1
启动flume
cd /usr/local/apache-flume-1.10.1-bin/
bin/flume-ng agent -n a1 -c conf -f conf/taildir.conf -Dflume.root.logger=info,console
监控页查看
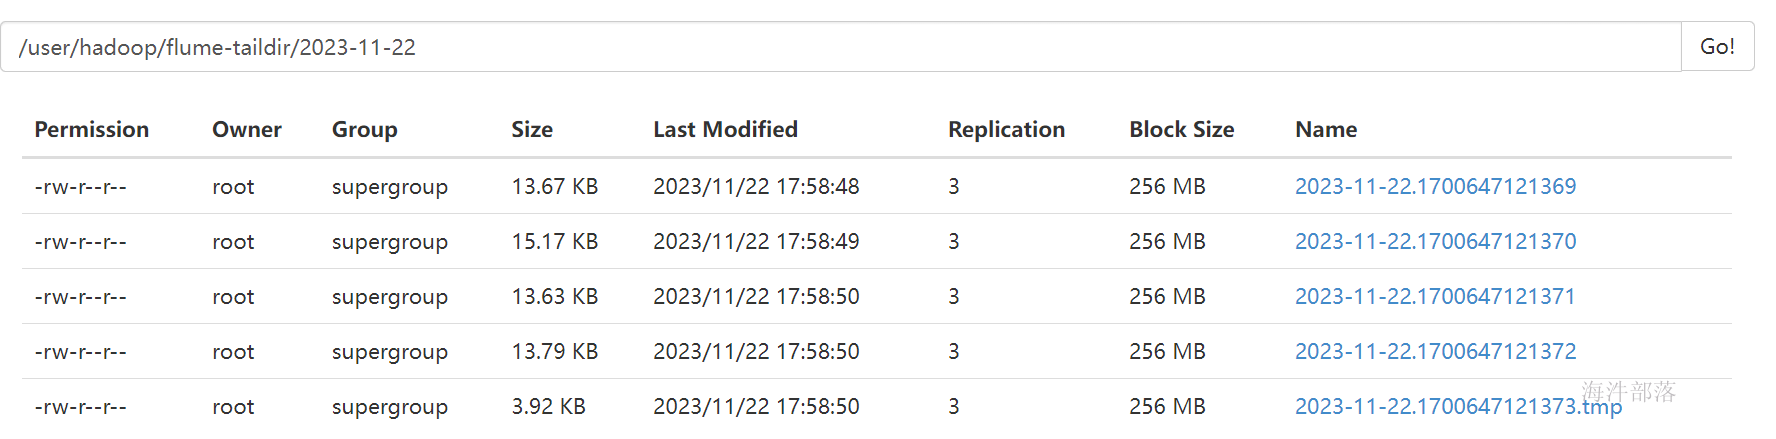
命令行查询条数

自定义拦截器
数据已经采集完毕但是我们现在要对数据做一个简单的处理,比如没有登录的用户的数据我们直接进行过滤
将不合法的数据进行轻度的ETL处理是非常重要的
首先我们去看数据的组成部分

字段解释
1:IP
2:打日志的时间
3:请求的类型GET/POST
4:请求的地址
5:请求状态码
6:POST提交的数据
7:refer,来源
8:浏览器的Agent信息
9:用户浏览器的唯一标识,这个是自己的程序产生的,不是nginx生成的
10:用户登陆的用户名,如果用户不登陆就没有
所以思路就是将数据进行拆分,自定义拦截器将最后两个字段为空的数据进行过滤掉
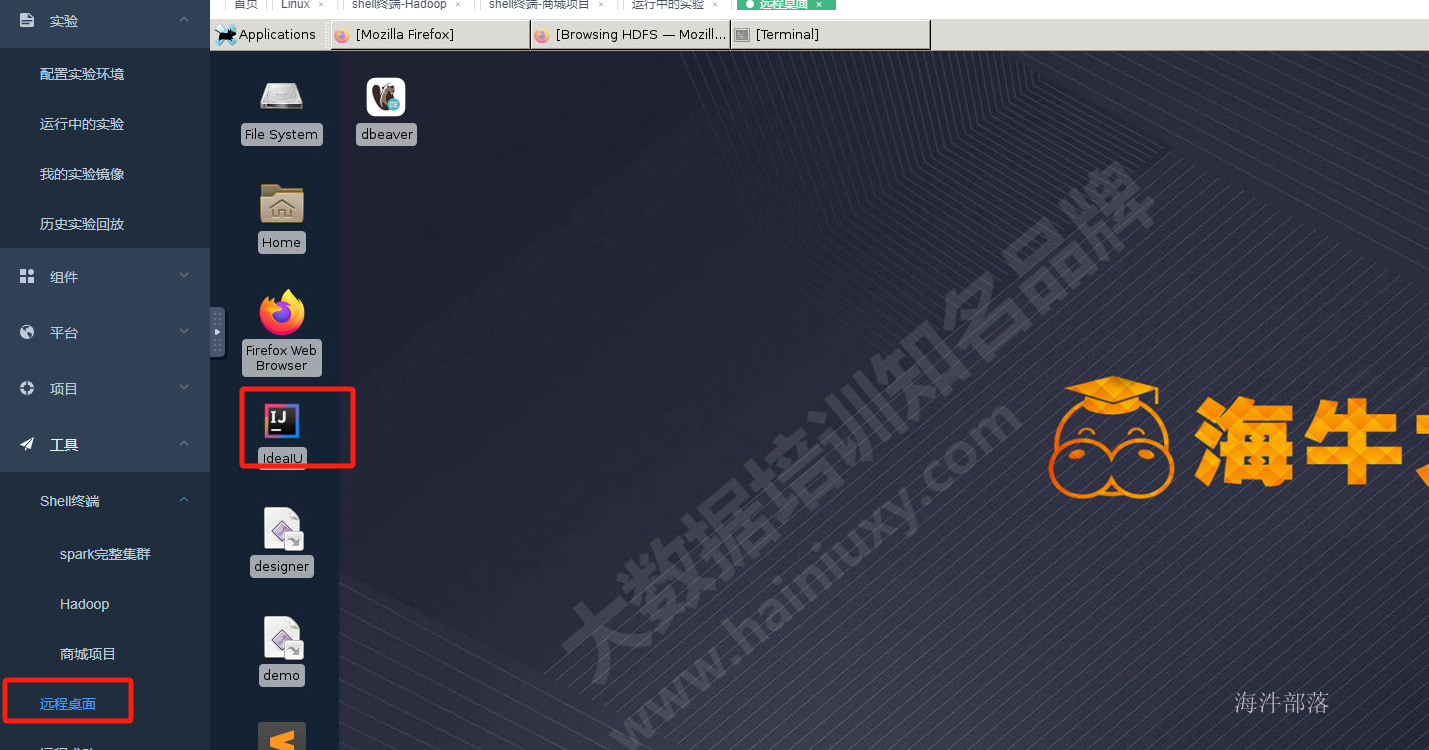
所以我们需要自定义拦截器,自定义拦截器需要我们自己开发代码,这个时候去打开远程桌面
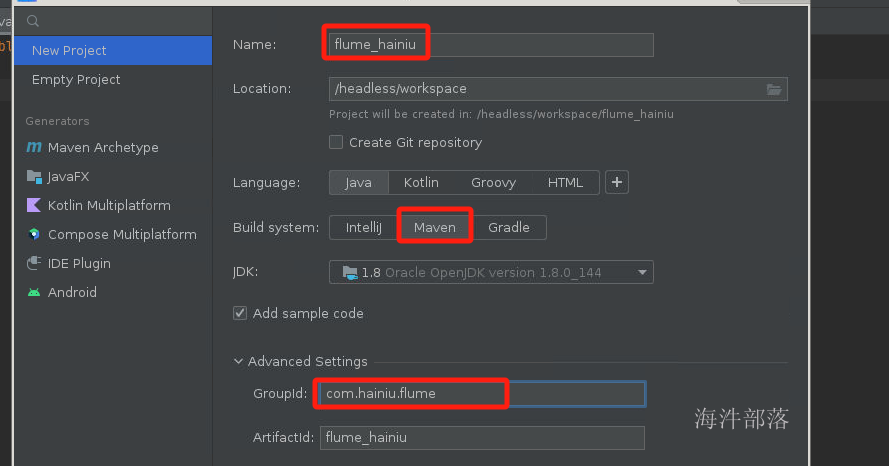
创建maven项目并且引入依赖
<dependency>
    <groupId>org.apache.flume</groupId>
    <artifactId>flume-ng-core</artifactId>
    <version>1.10.0</version>
</dependency>
代码如下:
package com.hainiu.flume;

import org.apache.flume.Context;
import org.apache.flume.Event;
import org.apache.flume.interceptor.Interceptor;

import java.nio.charset.StandardCharsets;
import java.util.ArrayList;
import java.util.List;

public class MyInterceptor implements Interceptor {
    @Override
    public void initialize() {

    }

    @Override
    public Event intercept(Event event) {
        String line = new String(event.getBody(), StandardCharsets.UTF_8);

        String[] strs = line.split("\001");
        if(strs[10].equals("-")|| strs[11].equals("-"))
            return null;
        return event;
    }

    @Override
    public List<Event> intercept(List<Event> list) {
        List<Event> result = new ArrayList<>();
        for (Event event : list) {
            Event e = intercept(event);
            if(e !=null){
                result.add(e);
            }
        }
        return result;
    }

    @Override
    public void close() {

    }

    public static class Builder implements Interceptor.Builder{

        @Override
        public Interceptor build() {
            return new MyInterceptor();
        }

        @Override
        public void configure(Context context) {

        }
    }
}
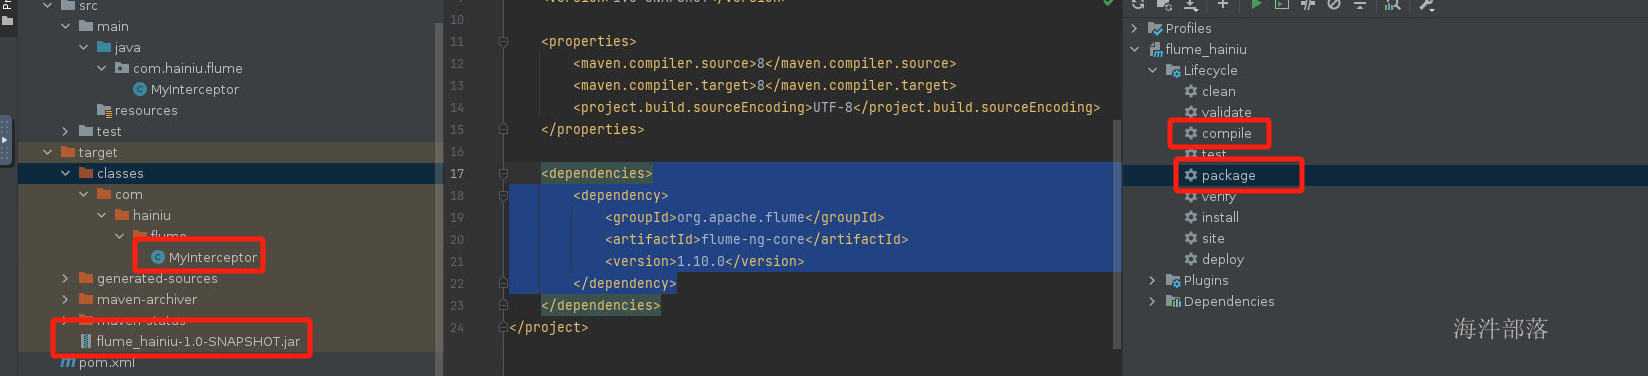
点击maven的编译和打包功能,实现代码编译打包
将代码上传到flume的对应机器中
scp /headless/workspace/flume_hainiu/target/flume_hainiu-1.0-SNAPSHOT.jar root@shop1:/usr/local/apache-flume-1.10.1-bin/lib/进入到shop1,进行flume配置文件修改为
# Name the components on this agent
a1.sources = s1
a1.channels = c1
a1.sinks = k1
# sources类型
a1.sources.s1.type  =  taildir
#存储读取文件数据最后位置
a1.sources.s1.positionFile  =  /root/taildir_position.json
a1.sources.s1.filegroups  =  g1
a1.sources.s1.filegroups.g1  =  /data/hainiu_shop_access_log/all.log
# 拦截器配置
a1.sources.s1.interceptors=i1
a1.sources.s1.interceptors.i1.type=com.hainiu.flume.MyInterceptor$Builder
# Describe the sink
a1.sinks.k1.type = hdfs
a1.sinks.k1.hdfs.useLocalTimeStamp = true
a1.sinks.k1.hdfs.path = hdfs:///user/hadoop/flume-taildir/%Y-%m-%d
a1.sinks.k1.hdfs.filePrefix = %Y-%m-%d
a1.sinks.k1.hdfs.writeFormat = Text
a1.sinks.k1.hdfs.fileType = DataStream
a1.sinks.k1.hdfs.rollInterval = 0
a1.sinks.k1.hdfs.rollSize = 0
a1.sinks.k1.hdfs.rollCount = 50

# channals file
a1.channels.c1.type = memory
a1.channels.c1.capacity = 10000
a1.channels.c1.transactionCapacity = 100
# Bind the source and sink to the channel
a1.sources.s1.channels = c1
a1.sinks.k1.channel = c1
重新启动flume
访问浏览器发现flume没有采集到任何数据

这个时候我们注册登录在访问网站


发现数据已经采集完毕
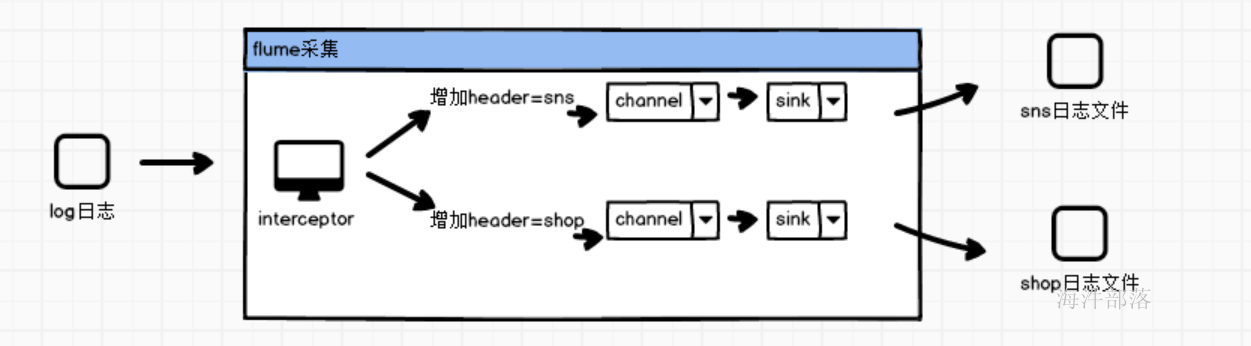
flume数据分类
flume的源端source可以增加选择器从而进行数据分类处理
思路如下:
首先在flume的source源端接收到数据后使用自定义拦截器对数据进行标记增加header头部信息
使用selector选择器进行分发到不同的channel中
使用sink进行数据写出到不同文件
大家可以看到商城日志产生的日志是带有外链参数的,也就是
第七个图上标记
所以我们可以实现拦截器在日志event上增加header头部标识,然后下游根据标识进行分类拆分到不同的channel中,从而实现日志的分类存储
首先开发interceptor
代码如下:
package com.hainiu.flume;

import org.apache.flume.Context;
import org.apache.flume.Event;
import org.apache.flume.interceptor.Interceptor;

import java.nio.charset.StandardCharsets;
import java.util.ArrayList;
import java.util.HashMap;
import java.util.Iterator;
import java.util.List;

public class HeaderInterceptor implements Interceptor {
    @Override
    public void initialize() {

    }

    @Override
    public Event intercept(Event event) {
        String line = new String(event.getBody(), StandardCharsets.UTF_8);
        String[] strs = line.split("\001");
        String refer = strs[7];
        if(refer.equals("-")){
            return null;
        }
        HashMap<String, String> headers = new HashMap<>();
        if(refer.contains("sns.hainiushop.com")){
            headers.put("type","sns");
        }else if(refer.contains("www.hainiushop.com")){
            headers.put("type","shop");
        }else{
            return null;
        }
        event.setHeaders(headers);
        return event;
    }

    @Override
    public List<Event> intercept(List<Event> list) {
        ArrayList<Event> result = new ArrayList<>();
        for (Event event : list) {
            Event e = intercept(event);
            if(e != null)
                result.add(e);
        }
        return result;
    }

    @Override
    public void close() {

    }

    public static class Builder implements Interceptor.Builder{

        @Override
        public Interceptor build() {
            return null;
        }

        @Override
        public void configure(Context context) {

        }
    }
}
配置文件如下:
# Name the components on this agent
a1.sources = s1
a1.channels = c1 c2
a1.sinks = k1 k2
# sources类型
a1.sources.s1.type  =  taildir
#存储读取文件数据最后位置
a1.sources.s1.positionFile  =  /root/taildir_position.json
a1.sources.s1.filegroups  =  g1
a1.sources.s1.filegroups.g1  =  /data/hainiu_shop_access_log/all.log
# 拦截器配置
a1.sources.s1.interceptors=i1
a1.sources.s1.interceptors.i1.type=com.hainiu.flume.HeaderInterceptor$Builder

# 设定选择器
a1.sources.s1.selector.type = multiplexing
a1.sources.s1.selector.header = type
a1.sources.s1.selector.mapping.sns= c1
a1.sources.s1.selector.mapping.shop = c2
a1.sources.s1.selector.default = c2

# Describe the sink
a1.sinks.k1.type = hdfs
a1.sinks.k1.hdfs.useLocalTimeStamp = true
a1.sinks.k1.hdfs.path = hdfs:///user/hadoop/flume-taildir/sns/%Y-%m-%d
a1.sinks.k1.hdfs.filePrefix = %Y-%m-%d
a1.sinks.k1.hdfs.writeFormat = Text
a1.sinks.k1.hdfs.fileType = DataStream
a1.sinks.k1.hdfs.rollInterval = 0
a1.sinks.k1.hdfs.rollSize = 0
a1.sinks.k1.hdfs.rollCount = 50

a1.sinks.k2.type = hdfs
a1.sinks.k2.hdfs.useLocalTimeStamp = true
a1.sinks.k2.hdfs.path = hdfs:///user/hadoop/flume-taildir/shop/%Y-%m-%d
a1.sinks.k2.hdfs.filePrefix = %Y-%m-%d
a1.sinks.k2.hdfs.writeFormat = Text
a1.sinks.k2.hdfs.fileType = DataStream
a1.sinks.k2.hdfs.rollInterval = 0
a1.sinks.k2.hdfs.rollSize = 0
a1.sinks.k2.hdfs.rollCount = 50

# channals file
a1.channels.c1.type = memory
a1.channels.c1.capacity = 10000
a1.channels.c1.transactionCapacity = 100

a1.channels.c2.type = memory
a1.channels.c2.capacity = 10000
a1.channels.c2.transactionCapacity = 100

# Bind the source and sink to the channel
a1.sources.s1.channels = c1 c2
a1.sinks.k1.channel = c1
a1.sinks.k2.channel = c2
启动命令如下:
cd /usr/local/apache-flume-1.10.1-bin
bin/flume-ng agent -n a1 -c conf -f conf/header.conf -Dflume.root.logger=info,console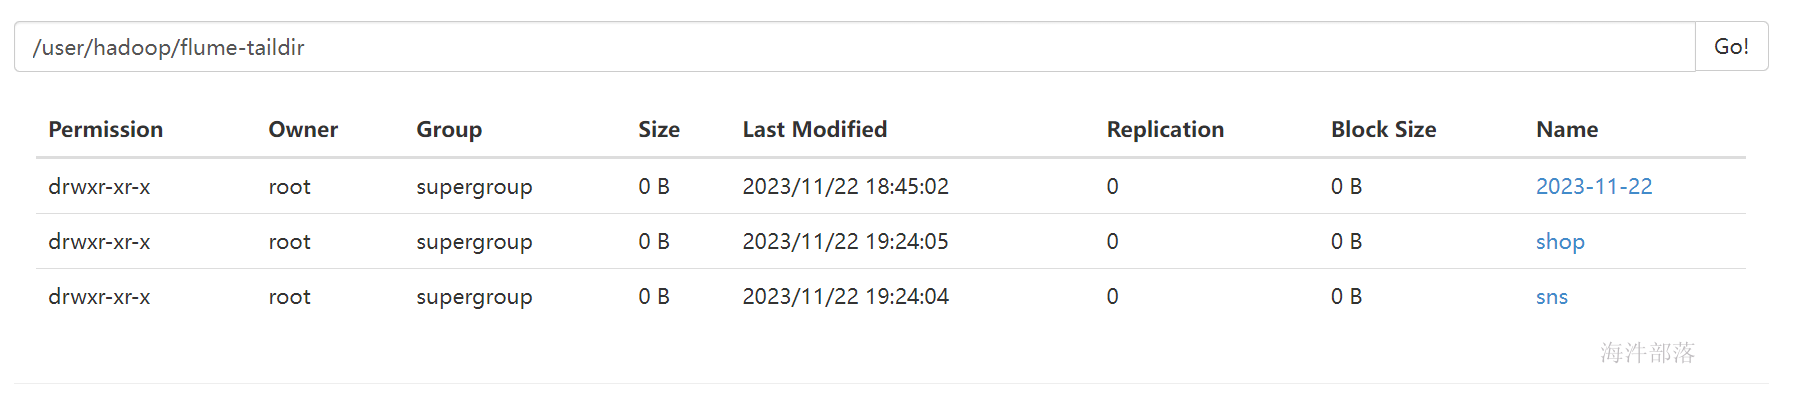
可以看到日志分类生成了
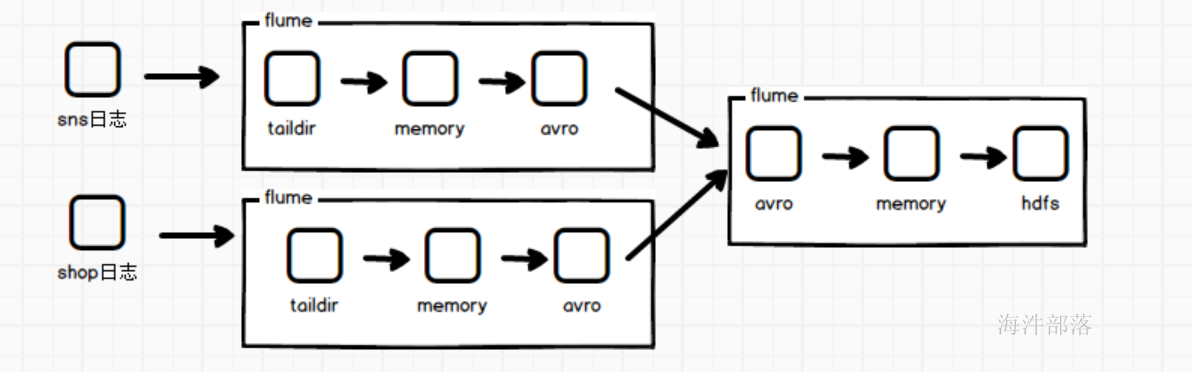
flume日志合并采集
假如我们在服务器上面存在两个以上的文件要采集,而且需要将两个文件的内容或者说两个服务器上文件的内容汇总到一起,整体写入到一个文件中,这个时候我们就需要多个flume的联合搭配使用
首先修改shop1的nginx配置,让nginx的访问日志在访问不同项目的时候打印到不同日志文件中
vim /usr/local/nginx/conf/sites-enabled/hainiushop.com 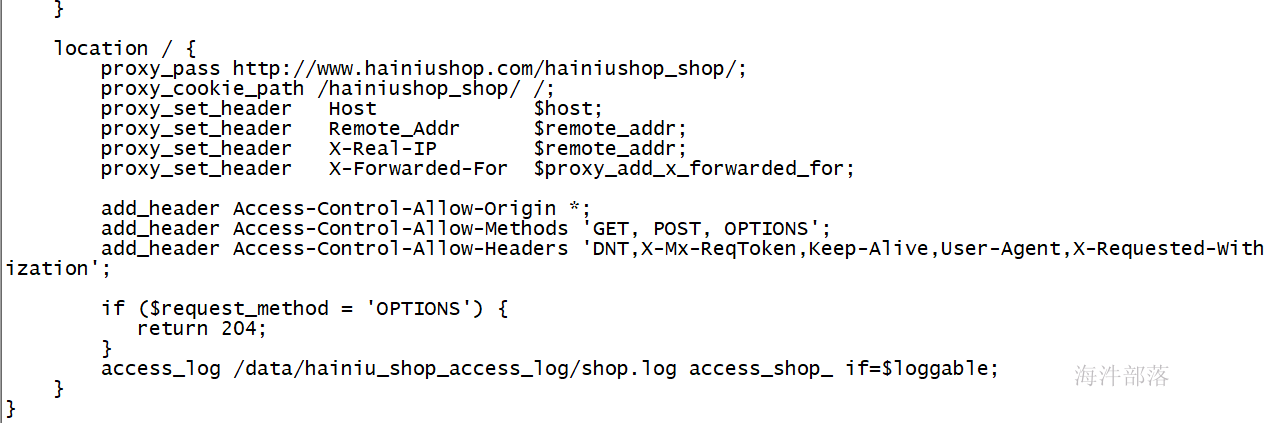
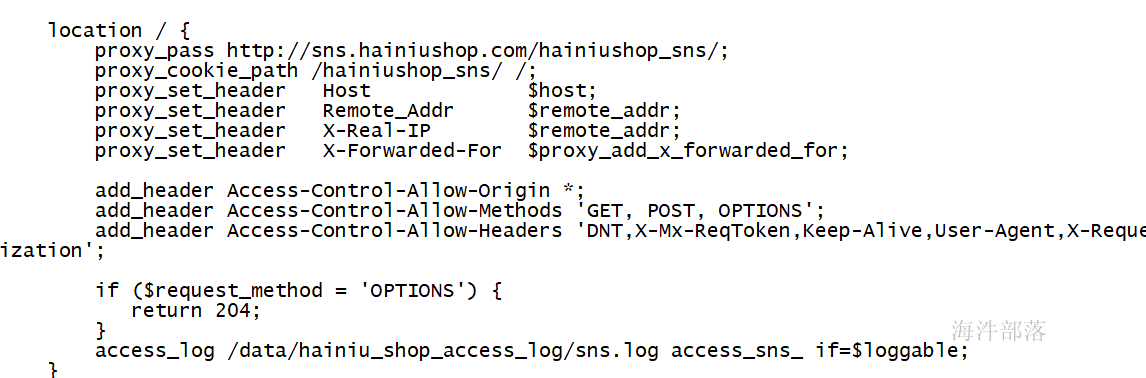
然后重启nginx的代理
/usr/local/nginx/sbin/nginx -s reload这个时候访问网站会发现日志已经打印到不同位置

这个时候在shop1的机器上启动两个flume分别采集不同的文件,并且发送给shop2的flume
配置如下:
sns.conf
# Name the components on this agent
a1.sources = s1
a1.channels = c1
a1.sinks = k1
# sources类型
a1.sources.s1.type  =  taildir
#存储读取文件数据最后位置
a1.sources.s1.positionFile  =  /root/taildir_position1.json
a1.sources.s1.filegroups  =  g1
a1.sources.s1.filegroups.g1  =  /data/hainiu_shop_access_log/sns.log

# Describe the sink
a1.sinks.k1.type=avro
a1.sinks.k1.hostname = shop2
a1.sinks.k1.port = 55555

# channals file
a1.channels.c1.type = memory
a1.channels.c1.capacity = 10000
a1.channels.c1.transactionCapacity = 100
# Bind the source and sink to the channel
a1.sources.s1.channels = c1
a1.sinks.k1.channel = c1
shop.conf配置
# Name the components on this agent
a1.sources = s1
a1.channels = c1
a1.sinks = k1
# sources类型
a1.sources.s1.type  =  taildir
#存储读取文件数据最后位置
a1.sources.s1.positionFile  =  /root/taildir_position2.json
a1.sources.s1.filegroups  =  g1
a1.sources.s1.filegroups.g1  =  /data/hainiu_shop_access_log/shop.log

# Describe the sink
a1.sinks.k1.type=avro
a1.sinks.k1.hostname = shop2
a1.sinks.k1.port = 55555

# channals file
a1.channels.c1.type = memory
a1.channels.c1.capacity = 10000
a1.channels.c1.transactionCapacity = 100
# Bind the source and sink to the channel
a1.sources.s1.channels = c1
a1.sinks.k1.channel = c1
shop2机器上的配置为
sink2hdfs.conf
# Name the components on this agent
a1.sources = s1
a1.channels = c1
a1.sinks = k1
# sources类型
a1.sources.s1.type=avro
a1.sources.s1.bind=11.106.67.16
a1.sources.s1.port=55555

# Describe the sink
a1.sinks.k1.type = hdfs
a1.sinks.k1.hdfs.useLocalTimeStamp = true
a1.sinks.k1.hdfs.path = hdfs:///user/hadoop/flume-taildir/all_access/%Y-%m-%d
a1.sinks.k1.hdfs.filePrefix = %Y-%m-%d
a1.sinks.k1.hdfs.writeFormat = Text
a1.sinks.k1.hdfs.fileType = DataStream
a1.sinks.k1.hdfs.rollInterval = 0
a1.sinks.k1.hdfs.rollSize = 0
a1.sinks.k1.hdfs.rollCount = 50

# channals file
a1.channels.c1.type = memory
a1.channels.c1.capacity = 10000
a1.channels.c1.transactionCapacity = 100
# Bind the source and sink to the channel
a1.sources.s1.channels = c1
a1.sinks.k1.channel = c1
三个机器分别启动flume
# shop1
nohup bin/flume-ng agent -n a1 -c conf -f conf/sns.conf -Dflume.root.logger=info,console &
nohup bin/flume-ng agent -n a1 -c conf -f conf/shop.conf -Dflume.root.logger=info,console &
# shop2
nohup bin/flume-ng agent -n a1 -c conf -f conf/sink2hdfs.conf -Dflume.root.logger=info,console &
检查hdfs发现数据已经生成