dolphinscheduler部署
1 安装jdk(已安装可忽略)
- 安装jdk
# 上传jdk安装包
rpm -ivh jdk-8u144-linux-x64.rpm- 配置环境变量
export JAVA_HOME=/usr/java/jdk1.8.0_144
export JRE_HOME=$JAVA_HOME/jre
export PATH=$PATH:$JAVA_HOME/bin
export CLASSPATH=.:$JAVA_HOME/lib/dt.jar:$JAVA_HOME/lib/tools.jar
source环境变量
source /etc/profile2 安装常用软件
yum install -y openssh-server vim gcc gcc-c++ glibc-headers bzip2-devel lzo-devel curl wget openssh-clients zlib-devel autoconf automake cmake libtool openssl-devel fuse-devel snappy-devel telnet unzip zip net-tools.x86_64 firewalld systemd3 安装MySQL(已安装可忽略)
下载安装包
wget https://dev.mysql.com/get/mysql57-community-release-el7-11.noarch.rpm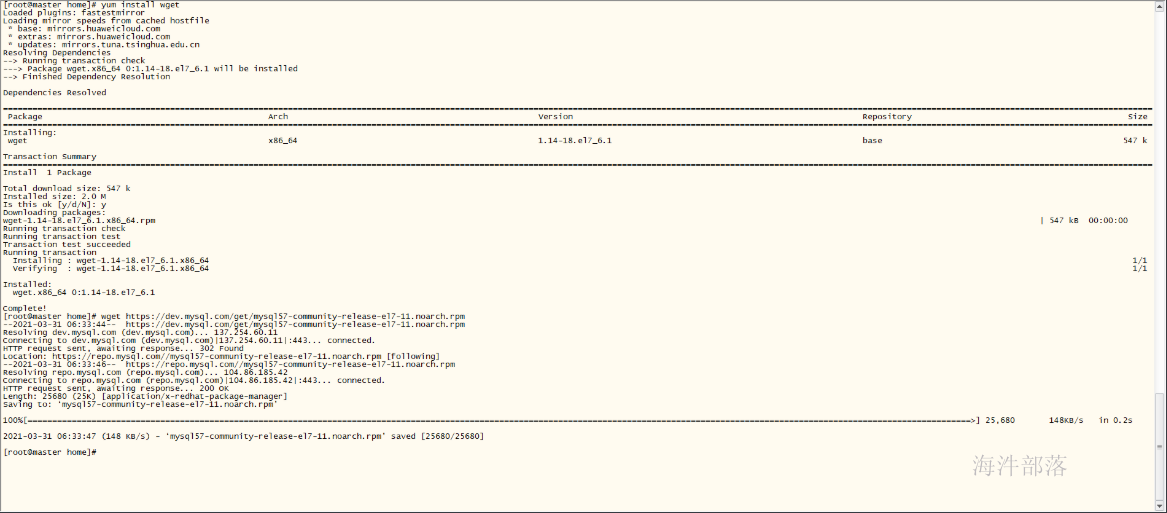
安装rpm包
rpm -Uvh mysql57-community-release-el7-11.noarch.rpm检查mysql源
yum repolist enabled | grep mysql安装mysql-community-server
yum install -y mysql-community-server启动mysql服务
systemctl start mysqld
systemctl status mysqld
查看初始密码
cat /var/log/mysqld.log | grep password
修改mysql密码
mysql -uroot -p
#输入上一步查询到的初始密码
set global validate_password_policy=LOW;
set password=password("Congf1daof4");
4 创建dolphinscheduler元数据库
-- 创建库
CREATE DATABASE dolphinscheduler DEFAULT CHARACTER SET utf8 DEFAULT COLLATE utf8_general_ci;
-- 创建远程用户
GRANT ALL PRIVILEGES ON dolphinscheduler.* TO 'dolphinscheduler'@'%' IDENTIFIED BY '12345678';
-- 创建本地用户
GRANT ALL PRIVILEGES ON dolphinscheduler.* TO 'dolphinscheduler'@'localhost' IDENTIFIED BY '12345678';
flush privileges;
5 配置dolphinscheduler用户sudo免密
#配置sudo免密
sed -i '$adolphinscheduler  ALL=(ALL)  NOPASSWD: NOPASSWD: ALL' /etc/sudoers
sed -i 's/Defaults    requirett/#Defaults    requirett/g' /etc/sudoers
6 配置dolphinscheduler 用户ssh免密
# 添加用户
useradd dolphinscheduler
# 设置密码 12345678
passwd dolphinscheduler
# 生成秘钥
su - dolphinscheduler
ssh-keygen -t rsa -P '' -f ~/.ssh/id_rsa
cat ~/.ssh/id_rsa.pub >> ~/.ssh/authorized_keys
chmod 600 ~/.ssh/authorized_keys
# 验证免密是否生效
ssh localhost
# 不需要输入密码可以ssh成功,即配置ssh成功
7 部署zookeeper(已安装可忽略)
cdh已经部署,可以忽略
# 提前上传zk包
tar -zxvf zookeeper-3.4.8.tar.gz -C /usr/local/
mv /usr/local/zookeeper-3.4.8/ /usr/local/zookeeper- 配置zookeeper path
vim /etc/profile
写入如下内容:
export PATH=$PATH:$JAVA_HOME/bin:/usr/local/zookeeper/bin
修改配置文件
mv /usr/local/zookeeper/conf/zoo_sample.cfg /usr/local/zookeeper/conf/zoo.cfg启动zk
zkServer.sh start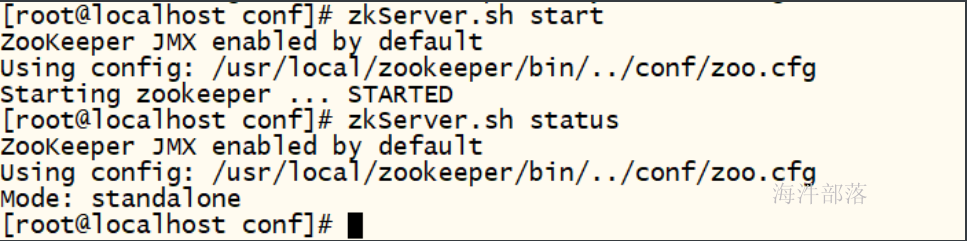
8 安装dolphinscheduler
8.1 解压安装dolphinscheduler
cd /opt
#提前上传安装包

mkdir -p /opt/dolphinscheduler
# 解压
tar -zxvf apache-dolphinscheduler-incubating-1.3.5-dolphinscheduler-bin.tar.gz -C /opt/dolphinscheduler
cd /opt/dolphinscheduler
mv apache-dolphinscheduler-incubating-1.3.5-dolphinscheduler-bin  dolphinscheduler-bin
#修改所有者
chown -R dolphinscheduler:dolphinscheduler dolphinscheduler-bin
8.2 修改数据源配置并初始化数据表
vim /opt/dolphinscheduler/dolphinscheduler-bin/conf/datasource.properties 注释掉默认的postgresql的配置,增加MySQL的配置
#mysql
spring.datasource.driver-class-name=com.mysql.jdbc.Driver
# 需要修改ip,本机localhost即可
spring.datasource.url=jdbc:mysql://192.168.88.222:3306/dolphinscheduler?useUnicode=true&characterEncoding=UTF-8&allowMultiQueries=true
#需要修改为上面的{user}值
spring.datasource.username=dolphinscheduler
#需要修改为上面的{password}值
spring.datasource.password=12345678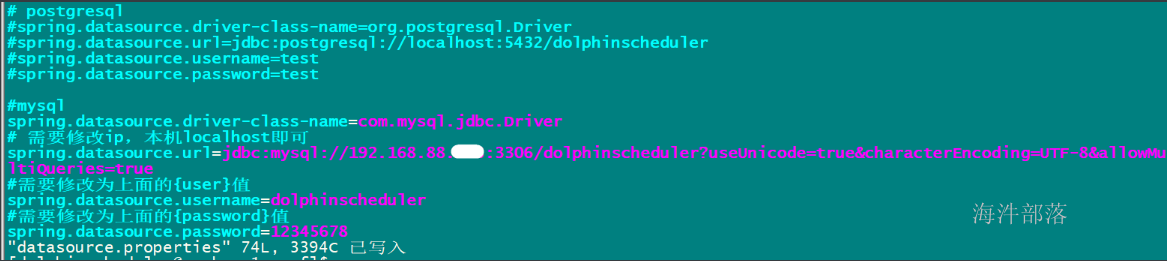
加载mysql驱动
mv mysql-connector-java-5.1.35.jar /opt/dolphinscheduler/dolphinscheduler-bin/lib/
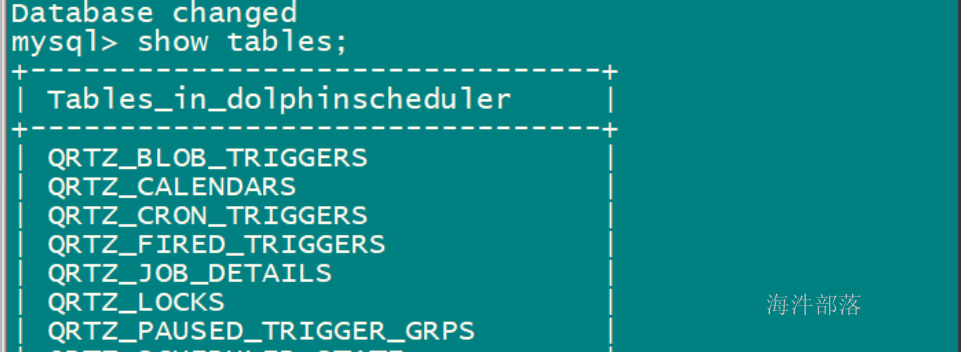
创建表及初始化
sh /opt/dolphinscheduler/dolphinscheduler-bin/script/create-dolphinscheduler.sh
查看MySQL,调度系统的表已经初始化
8.3 修改dolphinscheduler环境变量配置
vim /opt/dolphinscheduler/dolphinscheduler-bin/conf/env/dolphinscheduler_env.sh写入如下内容:
export JAVA_HOME=/usr/java/latest
export JRE_HOME=$JAVA_HOME/jre
export PATH=$PATH:$JAVA_HOME/bin:/opt/cloudera/parcels/CDH-6.3.2-1.cdh6.3.2.p0.1605554/lib/zookeeper/bin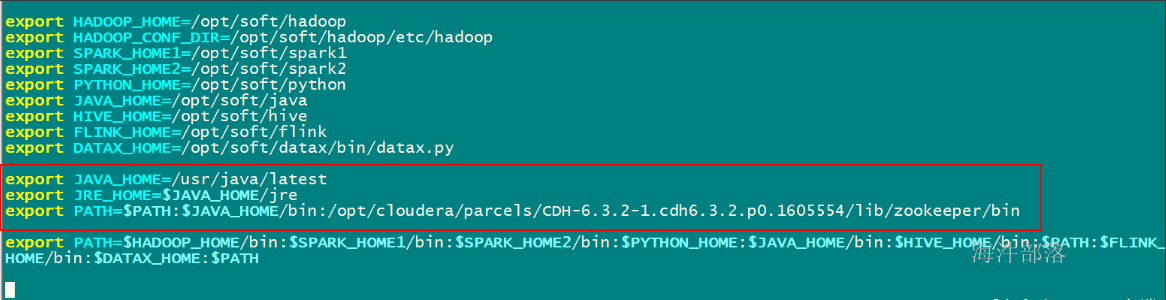
source 使得脚本环境生效
# 使得配置生效
source /opt/dolphinscheduler/dolphinscheduler-bin/conf/env/dolphinscheduler_env.sh
# 测试zookeeper客户端,能进入zookeeper客户端即可
zkCli.sh -server worker-1:2181
8.4 一键安装配置修改
vim /opt/dolphinscheduler/dolphinscheduler-bin/conf/config/install_config.conf写入如下内容:
#
# Licensed to the Apache Software Foundation (ASF) under one or more
# contributor license agreements. See the NOTICE file distributed with
# this work for additional information regarding copyright ownership.
# The ASF licenses this file to You under the Apache License, Version 2.0
# (the "License"); you may not use this file except in compliance with
# the License. You may obtain a copy of the License at
#
# http://www.apache.org/licenses/LICENSE-2.0
#
# Unless required by applicable law or agreed to in writing, software
# distributed under the License is distributed on an "AS IS" BASIS,
# WITHOUT WARRANTIES OR CONDITIONS OF ANY KIND, either express or implied.
# See the License for the specific language governing permissions and
# limitations under the License.
#
# NOTICE : If the following config has special characters in the variable `.*[]^${}\+?|()@#&`, Please escape, for example, `[` escape to `\[`
# postgresql or mysql
dbtype="mysql"
# db config
# db address and port
dbhost="192.168.88.197:3306"
# db username
username="dolphinscheduler"
# database name
dbname="dolphinscheduler"
# db passwprd
# NOTICE: if there are special characters, please use the \ to escape, for example, `[` escape to `\[`
password="12345678"
# zk cluster 客户端
zkQuorum="worker-1:2181"
# Note: the target installation path for dolphinscheduler, please not config as the same as the current path (pwd)
installPath="/opt/soft/dolphinscheduler"
# deployment user
# Note: the deployment user needs to have sudo privileges and permissions to operate hdfs. If hdfs is enabled, the root directory needs to be created by itself
deployUser="dolphinscheduler"
# alert config
# mail server host
mailServerHost="smtp.exmail.qq.com"
# mail server port
# note: Different protocols and encryption methods correspond to different ports, when SSL/TLS is enabled, make sure the port is correct.
mailServerPort="25"
# sender
mailSender="xxxxxxxxxx"
# user
mailUser="xxxxxxxxxx"
# sender password
# note: The mail.passwd is email service authorization code, not the email login password.
mailPassword="xxxxxxxxxx"
# TLS mail protocol support
starttlsEnable="true"
# SSL mail protocol support
# only one of TLS and SSL can be in the true state.
sslEnable="false"
#note: sslTrust is the same as mailServerHost
sslTrust="smtp.exmail.qq.com"
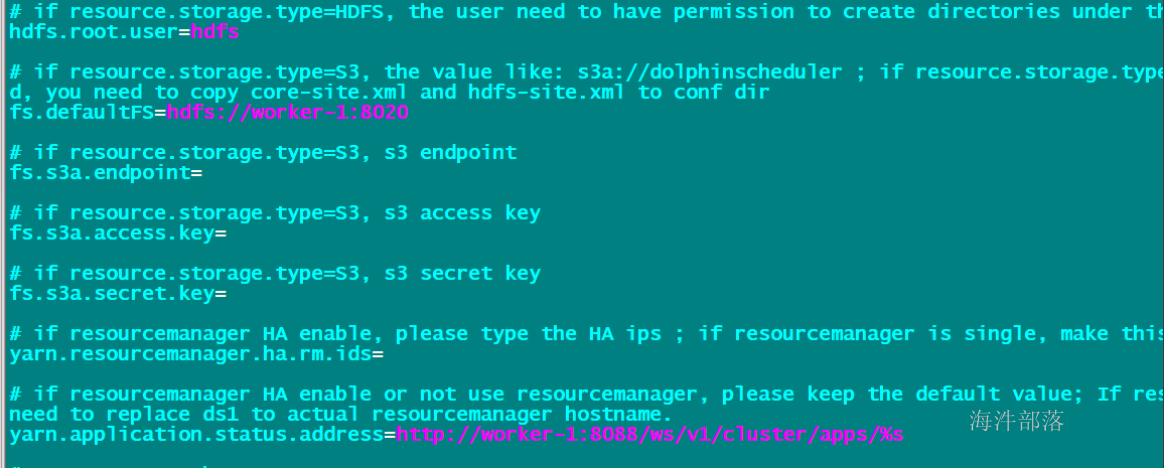
# resource storage type:HDFS,S3,NONE
resourceStorageType="HDFS"
# if resourceStorageType is HDFS,defaultFS write namenode address,HA you need to put core-site.xml and hdfs-site.xml in the conf directory.
# if S3,write S3 address,HA,for example :s3a://dolphinscheduler,
# Note,s3 be sure to create the root directory /dolphinscheduler
defaultFS="hdfs://worker-1:8020"
# if resourceStorageType is S3, the following three configuration is required, otherwise please ignore
# if resourcemanager HA enable, please type the HA ips ; if resourcemanager is single, make this value empty
yarnHaIps=""
# if resourcemanager HA enable or not use resourcemanager, please skip this value setting; If resourcemanager is single, you only need to replace yarnIp1 to actual resourcemanager hostname.
singleYarnIp="worker-1"
# resource store on HDFS/S3 path, resource file will store to this hadoop hdfs path, self configuration, please make sure the directory exists on hdfs and have read write permissions。/dolphinscheduler is recommended
resourceUploadPath="/data/dolphinscheduler"
# who have permissions to create directory under HDFS/S3 root path
# Note: if kerberos is enabled, please config hdfsRootUser=
hdfsRootUser="hdfs"
# kerberos config
# whether kerberos starts, if kerberos starts, following four items need to config, otherwise please ignore
kerberosStartUp="false"
# kdc krb5 config file path
krb5ConfPath="$installPath/conf/krb5.conf"
# keytab username
keytabUserName="dolphinscheduler@HAINIU.COM"
# username keytab path
keytabPath="$installPath/conf/dolphinscheduler.keytab"
# api server port
apiServerPort="12345"
# install hosts
# Note: install the scheduled hostname list. If it is pseudo-distributed, just write a pseudo-distributed hostname
ips="worker-1"
# ssh port, default 22
# Note: if ssh port is not default, modify here
sshPort="22"
# run master machine
# Note: list of hosts hostname for deploying master
masters="worker-1"
# run worker machine
# note: need to write the worker group name of each worker, the default value is "default"
workers="worker-1:hainiu,worker-1:default"
# run alert machine
# note: list of machine hostnames for deploying alert server
alertServer="worker-1"
# run api machine
# note: list of machine hostnames for deploying api server
apiServers="worker-1"
修改为自己环境的配置
# 创建安装目录并授权
sudo mkdir -p /opt/soft/dolphinscheduler
sudo chown dolphinscheduler:dolphinscheduler /opt/soft/dolphinscheduler

# 创建资源中心目录并授权
sudo mkdir -p /data/dolphinscheduler
sudo chown -R dolphinscheduler:dolphinscheduler /data/dolphinscheduler
虚拟机安装,注意事项:
有个脚本文件需要修改配置
vim /opt/dolphinscheduler/dolphinscheduler-bin/bin/dolphinscheduler-daemon.sh
修改内存大小
修改master端口
由于master端口默认是5678, 端口可能被占用,可将端口改成 54321。
vim /opt/dolphinscheduler/dolphinscheduler-bin/conf/master.properties
# 修改端口号
master.listen.port=54321
修改 /opt/dolphinscheduler/dolphinscheduler-bin/conf/common.properties
8.5 执行一键安装
su - dolphinscheduler
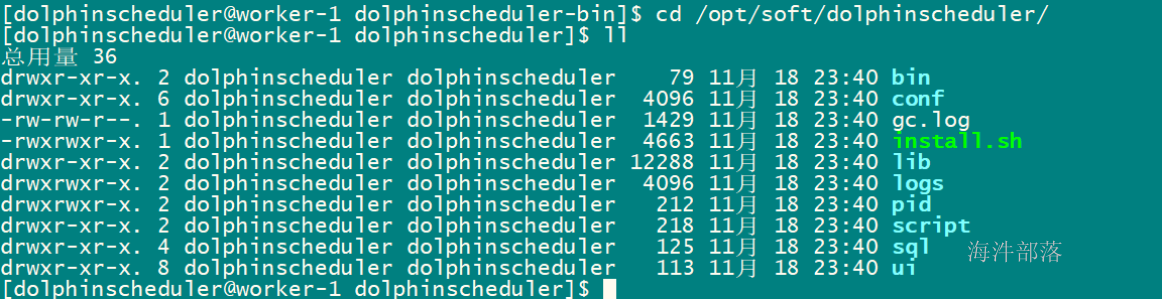
sh /opt/dolphinscheduler/dolphinscheduler-bin/install.sh安装启动后目录:
安装启动后进程:

进入web页面
http://192.168.88.197:12345/dolphinscheduler/ui/view/login/index.html
默认用户名/密码:
admin / dolphinscheduler123
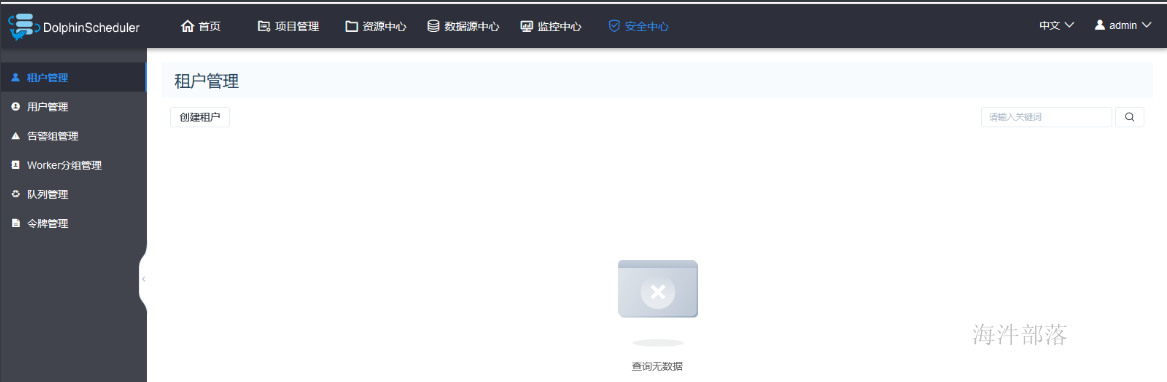
登录后进入主页:
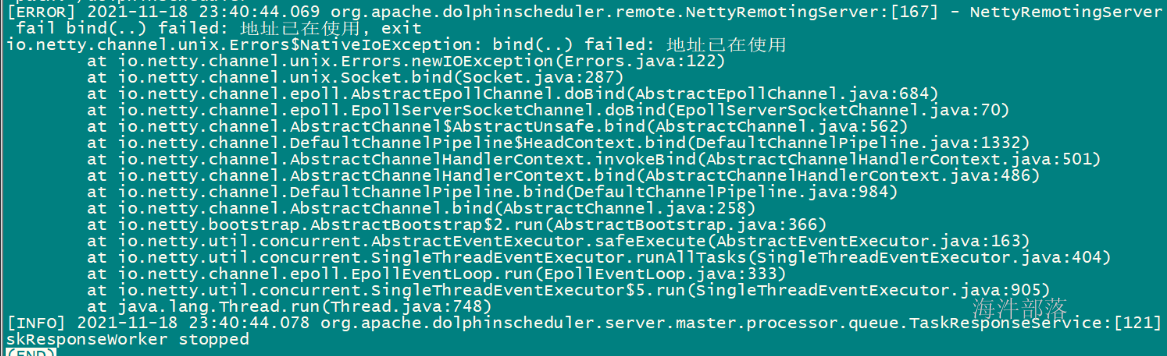
查看master日志,看端口是否被占用
less /opt/soft/dolphinscheduler/logs/dolphinscheduler-master.log
端口占用报错信息:
9 关闭和启动
-
一键停止集群所有服务
sh /opt/soft/dolphinscheduler/bin/stop-all.sh -
一键开启集群所有服务
sh /opt/soft/dolphinscheduler/bin/start-all.sh - 启停Master
sh /opt/soft/dolphinscheduler/bin/dolphinscheduler-daemon.sh start master-server
sh /opt/soft/dolphinscheduler/bin/dolphinscheduler-daemon.sh stop master-server- 启停Worker
sh /opt/soft/dolphinscheduler/bin/dolphinscheduler-daemon.sh start worker-server
sh /opt/soft/dolphinscheduler/bin/dolphinscheduler-daemon.sh stop worker-server- 启停Api
sh /opt/soft/dolphinscheduler/bin/dolphinscheduler-daemon.sh start api-server
sh /opt/soft/dolphinscheduler/bin/dolphinscheduler-daemon.sh stop api-server- 启停Logger
sh /opt/soft/dolphinscheduler/bin/dolphinscheduler-daemon.sh start logger-server
sh /opt/soft/dolphinscheduler/bin/dolphinscheduler-daemon.sh stop logger-server- 启停Alert
sh /opt/soft/dolphinscheduler/bin/dolphinscheduler-daemon.sh start alert-server
sh /opt/soft/dolphinscheduler/bin/dolphinscheduler-daemon.sh stop alert-server