mapreduce优化和执行
1.mapreduce的配置
<?xml version="1.0"?>
<?xml-stylesheet type="text/xsl" href="configuration.xsl"?>
<!--
  Licensed under the Apache License, Version 2.0 (the "License");
  you may not use this file except in compliance with the License.
  You may obtain a copy of the License at

    http://www.apache.org/licenses/LICENSE-2.0

  Unless required by applicable law or agreed to in writing, software
  distributed under the License is distributed on an "AS IS" BASIS,
  WITHOUT WARRANTIES OR CONDITIONS OF ANY KIND, either express or implied.
  See the License for the specific language governing permissions and
  limitations under the License. See accompanying LICENSE file.
-->

<!-- Put site-specific property overrides in this file. -->

<configuration>
<!--运行模式 -->
<property>
    <name>mapreduce.framework.name</name>
    <value>yarn</value>
    <description>运行模式</description>
</property>
<!--运行模式 -->
<!--资源限定 -->
<property>
    <name>yarn.app.mapreduce.am.resource.mb</name>
    <value>1024</value>
    <description>MR ApplicationMaster yarn申请的内存量</description>
</property>
<property>
    <name>yarn.app.mapreduce.am.command-opts</name>
    <value>-Xmx256m</value>
    <description>jvm使用内存</description>
</property>
<property>
    <name>mapreduce.map.memory.mb</name>
    <value>1024</value>
    <description>每个Map Task yarn申请内存</description>
</property>

<property>
    <name>mapreduce.reduce.memory.mb</name>
    <value>1024</value>
    <description>每个Reduce Task yarn申请内存</description>
</property>

<property>
    <name>yarn.app.mapreduce.am.resource.cpu-vcores</name>
    <value>1</value>
    <description>MR ApplicationMaster占用的虚拟CPU个数,此参数对应yarn.nodemanager.resource.cpu-vcores,建议最大为一个物理CPU的数量</description>
</property>
<property>
    <name>mapreduce.reduce.java.opts</name>
    <value>-Xmx256m</value>
    <description>reduce jvm实际内存</description>
</property>

<property>
    <name>mapreduce.map.java.opts</name>
    <value>-Xmx256m</value>
    <description>map jvm实际内存</description>
</property>

<property>
    <name>mapreduce.map.cpu.vcores</name>
    <value>1</value>
    <description>每个map Task需要的虚拟cpu数</description>
</property>

<property>
    <name>mapreduce.reduce.cpu.vcores</name>
    <value>1</value>
    <description>每个Reduce Task需要的虚拟cpu数</description>
</property>
<property>
    <name>mapreduce.application.classpath</name>
    <value>/usr/local/hadoop/etc/hadoop,/usr/local/hadoop/share/hadoop/common/*,/usr/local/hadoop/share/hadoop/common/lib/*,/usr/local/hadoop/share/hadoop/hdfs/*,/usr/local/hadoop/share/hadoop/hdfs/lib/*,/usr/local/hadoop/share/hadoop/mapreduce/*,/usr/local/hadoop/share/hadoop/mapreduce/lib/*,/usr/local/hadoop/share/hadoop/yarn/*,/usr/local/hadoop/share/hadoop/yarn/lib/*,/usr/local/hadoop/lib/*,/usr/local/hbase/lib/*</value>
    <description>运行mr程序所使用的虚拟机运行时的classpath</description>
</property>
<!--资源限定 -->
<property>
    <name>mapreduce.jobhistory.address</name>
    <value>nn1:10020</value>
    <description>MapReduce JobHistory Server地址</description>
</property>

<property>
    <name>mapreduce.jobhistory.webapp.address</name>
    <value>nn1:19888</value>
    <description>MapReduce JobHistory Server Web UI地址</description>
</property>
<property>
    <name>mapreduce.jobhistory.intermediate-done-dir</name>
    <value>/data/mapred/tmp</value>
    <description>MapReduce作业产生的日志存放位置</description>
</property>

<property>
    <name>mapreduce.jobhistory.done-dir</name>
    <value>/data/mapred/done</value>
    <description>MR JobHistory Server管理的日志的存放位置</description>
</property>
<property>
    <name>mapreduce.job.userlog.retain.hours</name>
    <value>48</value>
</property>
</configuration>
以上是基准设置,有了以上配置我们可以设定在mr程序执行时候所需的资源大小
2.任务的打包
在项目中的pom文件中增加assembly插件
maven-assembly-plugin 就是用来帮助打包用的,比如说打出一个什么类型的包,包里包括哪些内容等等
<project xmlns="http://maven.apache.org/POM/4.0.0" xmlns:xsi="http://www.w3.org/2001/XMLSchema-instance"
  xsi:schemaLocation="http://maven.apache.org/POM/4.0.0 http://maven.apache.org/xsd/maven-4.0.0.xsd">
  <modelVersion>4.0.0</modelVersion>

  <groupId>com.hainiu.mr</groupId>
  <artifactId>TestMR</artifactId>
  <version>1.0-SNAPSHOT</version>
  <packaging>jar</packaging>

    <properties>
        <!-- 项目编码 -->
        <project.build.sourceEncoding>UTF-8</project.build.sourceEncoding>
        <!-- 编译及输出的时候应用那个版本的jdk -->
        <maven.compiler.source>1.8</maven.compiler.source>
        <maven.compiler.target>1.8</maven.compiler.target>
    </properties>

    <dependencies>
        <!-- https://mvnrepository.com/artifact/org.apache.hadoop/hadoop-client -->
        <dependency>
            <groupId>org.apache.hadoop</groupId>
            <artifactId>hadoop-client</artifactId>
            <version>2.7.3</version>
            <!--已提供范围的依赖在编译classpath (不是运行时)可用。它们不是传递性的,也不会被打包 -->
            <scope>provided</scope>
        </dependency>
    </dependencies>

    <build>
        <resources>
            <resource>
                <!-- 加载源码的位置 -->
                <directory>src/main/resources</directory>
            </resource>
        </resources>
        <plugins>
            <plugin>
                <!-- 加载打包插件 -->
                <groupId>org.apache.maven.plugins</groupId>
                <artifactId>maven-assembly-plugin</artifactId>
                <configuration>
                    <!-- 指定配置文件 -->
                    <descriptors>
                        <descriptor>src/main/resources/assembly.xml</descriptor>
                    </descriptors>
                    <archive>
                        <manifest>
                            <!-- 加载主要运行类 -->
                           <!--<mainClass>${mainClass}</mainClass>-->
                        </manifest>
                    </archive>
                </configuration>
                <executions>
                    <!-- 配置执行器 -->
                    <execution>
                        <id>make-assembly</id>
                        <!-- 绑定到package生命周期阶段上 -->
                        <phase>package</phase>
                        <goals>
                            <!-- 只运行一次 -->
                            <goal>single</goal>
                        </goals>
                    </execution>
                </executions>
            </plugin>
            <plugin>
                <!-- 配置跳过单元测试 -->
                <groupId>org.apache.maven.plugins</groupId>
                <artifactId>maven-surefire-plugin</artifactId>
                <version>2.12</version>
                <configuration>
                    <skip>true</skip>
                    <forkMode>once</forkMode>
                    <excludes>
                        <exclude>**/**</exclude>
                    </excludes>
                </configuration>
            </plugin>
        </plugins>
    </build>
</project>
把assembly配置文件放到/src/main/resources目录中,如果没有则创建一个
在assembly.xml中配置好打包时需要包含的文件,和需要排除的文件
<assembly xmlns="http://maven.apache.org/plugins/maven-assembly-plugin/assembly/1.1.0"
xmlns:xsi="http://www.w3.org/2001/XMLSchema-instance" xsi:schemaLocation="http://maven.apache.org/plugins/maven-assembly-plugin/assembly/1.1.0 http://maven.apache.org/xsd/assembly-1.1.0.xsd">
<!-- TODO: a jarjar format would be better -->
<!-- 添加到生成文件名称的后缀符 -->
<id>hainiu</id>
<!-- 打包类型 -->
<formats>
<format>jar</format>
</formats>
<!-- 指定是否包含打包层目录 -->
<includeBaseDirectory>false</includeBaseDirectory>
<!-- 指定要包含的文件集 -->
<fileSets>
<fileSet>
<!-- 指定目录 -->
<directory>${project.build.directory}/classes</directory>
<!-- 指定文件集合的输出目录,该目录是相对于根目录 -->
<outputDirectory>/</outputDirectory>
<!-- 排除文件 -->
<excludes>
<exclude>*.xml</exclude>
<exclude>*.properties</exclude>
</excludes>
</fileSet>
</fileSets>
<!-- 用来定制工程依赖 jar 包的打包方式 -->
<dependencySets>
<dependencySet>
<!-- 指定包依赖目录,该目录是相对于根目录 -->
<outputDirectory>/</outputDirectory>
<!-- 当前项目构件是否包含在这个依赖集合里 -->
<useProjectArtifact>false</useProjectArtifact>
<!-- 是否将第三方jar包解压到该依赖中 false 直接引入jar包 true解压引入 -->
<unpack>true</unpack>
<!-- 将scope为runtime的依赖包打包到lib目录下。 -->
<scope>runtime</scope>
</dependencySet>
</dependencySets>
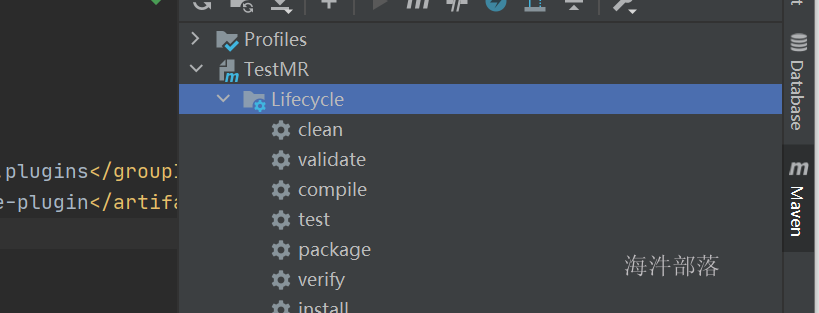
</assembly>在idea的maven插件按钮中直接点击package就可以直接打包了
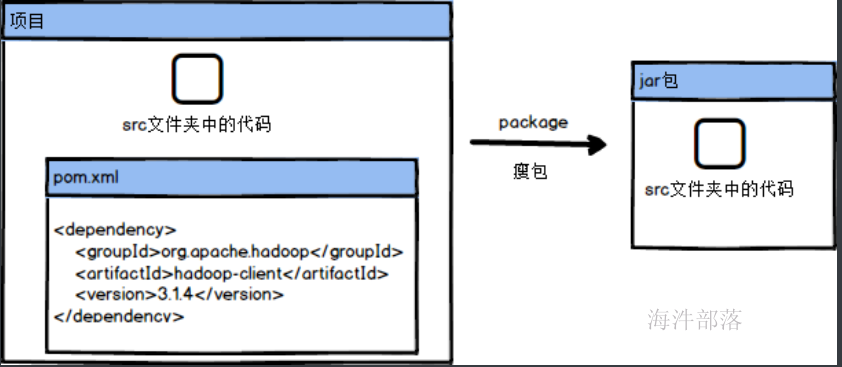
打包的概念就是将我们编译好的class文件全部都打成一个包,这样就可以在集群中进行提交执行了
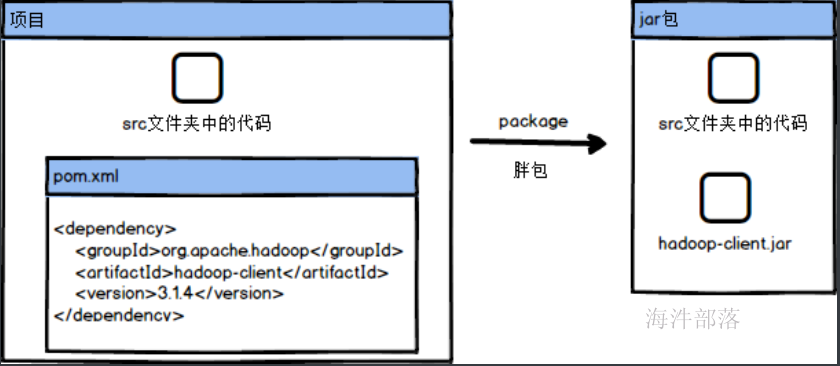
这个时候我们需要知道一个概念,就是胖包还是瘦包,胖包就是将依赖的包也打入到我们打的包中,瘦包就是我们打包的内容有且只有自己开发的代码,并没有依赖的jar包
那么瘦包和胖包分别在什么时候打呢??
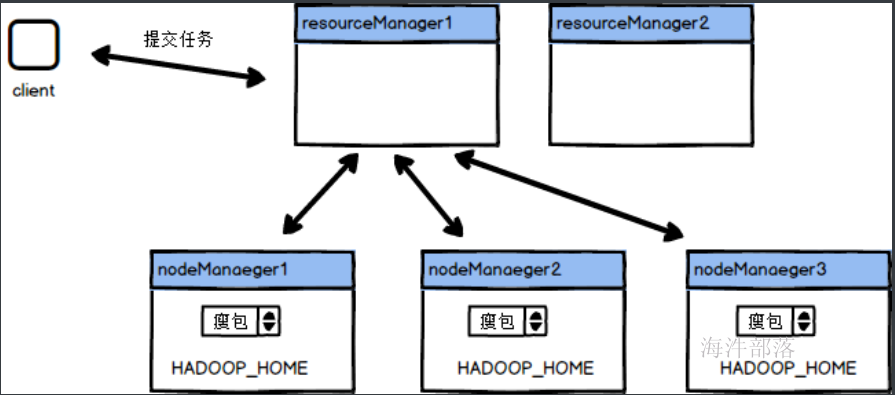
主要看我们所运行的任务本身了,比如我们有一个任务要将代码打包放到集群中去执行,这个任务中有一个功能是连接mysql数据库,那么在打包的时候,如果选择瘦包,那么包中就会只有代码,这个时候我们将任务提交到集群中进行执行,但是集群中如果没有mysql的包的支持就会报错,这个时候我们就需要打胖包,因为胖包中存在所有需要的包和环境,我们直接执行就行了,但是如果我们代码中需要的jar包在环境中存在我们就不需要将额外包打进来,就比如我们的依赖中存在hadoop-client这个包,这个在yarn中执行的时候环境是存在的,这个时候我们就只需要打瘦包就行了
那么我们怎么去打瘦包还是胖包呢???
如果我们不因为assembly插件,直接点击package按钮就是瘦包
加入assembly插件就是为了打胖包的
怎么去选择打入哪些包呢
首先我们要知道maven的作用域的概念,maven中引入的依赖都可以选择它的作用域范围,也就是你引入它是为了干嘛,我们下面看一下常用的五种作用域
compile
不声明scope元素的情况下的默认值;compile表示被依赖包需要参与当前项目的编译,包括后续的测试,运行周期也参与其中,是一个比较强的依赖;打包的时候通常需要包含进去。provided
provided 类型的scope只会在项目的编译、测试阶段起作用;可以认为在目标容器中已经提供了这个依赖,无需在提供,但是在编写代码或者编译时可能会用到这个依赖;依赖不会被打入到项目jar包中。runtime
runtime与compile比较相似,区别在于runtime 跳过了编译阶段,打包的时候通常需要包含进去。test
在一般的编译和运行时都不需要,它们只有在测试编译和测试运行阶段可用,不会被打包到项目jar包中,同时如果项目A依赖于项目B,项目B中的test作用域下的依赖不会被继承。system
表示使用本地系统路径下的jar包,需要和一个systemPath一起使用,如下:<dependency>
<groupId>org.apache.hadoop</groupId>
<artifactId>hadoop-client</artifactId>
<version>3.1.4</version>
<systemPath>/root/jars/hadoop-client.jar</systemPath>
<scope>system</scope>
</dependency>我们一般会设置包的作用域用于告诉系统究竟什么包打入到包中什么的包不打进去
比如一个包我们scope的作用域设置为compile就会打入进去,但是设定为provided就不会打进去
下面我们可以做个测试
pom.xml中键入以下内容
 <dependencies>
        <dependency>
            <groupId>org.apache.hadoop</groupId>
            <artifactId>hadoop-client</artifactId>
            <version>3.1.3</version>
            <scope>compile</scope>
        </dependency>
        <dependency>
            <groupId>mysql</groupId>
            <artifactId>mysql-connector-java</artifactId>
            <version>5.1.49</version>
            <scope>provided</scope>
        </dependency>
    </dependencies>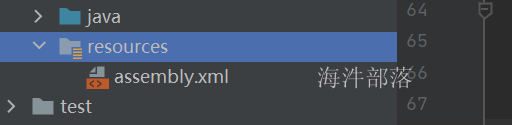
增加配置文件
clean是删除target目录中的所有内容
compile是编译源码生成class文件输入到target目录中
package是打包target目录中的内容,生成jar包
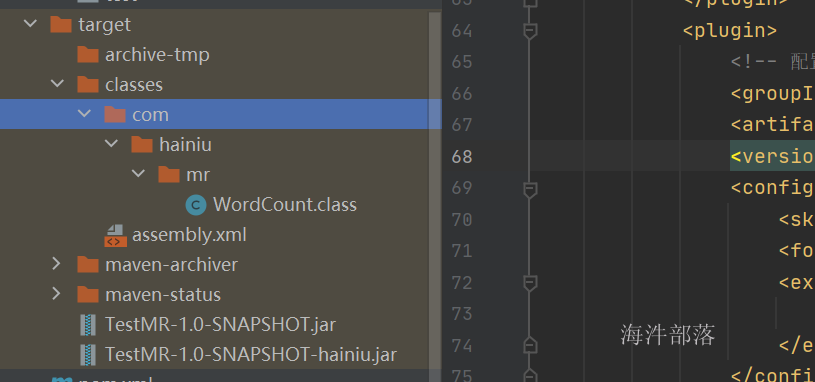
可以看到内容已经生成,其中没有hainiu结尾的包就是普通的瘦包,而带有hainiu结尾的包是我们打的胖包,胖包中含有我们设定为compile作用域的依赖包
这个时候可以打包这个包看一下

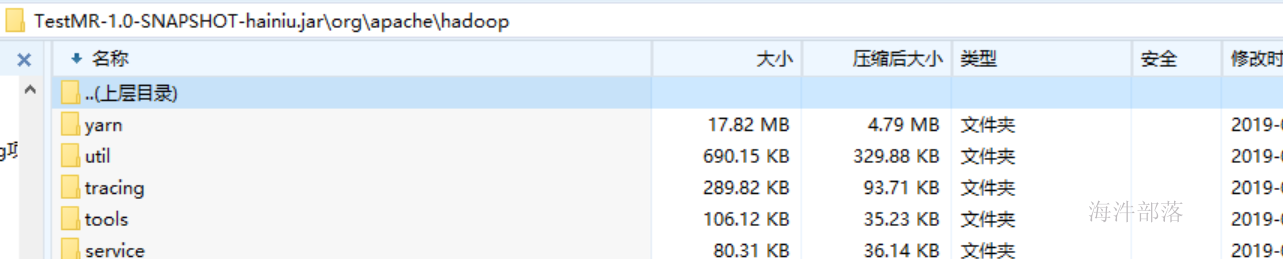
打开以后我们发现其中携带了我们想要的hadoop-client包中的内容,而mysql的数据是没有携带的
3.代码的提交执行
首先我们将代码进行打包,就拿wordcount的案例为主进行测试

我们会发现在执行的日志中出现下列字样,因为我们在写mr的执行类的时候使用的配置如下
public static void main(String[] args) throws Exception{
        Job job = Job.getInstance();
        job.setJarByClass(WordCount.class);
        job.setMapperClass(WMapper.class);
        job.setMapOutputKeyClass(Text.class);
        job.setMapOutputValueClass(IntWritable.class);
        TextInputFormat.addInputPath(job,new Path("data/word.txt"));

        job.setReducerClass(WReducer.class);
        job.setOutputKeyClass(Text.class);
        job.setOutputValueClass(IntWritable.class);
        TextOutputFormat.setOutputPath(job,new Path("data/res"));

        job.waitForCompletion(true);
我们是直接执行的,但是新版的代码需要使用Tool接口执行,这样可以更好的适配,并且会运行时候传入的配置
public class WordCount extends Configured implements Tool {
    @Override
    public int run(String[] args) throws Exception {
        Configuration conf = getConf();
        Job job = Job.getInstance(conf);
        job.setJarByClass(WordCount.class);
        job.setMapperClass(WMapper.class);
        job.setMapOutputKeyClass(Text.class);
        job.setMapOutputValueClass(IntWritable.class);
        TextInputFormat.addInputPath(job,new Path("data/word.txt"));

        job.setReducerClass(WReducer.class);
        job.setOutputKeyClass(Text.class);
        job.setOutputValueClass(IntWritable.class);
        TextOutputFormat.setOutputPath(job,new Path("data/res"));

        boolean flag = job.waitForCompletion(true);
        return flag? 0 : -1;
    }

    public static void main(String[] args) throws Exception{
        ToolRunner.run(new WordCount(),args);
    }
}
实现tool接口,运行的时候使用ToolRunner.run调用方法执行
继承Configured父类,直接获取传递进来的配置信息,通过getConf方法可以直接获取
Configuration conf = getConf();
Job job = Job.getInstance(conf);
然后将配置信息放入到 Job对象中,进行设置
除此之外我们还需要设定输入的文件和输出文件的路径位置,因为我们需要读取hdfs的文件和输出到hdfs中
这个时候我们需要使用到main方法中的args参数
因为我们提交任务使用参数传递 hadoop jar xx.jar input output作为传入的参数,这个input和output参数会进入到main方法的args参数中,在代码中可以从args中取值
最后我们的整体代码如下:
package com.hainiu.mr;

import org.apache.hadoop.conf.Configuration;
import org.apache.hadoop.conf.Configured;
import org.apache.hadoop.fs.Path;
import org.apache.hadoop.io.IntWritable;
import org.apache.hadoop.io.LongWritable;
import org.apache.hadoop.io.Text;
import org.apache.hadoop.mapreduce.Job;
import org.apache.hadoop.mapreduce.Mapper;
import org.apache.hadoop.mapreduce.Reducer;
import org.apache.hadoop.mapreduce.lib.input.TextInputFormat;
import org.apache.hadoop.mapreduce.lib.output.TextOutputFormat;
import org.apache.hadoop.util.Tool;
import org.apache.hadoop.util.ToolRunner;

import java.io.IOException;

public class WordCount extends Configured implements Tool {

    public static class WMapper extends Mapper<LongWritable,Text, Text, IntWritable>{
        Text k = new Text();
        IntWritable v = new IntWritable(1);
        @Override
        protected void map(LongWritable key, Text value, Mapper<LongWritable, Text, Text, IntWritable>.Context context) throws IOException, InterruptedException {
            String[] strs = value.toString().split(" ");
            for (String str : strs) {
                k.set(str);
                context.write(k,v);
            }
        }
    }

    public static class WReducer extends Reducer<Text,IntWritable,Text,IntWritable>{
        @Override
        protected void reduce(Text key, Iterable<IntWritable> values, Reducer<Text, IntWritable, Text, IntWritable>.Context context) throws IOException, InterruptedException {
            int sum = 0;
            for (IntWritable value : values) {
                sum ++;
            }
            context.write(key,new IntWritable(sum));
        }
    }
    @Override
    public int run(String[] args) throws Exception {
        Configuration conf = getConf();
        Job job = Job.getInstance(conf);
        job.setJarByClass(WordCount.class);
        job.setMapperClass(WMapper.class);
        job.setMapOutputKeyClass(Text.class);
        job.setMapOutputValueClass(IntWritable.class);
        TextInputFormat.addInputPath(job,new Path(args[0]));

        job.setReducerClass(WReducer.class);
        job.setOutputKeyClass(Text.class);
        job.setOutputValueClass(IntWritable.class);
        TextOutputFormat.setOutputPath(job,new Path(args[1]));

        boolean flag = job.waitForCompletion(true);
        return flag? 0 : -1;
    }

    public static void main(String[] args) throws Exception{
        ToolRunner.run(new WordCount(),args);
    }
}
这个时候我们就可以打包了,在打包之前我们需要设定依赖包的作用域,因为集群中不需要这些依赖的包,我们将他们的作用域修改为provided
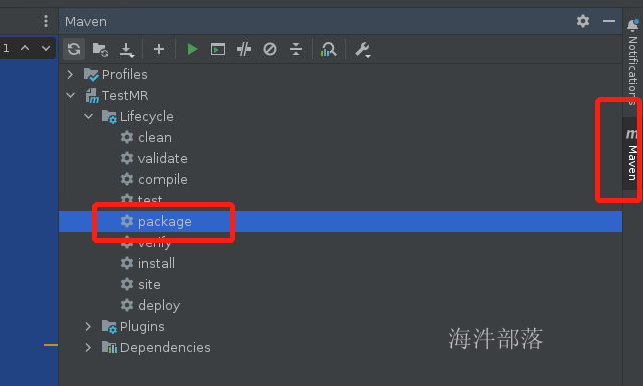
点击打包按钮
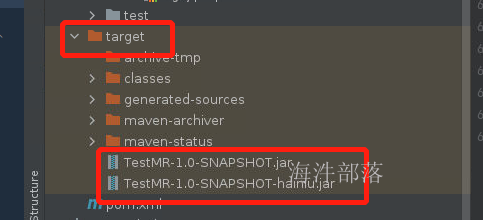
在target目录中存在两个已经打好的包,我们需要将hainiu结尾的包进行上传和执行就行了
因为我们的远程桌面和虚拟机是保持连接的,我们可以直接传输jar包到集群的机器上
scp /headless/workspace/TestMR/target/TestMR-1.0-SNAPSHOT-hainiu.jar hadoop@nn1:/home/hadoop/将jar包远程发送到nn1机器
然后在nn1机器执行jar包
创建word.txt输入以下内容,并且上传到hdfs中
hello world hello tom hello jack
hello world hello tom hello jack
hello world hello tom hello jack
hello world hello tom hello jack
hello world hello tom hello jack
hello world hello tom hello jack
hdfs dfs -put word.txt /#执行提交命令
cd
hadoop jar TestMR-1.0-SNAPSHOT-hainiu.jar com.hainiu.mr.WordCount -Dmapreduce.job.queuename=root.hainiu /word.txt /res1
其中-D传入参数就是之前我们执行代码时候继承configured的功劳
这就是代码的打包和上传的使用
4.driver的短命令
刚才我们已经提交了自己的任务,在提交任务的时候我们需要指定运行的包中的类是哪个,但是我们需要全包名指定比如代码中的com.hainiu.mr.WordCount
但是我们指定hadoop自带的wordcount的案例的时候却不需要,那么是什么原因呢?
hadoop jar /usr/local/hadoop/share/hadoop/mapreduce/hadoop-mapreduce-examples-3.1.4.jar wordcount input output这个时候我们可以打开hadoop的自带的包查看一下内容
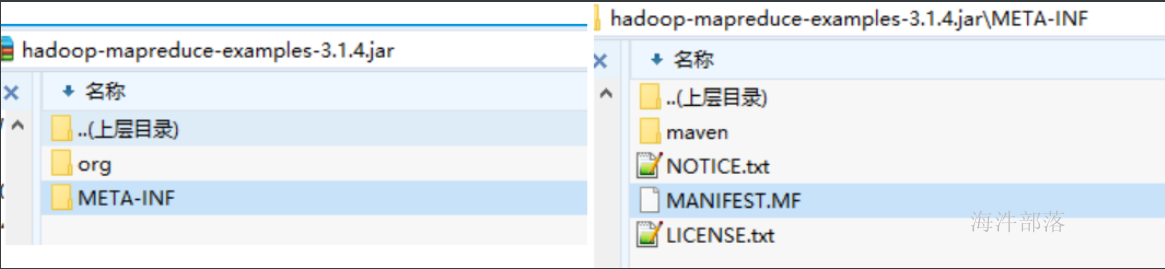
打开MANIFEST.MF可以看到其中的内容有主类映射
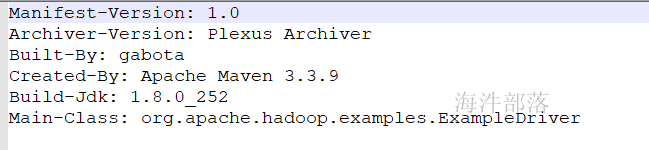
显示这个包的主类就是Main-Class: org.apache.hadoop.examples.ExampleDriver
这个时候我们打开这个类可以查看

找到源码包,打开查看
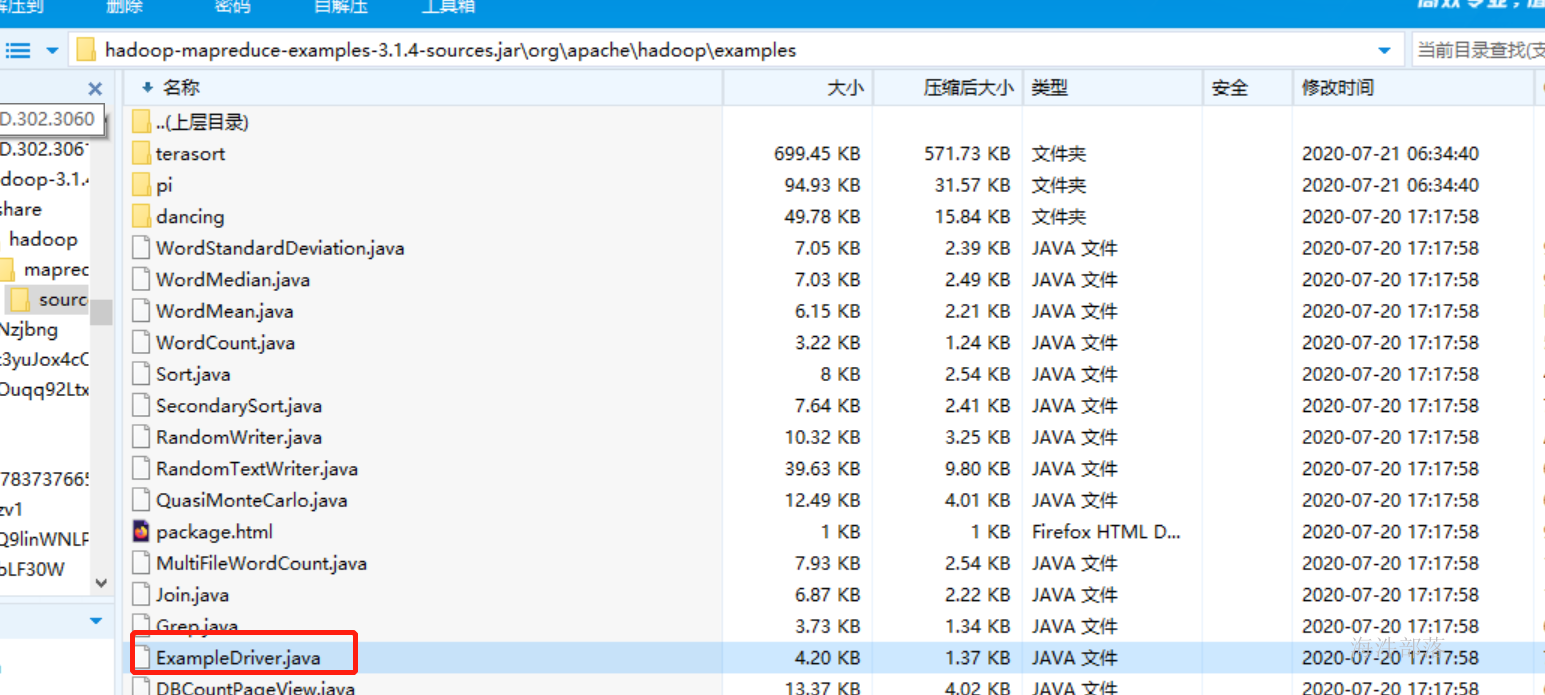

我们可以看到,这个类是我们执行的时候的主类
hadoop jar /usr/local/hadoop/share/hadoop/mapreduce/hadoop-mapreduce-examples-3.1.4.jar 这里不用指定会直接自己执行ExampleDriver这个类的主方法,然后使用ProgramDriver这个映射的类别进行映射,比如输入wordcount它会自己映射到WordCount这个类进行执行
所以我们可以直接写短命令就可以映射到jar包中不同的类了,这个方式我们也可以在自己的项目中进行实现
public class start {
    public static void main(String[] args) throws Throwable {
        ProgramDriver driver = new ProgramDriver();
        driver.addClass("wordcount",WordCount.class,"this is a program for wordcount");
        driver.run(args);
    }
}
我们可以定义一个映射类为start,这个时候我们可以设定jar包的主类就是这个start,然后根据输入的wordcount的映射找到WordCount
那么如何设定这个主类呢??
在pom.xml的打包插件的位置可以直接设定
<mainClass>com.hainiu.mr.Start</mainClass>整体配置如下:
 <build>
        <resources>
            <resource>
                <!-- 加载源码的位置 -->
                <directory>src/main/resources</directory>
            </resource>
        </resources>
        <plugins>
            <plugin>
                <!-- 加载打包插件 -->
                <groupId>org.apache.maven.plugins</groupId>
                <artifactId>maven-assembly-plugin</artifactId>
                <configuration>
                    <!-- 指定配置文件 -->
                    <descriptors>
                        <descriptor>src/main/resources/assembly.xml</descriptor>
                    </descriptors>
                    <archive>
                        <manifest>
                            <!-- 加载主要运行类 -->
                          <mainClass>com.hainiu.mr.Start</mainClass>
                        </manifest>
                    </archive>
                </configuration>
                <executions>
                    <!-- 配置执行器 -->
                    <execution>
                        <id>make-assembly</id>
                        <!-- 绑定到package生命周期阶段上 -->
                        <phase>package</phase>
                        <goals>
                            <!-- 只运行一次 -->
                            <goal>single</goal>
                        </goals>
                    </execution>
                </executions>
            </plugin>
            <plugin>
                <!-- 配置跳过单元测试 -->
                <groupId>org.apache.maven.plugins</groupId>
                <artifactId>maven-surefire-plugin</artifactId>
                <version>2.12</version>
                <configuration>
                    <skip>true</skip>
                    <forkMode>once</forkMode>
                    <excludes>
                        <exclude>**/**</exclude>
                    </excludes>
                </configuration>
            </plugin>
        </plugins>
    </build>
重新发送打包好的代码到nn1机器
scp /headless/workspace/TestMR/target/TestMR-1.0-SNAPSHOT-hainiu.jar hadoop@nn1:/home/hadoop/hadoop jar TestMR-1.0-SNAPSHOT-hainiu.jar wordcount -Dmapreduce.job.queuename=root.hainiu /word.txt /res2执行时候我们可以使用wordcount的短命令代替全部路径。使用映射可以直接映射到相应的类中
如果执行完毕我们可以查看运行完毕的日志,这个时候我们需要开启historyserver历史服务器
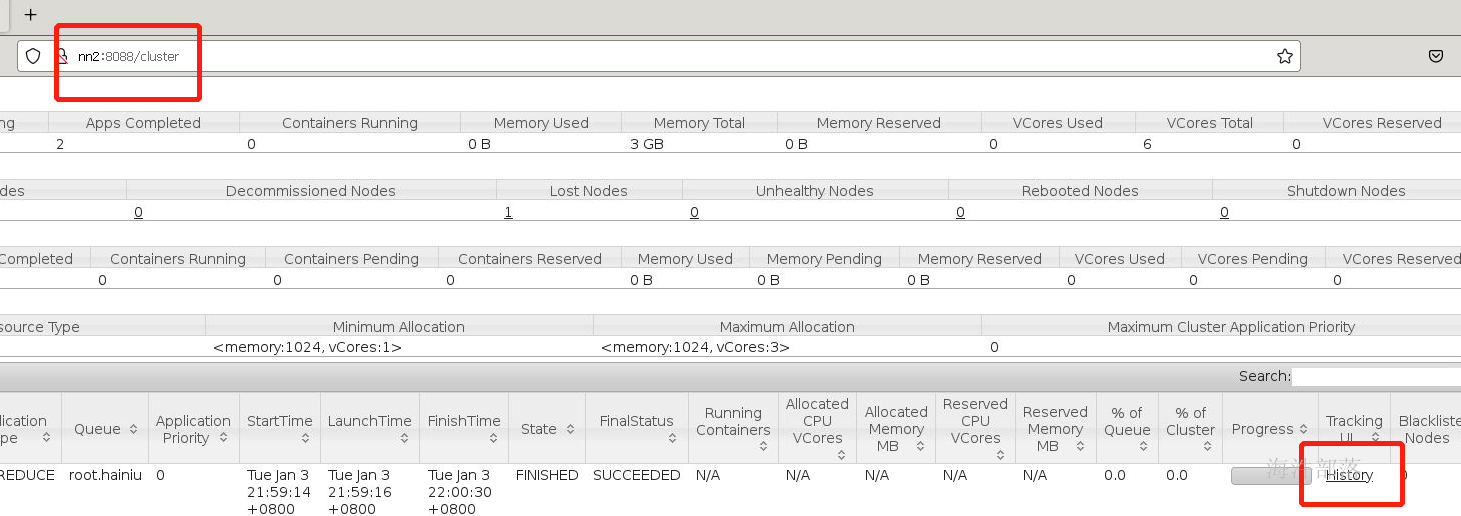

点击logs按钮
可以查看任务的整体运行结果
5.reducer端的压缩
之前我们设置过map端输出数据的压缩,压缩后的数据可以从mapper端直接写出到本地,也可以将数据传输给reducer端的时候减少数据的传输量,减少shuffle过程中的压力
reducer端也可以设置压缩
TextOutputFormat.setCompressOutput(job, true);
TextOutputFormat.setOutputCompressorClass(job, GzipCodec.class);
改代码变为本地执行,首先去除pom中配置文件的provided作用域的设定
然后修改输入文件的路径和输出文件的路径
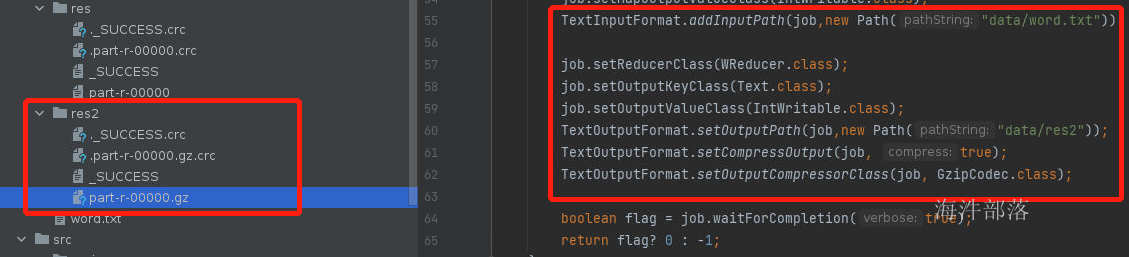
可以看到reducer端输出的结果已经带有压缩了,这样可以减少存储数据到hdfs的占用空间大小
6.推测执行
Straggle(掉队者)是指那些跑的很慢但最终会成功完成的任务。一个掉队的Map任务会阻止Reduce任务开始执行。
Hadoop不能自动纠正掉队任务,但是可以识别那些跑的比较慢的任务,然后它会产生另一个等效的任务作为备份,并使用首先完成的那个任务的结果,此时另外一个任务则会被要求停止执行。这种技术称为推测执行(speculative execution)。
默认是开启推测执行
    <property>
        <name>mapreduce.map.speculative</name>
        <value>true</value>
        <description>是否对Map Task启用推测执行机制</description>
    </property>

    <property>
        <name>mapreduce.reduce.speculative</name>
        <value>true</value>
        <description>是否对Reduce Task启用推测执行机制</description>
    </property>
有的时候要把 推测执行 关掉,这个一般是在代码中设置。
什么时候不合适开启推测执行呢?
如果你的输出是往MySQL数据库输出的,那么这个时候我们必须要关闭推测执行,因为推测执行是两个任务一起跑如果谁跑完了就kill掉对方,这样的话对我向数据库插入这种任务来说就会造成数据重复插入的问题,所以不能开启推测执行。
对于这个优化我们可以用代码进行实现
首先就上面的配置文件放入到mapred-site.xml中然后分发到每个机器中
scp_all.sh /usr/local/hadoop/etc/hadoop/mapred-site.xml /usr/local/hadoop/etc/hadoop/重启yarn
首先在data文件夹下面创建两个文件word.txt和word1.txt,其中word.txt保持原样,而word1.txt中输入
hainiu
hainiu
hainiu
hainiu
hainiu
上传word1.txt到hdfs中
hdfs dfs -put word1.txt /然后改版wordcount代码如下:
package com.hainiu.mr;

import org.apache.hadoop.conf.Configuration;
import org.apache.hadoop.conf.Configured;
import org.apache.hadoop.fs.Path;
import org.apache.hadoop.io.IntWritable;
import org.apache.hadoop.io.LongWritable;
import org.apache.hadoop.io.Text;
import org.apache.hadoop.io.compress.GzipCodec;
import org.apache.hadoop.mapreduce.InputSplit;
import org.apache.hadoop.mapreduce.Job;
import org.apache.hadoop.mapreduce.Mapper;
import org.apache.hadoop.mapreduce.Reducer;
import org.apache.hadoop.mapreduce.lib.input.FileSplit;
import org.apache.hadoop.mapreduce.lib.input.TextInputFormat;
import org.apache.hadoop.mapreduce.lib.output.TextOutputFormat;
import org.apache.hadoop.util.Tool;
import org.apache.hadoop.util.ToolRunner;

import java.io.IOException;

public class WordCount extends Configured implements Tool {

    public static class WMapper extends Mapper<LongWritable,Text, Text, IntWritable>{
        Text k = new Text();
        IntWritable v = new IntWritable(1);

        @Override
        protected void setup(Mapper<LongWritable, Text, Text, IntWritable>.Context context) throws IOException, InterruptedException {
            InputSplit inputSplit = context.getInputSplit();
            FileSplit fs = (FileSplit)inputSplit;
            if(fs.getPath().toString().contains("word1")){
                Thread.sleep(60000);
            }
        }

        @Override
        protected void map(LongWritable key, Text value, Mapper<LongWritable, Text, Text, IntWritable>.Context context) throws IOException, InterruptedException {
            String[] strs = value.toString().split(" ");
            for (String str : strs) {
                k.set(str);
                context.write(k,v);
            }
        }
    }

    public static class WReducer extends Reducer<Text,IntWritable,Text,IntWritable>{
        @Override
        protected void reduce(Text key, Iterable<IntWritable> values, Reducer<Text, IntWritable, Text, IntWritable>.Context context) throws IOException, InterruptedException {
            int sum = 0;
            for (IntWritable value : values) {
                sum ++;
            }
            context.write(key,new IntWritable(sum));
        }
    }
    @Override
    public int run(String[] args) throws Exception {
        Configuration conf = getConf();
        Job job = Job.getInstance(conf);
        job.setJarByClass(WordCount.class);
        job.setMapperClass(WMapper.class);
        job.setMapOutputKeyClass(Text.class);
        job.setMapOutputValueClass(IntWritable.class);
        TextInputFormat.addInputPath(job,new Path(args[0]));
        TextInputFormat.addInputPath(job,new Path(args[1]));

        job.setReducerClass(WReducer.class);
        job.setOutputKeyClass(Text.class);
        job.setOutputValueClass(IntWritable.class);
        TextOutputFormat.setOutputPath(job,new Path(args[2]));
        TextOutputFormat.setCompressOutput(job, true);
        TextOutputFormat.setOutputCompressorClass(job, GzipCodec.class);

        boolean flag = job.waitForCompletion(true);
        return flag? 0 : -1;
    }

    public static void main(String[] args) throws Exception{
        ToolRunner.run(new WordCount(),args);
    }
}
在map中设定逻辑,让一个map端的执行先睡眠一会,来模拟数据的处理延迟,这样推测执行就会启动,
  protected void setup(Mapper<LongWritable, Text, Text, IntWritable>.Context context) throws IOException, InterruptedException {
            InputSplit inputSplit = context.getInputSplit();
            FileSplit fs = (FileSplit)inputSplit;
            if(fs.getPath().toString().contains("word1")){
                Thread.sleep(60000);
            }
        }
提交完毕任务以后我们可以看到

其中有一个任务失败了,点开可以看到失败的原因是因为推测执行

同时我们在每次提交任务的时候都要指定队列的参数值,这个配置我们可设定在mapred-site.xml中
    <property>
        <name>mapreduce.job.queuename</name>
        <value>hainiu</value>
        <description>提交mr任务时所使用的队列</description>
    </property>
map端的压缩设置也可以直接放入到配置文件中
    <property>
        <name>mapreduce.map.output.compress</name>
        <value>true</value>
        <description>map是否开启输出压缩</description>
    </property>

    <property>
        <name>mapreduce.map.output.compress.codec</name>
        <value>org.apache.hadoop.io.compress.SnappyCodec</value>
        <description>map输出默认的算法</description>
    </property>
7.配置文件的加载顺序
在以上的操作部分中我们发现想要设置一个任务的配置我们可以选择的方式有四种,分别如下
conf.set() 代码的配置中加入
job.set() job对象中设置
-D在提交命令的参数中设置
mapred-site.xml中设置
1)mapred-site.xml
开发环境中放到项目里的resource目录就可以生效,因为这个目录是配置到项目的Build Path里的,为什么加载这个文件是由hadoop的configuration的配置文件加载机制决定的。
linux环境(正式环境)maprd-site.xml是放到/usr/local/hadoop/etc/hadoop目录下的。
xml配置文件方式不灵活,适合这种一经确定就不需要改变的配置。
2)-D参数
-Dname=value 用来给配置参数传值;
-D 要放在其他参数的前面,如 -Duser.name=hainiu /tmp/input/word.txt /tmp/output
-D参数适合个性化配置。
-D参数是如何进入到job对象的configuration对象的?

3)conf.set()
此种方式是job 的api 设置不了配置时,才使用的方式。如开启 map压缩输出。
4)job api 设置
此种方式是程序员优先使用的方式。如设置job相关的配置。
那么他们的顺序是什么呢???
1)-D参数
在没进入run()之前,-D参数已经解析完成;
把解析的-D参数分别放在 Configuration的 properties 属性 和 overlay 属性中;
2)mapred-site.xml
在run()中,创建mapreduce的job对象时加载的;
把解析的mapred-site.xml 配置参数 放在 Configuration的 properties 属性中;
3)conf.set()
把设置的参数分别放在 Configuration的 properties 属性 和 overlay 属性中;
4)job api 设置
把设置的参数分别放在 Configuration的 properties 属性 和 overlay 属性中;
-D参数 和 mapred-site.xml 设置冲突了, 以 -D参数 设置的为主;
因为:加载-D参数到 Configuration ( overlay ), 它替代了 mapred-site.xml 的 Configuration ( properties )
-D参数 和 job api 设置冲突了, 以 job api 设置的为主;
-D参数 和 conf.set()设置冲突了, 以conf.set 设置的为主;
因为 conf.set()和 job api 解析的配置到Configuration ( properties , overlay ),这个覆盖了-D参数的
记住结论
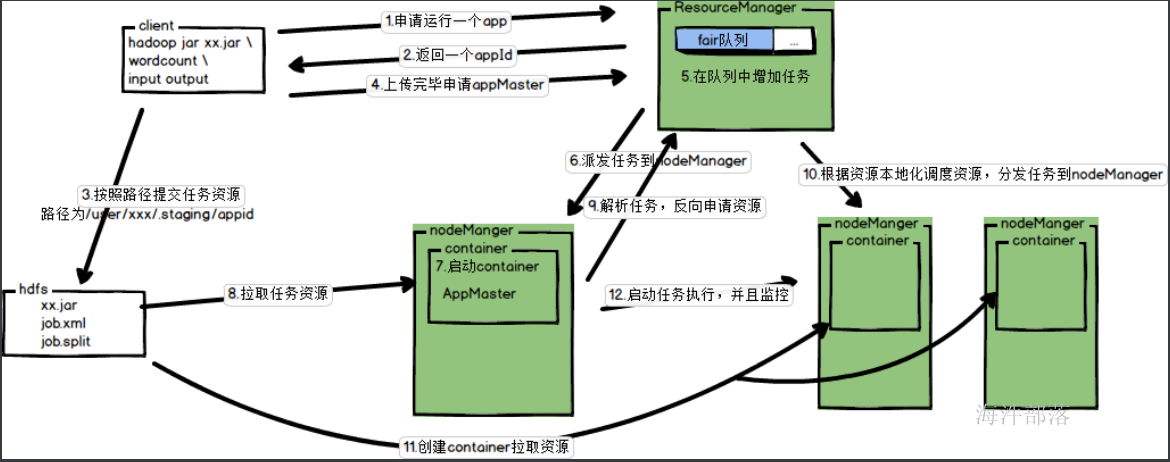
8.Job提交的任务流程
waitForCompletion
在mapreduce程序的job类中,我们通过set Configuration对象,得到相应的job对象,在job对象中指定Mapper类、Reducer类,Job类等属性后,通过waitForCompletion(true)方法提交并等待job执行。传入的boolean类型参数决定是否监控并打印job的执行情况。
方法首先检查Job状态,若处于DEFINE状态则通过submit()方法提交job。而后根据传入的参数决定是否监控并打印job的运行状况。
submit
该方法负责向集群提交job,方法首先再次检查job的状态,如果不是DEFINE则不能提交作业,setUseNewAPI()方法作用是指定job使用的是新版mapreduce的API,即org.apache.hadoop.mapreduce包下的Mapper和Reducer,而不是老版的mapred包下的类。
submit()中执行了两个比较重要的方法:
1)connect() 会对Job类中的Cluster类型的成员进行初始化,该成员对象中封装了通过Configuration设置的集群的信息,其内部创建了真正的通信协议对象,它将用于最终的job提交。
2)getJobSubmitter() 通过cluster中封装的集群信息(这里是文件系统和客户端)获取JobSubmitter对象,该对象负责最终向集群提交job并返回job的运行进度。
submitJobInternal
在 Job 对象上面调用 submit() 方法之后,在内部创建一个 JobSubmitter 实例,然后调用该实例的 submitJobInternal() 方法。
任务提交器(JobSubmitter)是最终提交任务到集群的方法。
执行过程如下:
1)首先checkSpecs(job) 检查作业输出路径是否配置并且是否存在,如果存在抛异常。
2)获取job中封装的Configuration对象,添加MAPREDUCE_APPLICATION_FRAMEWORK_PATH(应用框架路径)到分布式缓存中。
3)通过JobSubmissionFiles.getStagingDir()获取作业执行时相关资源的存放路径。
4)获取提交任务的当前主机的IP,并将ip、主机名等相关信息封装进Configuration对象中。
5)生成JobID并将其设置进job对象中,构造提交job的路径。然后是对该路径设置一系列权限的操作。
6)copyAndConfigureFiles,拷贝作业运行必备的资源,作业 JAR 文件。
7)调用writeSplits()方法,(非常重要)为作业计算输入分片(input splits)。写分片数据文件job.splits和分片元数据文件job.splitmetainfo,计算map任务数。
8)writeConf()方法,写 job.xml 配置文件
9)提交作业submitClient.submitJob,通过在资源管理器上调用 submitApplication 来提交作业。
集群运行后kill掉查看:

重点:
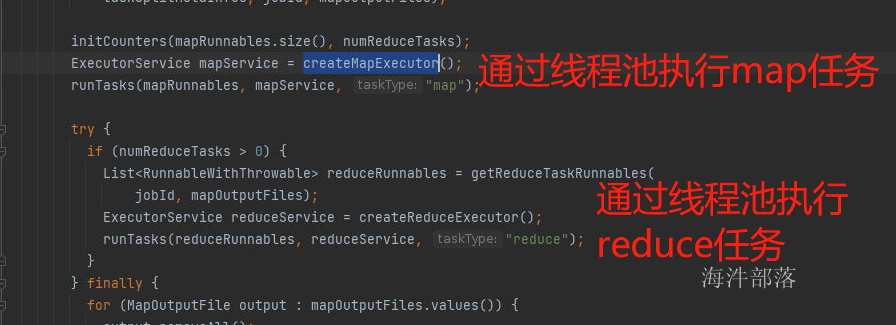
mapreduce 如果在windows本地运行:
那 运行Mapper阶段和Reducer阶段都是线程。
比如:job 运行两个Mapper,两个Reducer,那就是4个线程,相当于1个jvm开启4个线程。
mapreduce 如果在分布式集群运行:
那 运行Mapper阶段和Reducer阶段都是进程。
比如:job 运行两个Mapper,两个Reducer,那就是4个进程,相当于开启4个jvm。
本地提交的调用栈如下:
Job#waitForCompletion()
Job#submit()
JobSubmitter#submitJobInternal()
提交yarn:YARNRunner#submitJob()
本地提交:LocalJobRunner#submitJob()
本地提交:LocalJobRunner#submitJob()
org.apache.hadoop.mapred.LocalJobRunner.Job#Job() 构造器 (Job 是线程, 执行start(),启动线程)
org.apache.hadoop.mapred.LocalJobRunner.Job#run() 线程体
org.apache.hadoop.mapred.LocalJobRunner.Job.MapTaskRunnable#run() 线程体
org.apache.hadoop.mapred.MapTask#run()
org.apache.hadoop.mapred.MapTask#runNewMapper()
org.apache.hadoop.mapreduce.Mapper#run()
WordCountNew#map()
9.mapreducer的优化
1)合理设置HDFS文件块的大小
块的大小和文件的数量决定了map任务的数量,根据服务器读取数据的速度进行数据块大小设置(hadoop2.7.3 128M)。
我们之前讲解过,数据在进入到mapper端进行执行的时候,任务的个数是按照block块的个数进行适配的,那么我们合理的设置block块和大小和切片的大小是可以修改每个map端处理数据大小的,比如我们可以将block块的大小设定为256M,split-size的大小也设定为256M,那么它的map任务个数就会少很多,每个map处理的数据也会随之增多,可以在集群资源比较小的情况下,更加充分的利用资源
2)增加map buff缓冲区的大小
mapreduce.task.io.sort.mb 100 shuffle 的环形缓冲区大小,默认 100m
mapreduce.map.sort.spill.percent 0.8 环形缓冲区溢出的阈值,默认 80%
增加map端缓冲区的大小,可以减少数据溢写的次数,增加溢写文件的大小,让每个map端的效率更高
3)map输出的KEY的设计均匀
key设计不均衡的表现, reduce2执行完了,reduce1还在拉取数据,并且reduce2得等着reduce1完成,整个任务才算完成。
reduce1: 90w 个 a
reduce2: 10w 个 b
这样的现象称之为数据倾斜,一个在进入到reducer端的时候多个reducer的输入数据不均匀,使得数据处理速度和压力不对等,这个时候我们可以增加combiner,使用map端的聚合实现
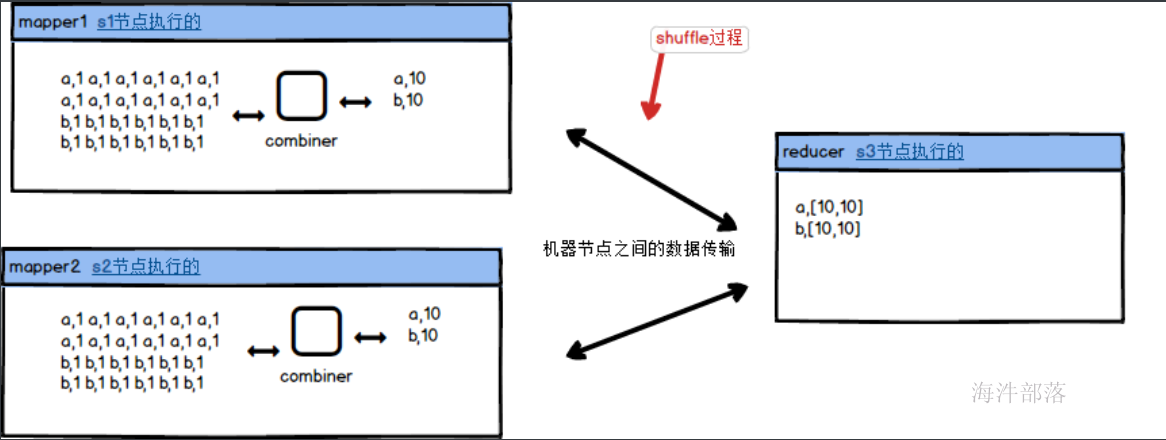
这样即使数据比较多,也会在map端先聚合完毕,不会增加reducer的压力,同样reducer端处理数据的数量也会比较均匀,不会出现数据倾斜问题
同时针对于key分布不均匀的情况我们还可以通过调整reducer的个数进行分散key实现数据倾斜的解决
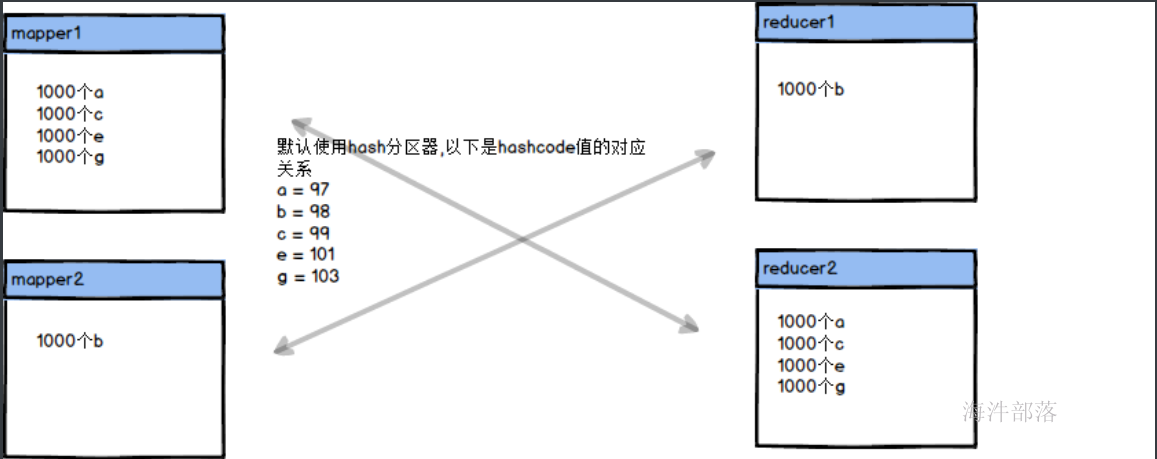
那么适当的调整reducer的个数可以让数据变得更加均匀
首先在data文件夹下面准备两个文件a.txt
a a a a a a a a a a a a a a a a a a a a a a a a a a a a a a a a a a a a a a
c c c c c c c c c c c c c c c c c c c c c c c c c c c c c c c c c c c c c c
e e e e e e e e e e e e e e e e e e e e e e e e e e e e e e e e e e e e e e
b.txt
b b b b b b b b b b b b b b b b b b b b b b b b b b b b b b b b b b b b b b
g g g g g g g g g g g g g g g g g g g g g g g g g g g g g g g g g g g g g g
将reducer数量首先设定为两个,然后在reducer的cleanup方法中增加打印,打印出来每个reducer的部分数据
全部代码如下:
package com.hainiu.mr;

import org.apache.hadoop.fs.Path;
import org.apache.hadoop.io.IntWritable;
import org.apache.hadoop.io.LongWritable;
import org.apache.hadoop.io.Text;
import org.apache.hadoop.mapreduce.Job;
import org.apache.hadoop.mapreduce.Mapper;
import org.apache.hadoop.mapreduce.Reducer;
import org.apache.hadoop.mapreduce.lib.input.TextInputFormat;
import org.apache.hadoop.mapreduce.lib.output.TextOutputFormat;

import java.io.IOException;

public class WordCount {
    public static class WMapper extends Mapper<LongWritable,Text, Text, IntWritable>{
        Text k = new Text();
        IntWritable v = new IntWritable(1);
        @Override
        protected void map(LongWritable key, Text value, Context context) throws IOException, InterruptedException {
            String[] strs = value.toString().split(" ");
            for (String str : strs) {
                k.set(str);
                context.write(k,v);
            }
        }
    }

    public static class WReducer extends Reducer<Text,IntWritable,Text,IntWritable>{
        IntWritable v = new IntWritable();
        String s = "";
        @Override
        protected void reduce(Text key, Iterable<IntWritable> values, Context context) throws IOException, InterruptedException {
            s+=key.toString();
            int sum = 0;
            for (IntWritable value : values) {
                sum ++;
                s += key.toString();
            }
            v.set(sum);
            context.write(key,v);
        }

        @Override
        protected void cleanup(Context context) throws IOException, InterruptedException {
            System.out.println(s);
        }
    }
    public static void main(String[] args) throws Exception {
        Job job = Job.getInstance();
        job.setJarByClass(WordCount.class);
        job.setMapperClass(WMapper.class);
        job.setMapOutputKeyClass(Text.class);
        job.setMapOutputValueClass(IntWritable.class);
        TextInputFormat.addInputPath(job, new Path("data/a.txt"));
        TextInputFormat.addInputPath(job, new Path("data/b.txt"));

        job.setNumReduceTasks(2);
        job.setReducerClass(WReducer.class);
        job.setOutputKeyClass(Text.class);
        job.setOutputValueClass(IntWritable.class);
        TextOutputFormat.setOutputPath(job, new Path("data/res"));

        job.waitForCompletion(true);
    }
}
输出结果如下:


我们可以通过打印结果发现下面的日志信息,一个reducer的输出结果过多产生了数据倾斜问题
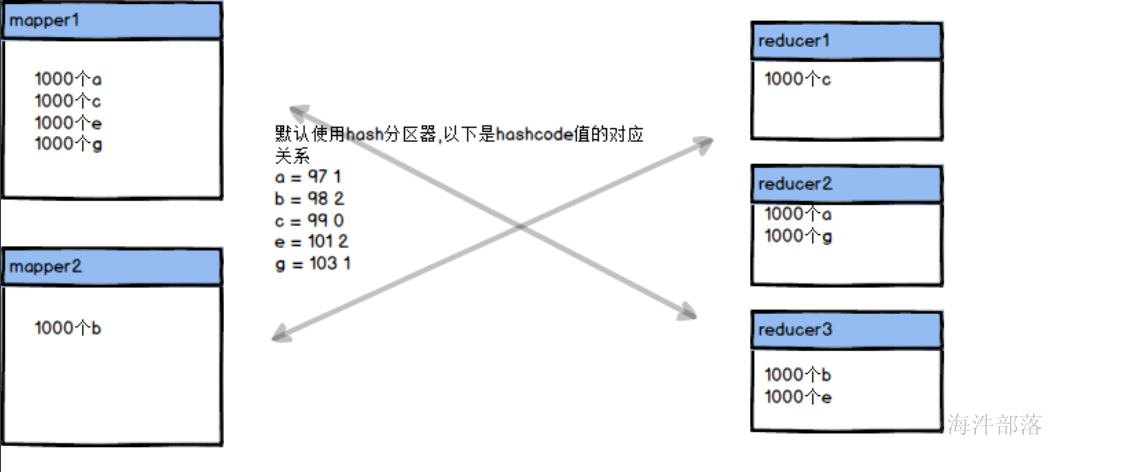
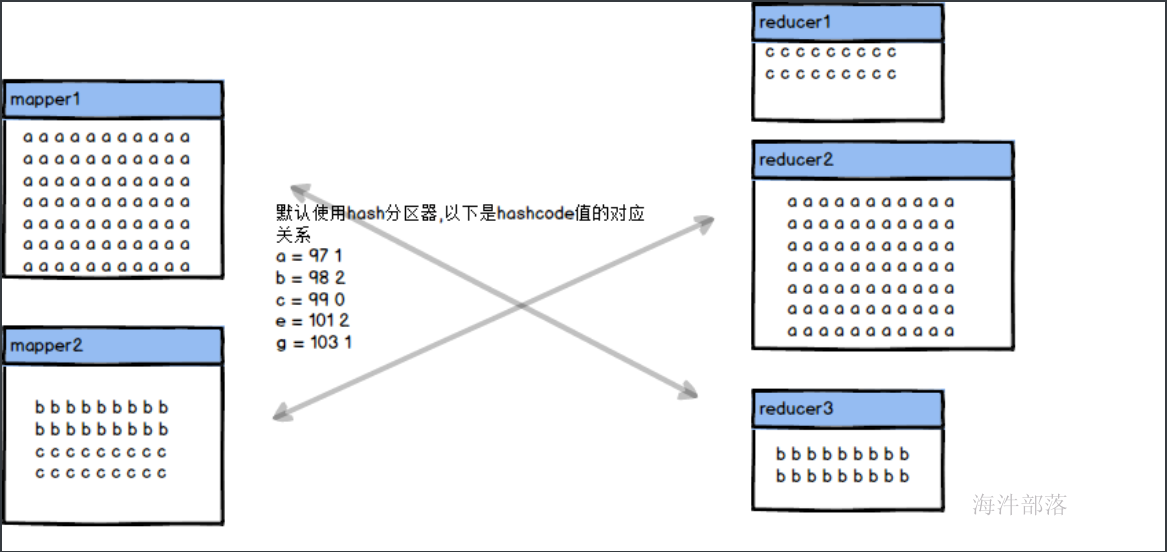
这个时候我们增加reducer的个数
job.setNumReduceTasks(3);


以上是三个reducer端的数据输出,我们可以看到数据变得更加均匀了
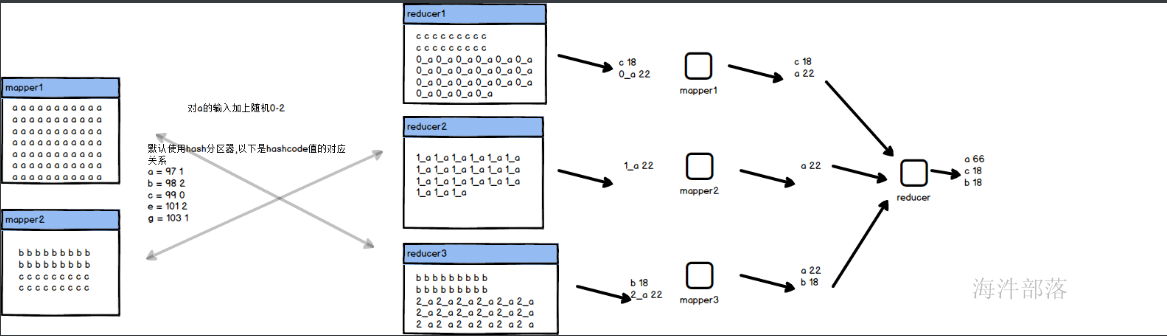
10.随机加盐和任务链
以上问题只能解决掉多个key因为hash值而出现的hash碰撞问题,那么如果真的是单点的key出现的数据倾斜是不会因为增加reducer的个数而解决掉问题的,我们除了增加combiner以外还可以增加key随机数的方式,将数据打乱分不到多个reducer端进行多人协同工作,那么我们就需要多个mr任务合作才能完成
逻辑如下:
需要多个reducer进行联合一起处理数据
整体代码如下:
wordcount1
package com.hainiu.mr;

import org.apache.hadoop.fs.Path;
import org.apache.hadoop.io.IntWritable;
import org.apache.hadoop.io.LongWritable;
import org.apache.hadoop.io.Text;
import org.apache.hadoop.mapreduce.Job;
import org.apache.hadoop.mapreduce.Mapper;
import org.apache.hadoop.mapreduce.Reducer;
import org.apache.hadoop.mapreduce.lib.input.TextInputFormat;
import org.apache.hadoop.mapreduce.lib.output.TextOutputFormat;

import java.io.IOException;
import java.util.Random;

public class WordCount1 {
    public static class WMapper extends Mapper<LongWritable,Text, Text, IntWritable>{
        Text k = new Text();
        IntWritable v = new IntWritable(1);
        Random r = new Random();
        @Override
        protected void map(LongWritable key, Text value, Context context) throws IOException, InterruptedException {
            String[] strs = value.toString().split(" ");
            for (String str : strs) {
                if(str.equals("a")){
                    int number = r.nextInt(3);
                    k.set(number+"_"+str);
                }else{
                    k.set(str);
                }
                context.write(k,v);
            }
        }
    }

    public static class WReducer extends Reducer<Text,IntWritable,Text,IntWritable>{
        IntWritable v = new IntWritable();
        @Override
        protected void reduce(Text key, Iterable<IntWritable> values, Context context) throws IOException, InterruptedException {
            int sum = 0;
            for (IntWritable value : values) {
                sum ++;
            }
            v.set(sum);
            context.write(key,v);
        }
    }

}
wordcount2
package com.hainiu.mr;

import org.apache.hadoop.fs.Path;
import org.apache.hadoop.io.IntWritable;
import org.apache.hadoop.io.LongWritable;
import org.apache.hadoop.io.Text;
import org.apache.hadoop.mapreduce.Job;
import org.apache.hadoop.mapreduce.Mapper;
import org.apache.hadoop.mapreduce.Reducer;
import org.apache.hadoop.mapreduce.lib.input.TextInputFormat;
import org.apache.hadoop.mapreduce.lib.output.TextOutputFormat;

import java.io.IOException;
import java.util.Random;

public class WordCount2 {
    public static class WMapper extends Mapper<LongWritable,Text, Text, IntWritable>{
        Text k = new Text();
        IntWritable v = new IntWritable();
        @Override
        protected void map(LongWritable key, Text value, Context context) throws IOException, InterruptedException {
            String[] strs = value.toString().split("\t");
            String word = strs[0];
            Integer number = Integer.valueOf(strs[1]);
            if(word.indexOf("_")> -1){
                word = word.substring(2);
            }
            k.set(word);
            v.set(number);
            context.write(k,v);
        }
    }

    public static class WReducer extends Reducer<Text,IntWritable,Text,IntWritable>{
        IntWritable v = new IntWritable();
        @Override
        protected void reduce(Text key, Iterable<IntWritable> values, Context context) throws IOException, InterruptedException {
            int sum = 0;
            for (IntWritable value : values) {
                sum += value.get();
            }
            v.set(sum);
            context.write(key,v);
        }
    }

}
增加任务依赖关系
package com.hainiu.mr;

import org.apache.hadoop.fs.Path;
import org.apache.hadoop.io.IntWritable;
import org.apache.hadoop.io.Text;
import org.apache.hadoop.mapred.JobConf;
import org.apache.hadoop.mapreduce.Job;
import org.apache.hadoop.mapreduce.lib.input.TextInputFormat;
import org.apache.hadoop.mapreduce.lib.jobcontrol.ControlledJob;
import org.apache.hadoop.mapreduce.lib.jobcontrol.JobControl;
import org.apache.hadoop.mapreduce.lib.output.TextOutputFormat;

public class JobChainStart {
    public static void main(String[] args) throws Exception{
        JobConf conf = new JobConf(JobChainStart.class);
        Job job = Job.getInstance(conf);
        job.setJarByClass(WordCount1.class);
        job.setMapperClass(WordCount1.WMapper.class);
        job.setMapOutputKeyClass(Text.class);
        job.setMapOutputValueClass(IntWritable.class);
        TextInputFormat.addInputPath(job, new Path("data/a1.txt"));
        TextInputFormat.addInputPath(job, new Path("data/b1.txt"));

        job.setNumReduceTasks(3);
        job.setReducerClass(WordCount1.WReducer.class);
        job.setOutputKeyClass(Text.class);
        job.setOutputValueClass(IntWritable.class);
        TextOutputFormat.setOutputPath(job, new Path("data/step1"));
        // 加入控制容器
        ControlledJob ctrljob1 = new ControlledJob(conf);
        ctrljob1.setJob(job);

        Job job2 = Job.getInstance(conf);
        job2.setJarByClass(WordCount2.class);
        job2.setMapperClass(WordCount2.WMapper.class);
        job2.setMapOutputKeyClass(Text.class);
        job2.setMapOutputValueClass(IntWritable.class);
        TextInputFormat.addInputPath(job2, new Path("data/step1"));

        job2.setReducerClass(WordCount2.WReducer.class);
        job2.setOutputKeyClass(Text.class);
        job2.setOutputValueClass(IntWritable.class);
        TextOutputFormat.setOutputPath(job2, new Path("data/step2"));
        // 作业2加入控制容器
        ControlledJob ctrljob2 = new ControlledJob(conf);
        ctrljob2.setJob(job2);

        // 意思为job2的启动,依赖于job1作业的完成
        ctrljob2.addDependingJob(ctrljob1);
        // 主的控制容器,控制上面的总的两个子作业
        JobControl jobCtrl = new JobControl("myctrl");
        jobCtrl.addJob(ctrljob1);
        jobCtrl.addJob(ctrljob2);

        // 在线程启动,记住一定要有这个
        Thread t = new Thread(jobCtrl);
        t.start();

        while (true) {

            if (jobCtrl.allFinished()) {// 如果作业成功完成,就打印成功作业的信息
                System.out.println(jobCtrl.getSuccessfulJobList());
                jobCtrl.stop();
                break;
            }
        }
    }
}
运行结果如下:

第一步成功拆分到不同的reducer中

最后结果进行整体处理,得出最终结果