18 高阶函数
在数据和计算中,高阶函数是至少满足下列一个条件的函数:
1)接受一个或多个函数作为输入
2)输出一个函数
输出一个函数
// 输出Int类型
scala> def add(a:Int, b:Int) = a + b
add: (a: Int, b: Int)Int
// 输出函数Int => Int
scala> def add(a:Int, b:Int) = (c:Int) => a + b + c
add: (a: Int, b: Int)Int => Int
// 使用时需要传入多个括号的数据
scala> add(1,2)
res0: Int => Int = <function1>
scala> res0(3)
res1: Int = 6
scala> add(1,2)(3)
res2: Int = 6
// 输出函数 Int => (Int => Int)
scala> def add(a:Int, b:Int) = (c:Int) => (d:Int) => a + b + c + d
add: (a: Int, b: Int)Int => (Int => Int)
scala> add(1,2)(3)(4)
res3: Int = 10
传入的是一个函数
传入函数 (Int,Int) => Int
// 输入参数是 函数 (Int,Int)=>Int
scala> def js(func:(Int,Int)=>Int) = func
js: (func: (Int, Int) => Int)(Int, Int) => Int
scala> val func1 = (a:Int, b:Int) => a + b
func1: (Int, Int) => Int = <function2>
scala> val func2 = (a:Int, b:Int) => a * b
func2: (Int, Int) => Int = <function2>
scala> js(func1)
res6: (Int, Int) => Int = <function2>
scala> res6(1,2)
res7: Int = 3
scala> js(func1)(1,2)
res8: Int = 3
scala> js(func2)(1,2)
res9: Int = 2
传入函数 Int => Int
scala> def js(func:(Int)=>Int) = func
js: (func: Int => Int)Int => Int
scala> val func1 = (a:Int) => a + 10
func1: Int => Int = <function1>
scala> val func2 = (a:Int) => a * 10
func2: Int => Int = <function1>
scala> js(func1)(1)
res10: Int = 11
scala> js(func2)(1)
res11: Int = 10
在上面的基础上,在集合里用函数
scala> def calculate(a:Int,b:Int,f:(Int,Int)=>Int) = f(a,b)
calculate: (a: Int, b: Int, f: (Int, Int) => Int)Int

scala> calculate(10,20,(a,b)=>a+b)
res15: Int = 30

scala> def getFunc(a:Int,b:Int)={
     | val func = (x:Int,y:Int)=> a*x +b*y
     | func
     | }
getFunc: (a: Int, b: Int)(Int, Int) => Int

scala> calculate(10,20,getFunc(1,2))
res16: Int = 50

scala> val arr = Array(1,2,3,4,5,6,7)
arr: Array[Int] = Array(1, 2, 3, 4, 5, 6, 7)

scala> arr.reduce((a,b)=> getFunc(1,2)(a,b))
res19: Int = 55
19 部分参数函数
如果函数传递所有预期的参数, 则表示已完全应用它。 如果只传递几个参数并不是全部参数, 那么将返回部分应用的函数。 这样就可以方便地绑定一些参数, 其余的参数可稍后填写补上;
scala> def add(a:Int, b:Int) = a + b
add: (a: Int, b: Int)Int
scala> add(1,2)
res17: Int = 3
// 部分参数就是 固定一部分参数,传入一部分参数
// 方式1:
// 使用时,用_:Int 做参数占位,用于传入参数
scala> val func1 = add(1, _:Int)
func1: Int => Int = <function1>
scala> func1(2)
res20: Int = 3
// 方式2
// 利用函数,固定一部分参数,传入一部分参数
scala> val func2 = (b:Int) => add(1, b)
func2: Int => Int = <function1>
scala> func2(2)
res21: Int = 3
默认值参数
scala> val add = (x:Int,y:Int) => x+y
add: (Int, Int) => Int = $Lambda$1488/999610765@2da20e8a

scala> val add1 = add(10,_:Int)
add1: Int => Int = $Lambda$1489/652615485@41ff6f38

scala> add1(20)
res20: Int = 30

scala> val add2 = (x:Int) => add(10,x)
add2: Int => Int = $Lambda$1490/554602748@3b47adeb

scala> add2(50)
res21: Int = 60

scala> def add(x:Int,y:Int=20) = x+y
add: (x: Int, y: Int)Int

scala> add(10)
res22: Int = 30

scala> add(10,40)
res23: Int = 50

scala> def circle(r:Int,pi:Double = 3.14) = 2*r* pi
circle: (r: Int, pi: Double)Double

scala> circle(2)
res24: Double = 12.56

scala> circle(2,3.1415926)
res25: Double = 12.5663704
20 柯理化(颗粒化)
柯里化(Currying)是把接受多个参数的函数变换成接受一个单一参数(最初函数的第一个参数)的函数,并且返回接受余下的参数且返回结果的新函数的技术。
是把接受多个参数的函数变成接受一个参数的函数;
柯理化的两种表现形式:
以 加法函数为例:
def curring(x:Int)(y:Int) = x + y
def curring(x:Int) = (y:Int) => x + y
在柯理化形式的基础上,固定一个参数,传入一个参数
scala> def curring(x:Int)(y:Int) = x + y
curring: (x: Int)(y: Int)Int
scala> curring(4)(5)
res23: Int = 9
// 第一种方式
scala> val func1 = curring(5)_
func1: Int => Int = <function1>
scala> func1(4)
res25: Int = 9
// 第二种方式
scala> val func2 = (x:Int) => curring(x)(5)
func2: Int => Int = <function1>
scala> func2(4)
res26: Int = 9
scala> def curring(x:Int) = (y:Int) => x + y
curring: (x: Int)Int => Int
柯里化的演示
scala> arr.fold(0)(_+_)
res26: Int = 28

scala> arr
res27: Array[Int] = Array(1, 2, 3, 4, 5, 6, 7)

scala> def add(x:Int,y:Int) = x+y
add: (x: Int, y: Int)Int

scala> def add(x:Int)(y:Int) = x+y
add: (x: Int)(y: Int)Int

scala> val add1 = (a:Int) => add(a)_
add1: Int => (Int => Int) = $Lambda$1518/1973590042@11a24a1a

scala> add1(10)
res28: Int => Int = $Lambda$1519/2136804728@677e4612

scala> res28(20)
res29: Int = 30

scala> val add2 = (a:Int) => add(a)(10)
add2: Int => Int = $Lambda$1520/1063482862@1411e3e4

scala> add2(100)
res30: Int = 110

scala>

scala> def add(x:Int)(y:Int)()()()()(z:Int) = x+y+z
add: (x: Int)(y: Int)()()()()(z: Int)Int

scala> add(10)(20)()()()()(30)
res31: Int = 60
柯里化分类
//默认值参数可以分类
scala> def circle(r:Int)(pi:Double=3.14) = {
     | 2*r*pi
     | }
circle: (r: Int)(pi: Double)Double
柯里化函数,配合implicit关键字使用
// 定义带有隐式参数的add方法
// implicit 修饰参数,代表该参数是隐式参数
scala> def add(a:Int)(implicit b:Int = 5) = a + b
add: (a: Int)(implicit b: Int)Int
// 直接传参
scala> add(4)(5)
res22: Int = 9
scala> add(4)(10)
res24: Int = 14
// 执行时,首先找当前环境是否有和隐式参数类型相同的隐式值,如果找到,用隐式值作为隐式参数
// 如果没找到,看隐式参数是否有默认值,如果有,使用默认值
// 如果还没找到,那就抛异常

// 当前环境没有和隐式参数类型相同的隐式值,隐式参数有默认值,使用默认值
// 4 + 5(默认值)
scala> add(4)
res25: Int = 9
// 定义隐式值
scala> implicit val b1:Int = 20
b1: Int = 20
// 当前环境有和隐式参数类型相同的隐式值,使用隐式值
// 4 + 20(隐式值)
scala> add(4)
res26: Int = 24
// 通过 implicitly[Int] 可提取出当前环境的隐式值并赋给变量
scala> val c:Int = implicitly[Int]
c: Int = 20
// 定义String类型隐式值
scala> implicit val b2:String = "aa"
b2: String = aa
scala> add(4)
res27: Int = 24
// 定义 Int类型隐式值, 当前环境有两个Int类型的隐式值
scala> implicit val b3:Int = 30
b3: Int = 30
// 由于当前环境有两个Int类型的隐式值,调用时不知道找哪个,所以报错
scala> add(4)
<console>:16: error: ambiguous implicit values:
 both value b1 of type => Int
 and value b3 of type => Int
 match expected type Int
       add(4)
          ^
// 由于当前环境已乱套,可通过退出重进解决
scala> :quit
C:\Users\My>scala
Welcome to Scala 2.11.8 (Java HotSpot(TM) 64-Bit Server VM, Java 1.8.0_131).
Type in expressions for evaluation. Or try :help.
scala>
在开发环境中使用柯里化和implicit,切记不能在同一个类中使用
package util
// 隐式成员是单独放在一个地方,使用的时候引入
object MyPredef {
  // 定义隐式值1
  implicit val b1:Int = 10
  // 定义隐式值2
  implicit val b2:Int = 20
}

package day03
object CurringDemo {
  // 定义带有隐式参数的方法
  def add(a:Int)(implicit b:Int = 5) = a + b
  def main(args: Array[String]): Unit = {
    println(add(4)(1))
    println(add(4))
    // 引入隐式值之后,当前环境就有隐式值了
    import util.MyPredef.b1
    println(add(4))
// 当前环境有两个Int类型隐式值,报异常
// import util.MyPredef.b2
// println(add(4))
  }
}
21 隐式转换
作用:能够丰富现有类库的功能,对类的方法进行增强,常用作类型转换也就是把一个类型转赋予另一个类的功能;
隐式转换应用场景
隐式转换函数、隐式值、隐式参数、隐式对象(只能在静态对象中使用);
21.1 隐式转换函数
隐式转换函数 是指 以implicit关键字声明并带有单个参数的函数,这样的函数被自动应用。
// 声明隐式函数,用于将 int类型转成 String 类型
implicit val int2Stringfunc = (a:Int) => a.toString
使用示例:
// 定义Int类型
scala> val a = 12345
a: Int = 12345
// Int类型没有 length 方法
scala> a.length
<console>:13: error: value length is not a member of Int
       a.length
         ^
// 定义隐式转换函数 (Int)=>String
scala> implicit def int2string(a:Int) = a.toString
warning: there was one feature warning; re-run with -feature for details
int2string: (a: Int)String
// 当执行时,看Int类型是否有length成员,如果有直接调用
// 如果没有,但当前环境是否有隐式函数,能将Int转成有该length成员的类型,如果有则调用
// 执行过程: Int --> String --> 调用String类型的length方法
scala> a.length
res2: Int = 5
scala内部自带了很多隐式转换函数和方法。如1 to 10其实是调用的1.to(10)这个方法
但是在Int类中并没有to这个方法
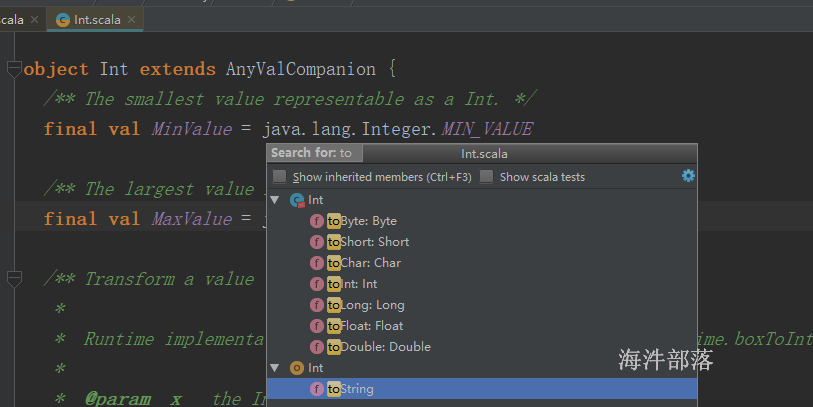

intWrapper就是以implicit关键字声明并带有单个参数的函数,intWrapper就是一个隐式转换方法;
用于scala 和 java 类型互转
scala> val a:Int = 1
a: Int = 1
// 将 scala 的 Int类型 赋给 java 的 Integer 类型
scala> val b:Integer = a
b: Integer = 1
// 将 java 的 Integer 类型 赋给 scala 的 Int类型
scala> val c:Int = b
c: Int = 1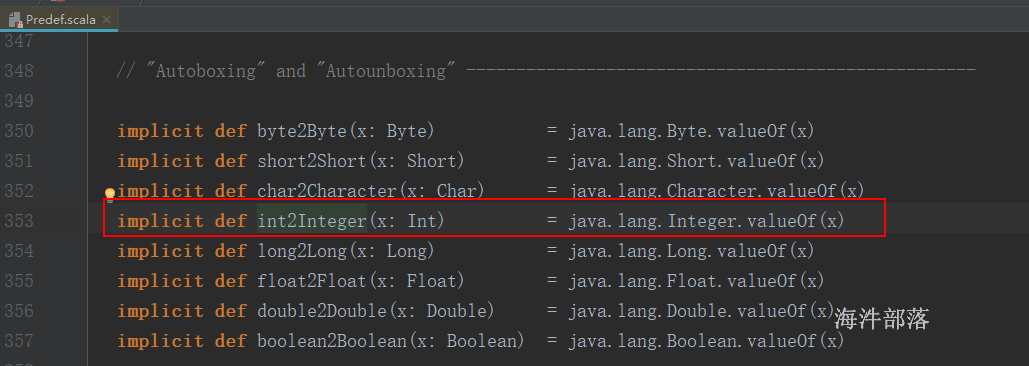
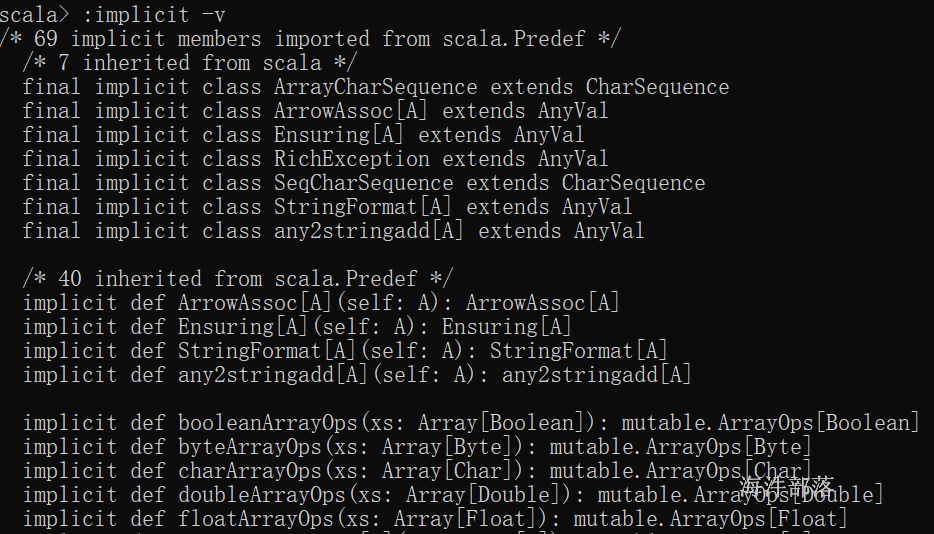
predef这个类就是预定义的predefine的简写
在shell中用:implicit -v来查看,默认有多少个隐式转换函数
在2.12.16中有65个隐式转换,scala升级比较快所以其它版本可能不同
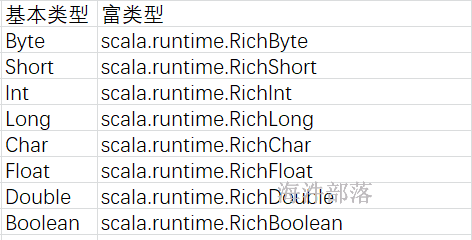
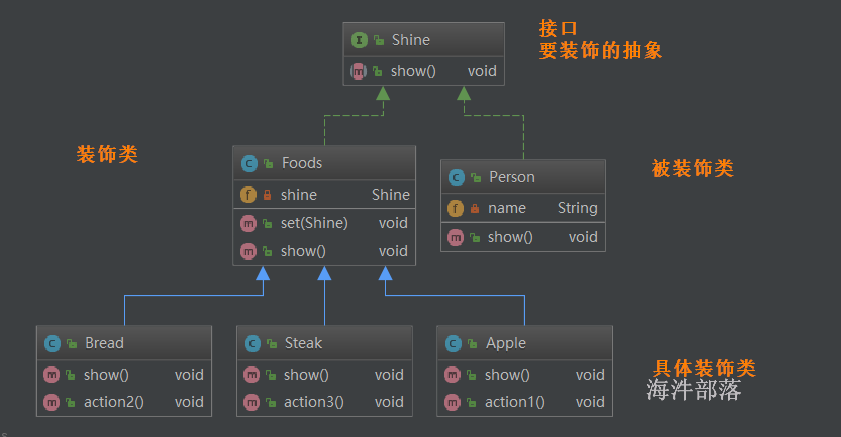
隐式转换函数其实用到了装饰模式(增强)
核心思想:用组合实现嵌套逻辑,每层有自己的个性化动作。在不修改原有类的基础上,给原有类增加功能。
21.2 隐式参数和隐式值
在调用含有隐式参数的函数时,编译器会自动寻找合适的隐式值当做隐式参数,而只有用implict标记过的值、对象、函数才能被找到。
def add(x:Int)(implicit y:Int = 10) = x + y // 参考 柯理化 隐式关键字例子
隐式参数注意:方法的参数如果有多个隐式参数的话,只需要使用一个implicit关键字,隐式参数列表必须放在方法的参数列表后面;
示例:
scala> def demo(a:Int)(implicit b:Int, c:Int) = a + b + c
demo: (a: Int)(implicit b: Int, implicit c: Int)Int
scala> implicit val b1:Int = 10
b1: Int = 10
// 一个隐式值作用在多个隐式参数上
scala> demo(5)
res5: Int = 25
隐式函数作为隐式参数:
    // 定义隐式函数
    implicit val int2stringfunc = (a:Int) => a.toString

    def sayLength(implicit str:String) = println(s"${str.length}")
    sayLength(1234)
21.3 隐式对象
比较器
/**
 * comparable comparator
 * 比较器接口comparable
 * 没有比较器就临时new一个new comparator
 * ordered  ordering
 */
object TestObject {
  def main(args: Array[String]): Unit = {
    val s1 = new Actor("liudehua",95)
    val s2 = new Actor("reba",96)
    val s3 = new Actor("nazha",97)
    val arr = Array(s1,s2,s3)
    arr.sorted(new Ordering[Actor] {
      override def compare(x: Actor, y: Actor): Int = y.fv - x.fv
    }).foreach(t=>println(t.name,t.fv))
  }
}
class Actor(val name:String,val fv:Int) /*extends Ordered[Actor]{
  override def compare(that: Actor): Int = {
    this.fv - that.fv
  }
}*/
隐式对象只能在别的trait/类/对象内部定义。
并且隐式对象在一些方法中需要使用
object MyOrder{
  implicit object MyActorOrdering extends Ordering[Actor]{
    override def compare(x: Actor, y: Actor): Int = y.fv - x.fv
  }
}
object TestObject {
  def main(args: Array[String]): Unit = {
    val s1 = new Actor("liudehua",95)
    val s2 = new Actor("reba",96)
    val s3 = new Actor("nazha",97)
    val arr = Array(s1,s2,s3)
    import MyOrder.MyActorOrdering
    arr.sorted.foreach(t=>println(t.name,t.fv))
    println(implicitly[MyOrder.MyActorOrdering.type ])
  }
}
class Actor(val name:String,val fv:Int)
隐式转换实现排序
object MyOrder{
  implicit object MyActorOrdering extends Ordering[Actor]{
    override def compare(x: Actor, y: Actor): Int = y.fv - x.fv
  }
}
object TestObject {
  def main(args: Array[String]): Unit = {
    val s1 = new Actor("liudehua",95)
    val s2 = new Actor("reba",96)
    val s3 = new Actor("nazha",97)
    val arr = Array(s1,s2,s3)
    import MyOrder.MyActorOrdering
    arr.sorted.foreach(t=>println(t.name,t.fv))
    println(implicitly[MyOrder.MyActorOrdering.type ])
  }
}
class Actor(val name:String,val fv:Int)
21.4 隐式转换的应用示例
1)类型转换
object ImplicitDemo {
  /**
    * 定义了一个隐式转换的方法
    */
  implicit def double2Int(d:Double) = {
    println(s"double:${d} to int:${d.toInt} method")
    d.toInt
  }
  /**
    * 定义了一个隐式转换的函数
    */
  implicit val double2IntF = (d:Double) => {
    println(s"double:${d} to int:${d.toInt} function")
    d.toInt
  }
  def m1(a:Int) = println(a)
  def main(args: Array[String]): Unit = {
    //当隐式转换方法和隐式转换函数同时存在,也就是入参,返回类型相同的情况下,则先找函数,因为scala是函数式编程,那函数就是老大
    //如果函数和方法同时存在,就优先用函数
    val d:Int = 6.6
    m1(6.6)
  }
}
2)给代表文件地址的字符串增加一个可以读文件的功能
这是一个显示的调用并不是一个隐式的调用,这是我们平时开发过程中常用的方法
package day04
import scala.io.Source
class Reader(val path:String) {
  // 读取文件得到文件内容返回
  def read = Source.fromFile(path).mkString
}
object Reader{
  def main(args: Array[String]): Unit = {
    val path:String = "/tmp/scala/ip.txt"
    val reader = new Reader(path)
    println(reader.read)
  }
}
隐式转换函数的实现方法
首先在MyPredef写一个String的隐式转换函数;

package day04
import scala.io.Source
class Reader(val path:String) {
  // 读取文件得到文件内容返回
  def read = Source.fromFile(path).mkString
}
object Reader{
  def main(args: Array[String]): Unit = {
    val path:String = "/tmp/scala/ip.txt"
// val reader = new Reader(path)
    // 通过隐式转换函数给字符串赋予读文件的功能(String => Reader)
    import util.MyPredef.string2Reader
    println(path.read)
  }
}
22 泛型
泛型就是不确定的类型,可以在类或方法不确实传入类型时使用,可以提高代码的灵活性和复用性;
scala中泛型的用法和java中差不多,但是会有一些自己独特的语法;
泛型类:指定类可以接受任意类型参数。
泛型方法:指定方法可以接受任意类型参数。
22.1 泛型类基本用法
package day04
import day04.SexEnumObj.SexEnum
// 定义带有泛型的抽象类
abstract class FXDemo[T](val t : T) {
  def printInfo():Unit
}
// 子类继承父类,把泛型具体化成Int
class FXIntDemo[Int](t : Int) extends FXDemo[Int](t:Int){
  override def printInfo(): Unit = {
    println(s"FXIntDemo[Int](${t})")
  }
}
// 子类继承父类,把泛型具体化成String
class FXStringDemo[String](t : String) extends FXDemo[String](t:String){
  override def printInfo(): Unit = {
    println(s"FXIntDemo[String](${t})")
  }
}
// 定义带有多泛型的类
class FXABCDemo[A, B, C](val a:A, val b:B, val c:C){
  override def toString: String = s"${a}, ${b}, ${c}"
}
// 定义sex的枚举对象
object SexEnumObj extends Enumeration{
  // 定义枚举类型(用于泛型)
  type SexEnum = Value
  // 定义枚举值
  val boy, girl = Value
}
object FXDemo{
  def main(args: Array[String]): Unit = {
    val demo = new FXIntDemo[Int](100)
    demo.printInfo()
    val demo2 = new FXStringDemo[String]("xiaoming")
    demo2.printInfo()
    val demo3 = new FXABCDemo[String, Int, String]("xiaoming", 20, "boy")
    println(demo3)
    val demo4 = new FXABCDemo[String, Int, SexEnum]("xiaoming", 20, SexEnumObj.boy)
    println(demo4)
  }
}
22.2 泛型种类
[B \<: A] UpperBound 上界,B类型的父类是A类型,左侧的B的类型必须是A类型或者A类型的子类。
[B >: A] LowerBound 下界,B类型的子类是A类型,左侧的B的类型必须是A类型或者A类型的父类。
[-A] 逆变,通常作为参数类型,T是A的子类。
[+B] 协变,通常作为返回类型,T是B的父类。
22.2.1 UpperBound
UpperBound 用在泛型类或泛型方法上,用于限制传递的参数必须是 指定类型对象或其子类对象。
如果想实现两个对象的比较,需要该对象实现Comparable接口。然后再配上泛型实现通用比较。
泛型继承,java的用法
package javaday04;
public class UpperBoundDemo<T extends Comparable<T>> {
    // psvm
    public static void main(String[] args) {
        // Integer 实现了 Comparable接口,创建对象时,约束通过
        UpperBoundDemo<Integer> demo1 = new UpperBoundDemo<Integer>();
        // Hainiu 没实现 Comparable接口,创建对象时,约束不通过
// UpperBoundDemo<Hainiu> demo2 = new UpperBoundDemo<Hainiu>();
        // 约束通过
        UpperBoundDemo<HainiuComparable> demo3 = new UpperBoundDemo<HainiuComparable>();
    }
}
class Hainiu{}
class HainiuComparable implements Comparable<HainiuComparable>{
    public int compareTo(HainiuComparable o) {
        return 0;
    }
}
泛型继承,scala用法
scala> class A
defined class A

scala> class B extends A
defined class B

scala> class C extends B
defined class C

scala> class Message[T:<B](val msg:T)
<console>:1: error: ']' expected but identifier found.
       class Message[T:<B](val msg:T)
                      ^

scala> class Message[T<:B](val msg:T)
defined class Message

scala> val m = new Message[B](new B)
m: Message[B] = Message@6fb94c36

scala> val m = new Message[A](new A)
<console>:13: error: type arguments [A] do not conform to class Message's type parameter bounds [T <: B]
       val m = new Message[A](new A)
           ^
<console>:13: error: type arguments [A] do not conform to class Message's type parameter bounds [T <: B]
       val m = new Message[A](new A)
                   ^

scala> val m = new Message[C](new C)
m: Message[C] = Message@43ec61f0
22.2.2 LowerBound
LowerBound 用在泛型类或泛型方法上,用于限制传递的参数必须是 指定类型对象或其父类对象。
scala> class Message[T>:B](val msg:T)
defined class Message

scala> new Message[B](new B)
res12: Message[B] = Message@66b98075

scala> new Message[A](new A)
res13: Message[A] = Message@6bde050d

scala> new Message[C](new C)
<console>:13: error: type arguments [C] do not conform to class Message's type parameter bounds [T >: B]
       val res14 =
           ^
<console>:14: error: type arguments [C] do not conform to class Message's type parameter bounds [T >: B]
       new Message[C](new C)
           ^
22.2.3 协变与逆变
在声明Scala的泛型类型时,“+”表示协变(covariance),而“-”表示逆变(contravariance)。
C[+T]:如果A是B的子类,那么C[A]是C[B]的子类;通常作为返回值类型。
C[-T]:如果A是B的子类,那么C[B]是C[A]的子类;通常作为参数类型。
C[T]:无论A和B是什么关系,C[A]和C[B]没有从属关系。

scala> class A
defined class A

scala> class B extends A
defined class B

scala> class C extends B
defined class C

scala> def func(f:B=>B)=f
func: (f: B => B)B => B

scala> func((b:B)=>new B)
res0: B => B = <function1>

scala> func((b:A)=>new B)
res1: B => B = <function1>

scala> func((b:C)=>new B)
<console>:16: error: type mismatch;
 found   : C => B
 required: B => B
       func((b:C)=>new B)
                 ^

scala> func((b:B)=>new A)
<console>:15: error: type mismatch;
 found   : A
 required: B
       func((b:B)=>new A)
                   ^

scala> func((b:B)=>new B)
res4: B => B = <function1>

scala> func((b:B)=>new C)
res5: B => B = <function1>

scala> func((b:A)=>new C)
res6: B => B = <function1>
23 Akka
24.1 Akka 概述
Spark的RPC是通过Akka类库实现的,Akka用Scala语言开发,基于Actor并发模型实现;
Akka具有高可靠、高性能、可扩展等特点,使用Akka可以轻松实现分布式RPC功能。
Actor是Akka中最核心的概念,它是一个封装了状态和行为的对象,Actor之间可以通过交换消息的方式进行通信,每个Actor都有自己的收件箱(MailBox)。
通过Actor能够简化锁及线程管理,可以非常容易地开发出正确地并发程序和并行系统。
Akka 具有如下特性:
1)提供了一种高级抽象,能够简化在并发(Concurrency)/并行(Parallelism)应用场景下的编程开发;
2)提供了异步非阻塞的、高性能的事件驱动编程模型;
3)超级轻量级事件处理(每GB堆内存几百万Actor);
24.2 Akka 组成及架构原理
ActorSystem
在Akka中,ActorSystem是一个重量级的结构。
ActorSystem 的职责是 负责创建并管理其创建的Actor,ActorSystem的单例的,一个JVM进程中有一个即可,而Actor是多例的。
Actor
在Akka中,Actor负责通信,在Actor中有一些重要的生命周期方法
1)preStart()方法:该方法在Actor对象构造方法执行后执行,整 个Actor生命周期中仅执行一次, 就像 mapreduce里的 setup()
2)receive()方法:该方法在Actor的preStart方法执行完成后执行,用于接收消息,会被反复执行, 就像mapreduce里的map()
每个actor 对象有对应的外部引用xxxRef,可以通过该 actor 对象的外部引用与actor通信。
akka的架构原理
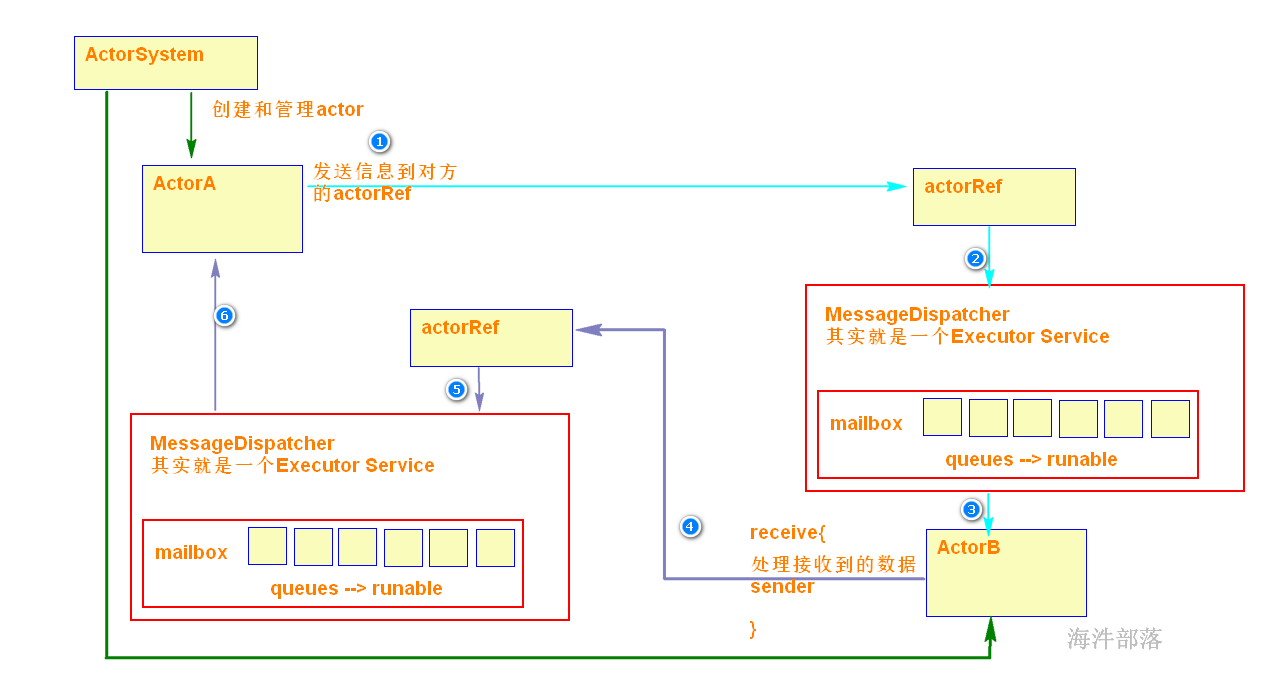
mailbox负责存储actor收到的消息,dispatcher负责从mailbox取消息,分配线程给actor执行具体的业务逻辑。
sender引用代表最近收到消息的发送actor,通常用于回消息,比如 sender() !xxxx。
24.3 Akka 的使用
使用Akka需要增加这两个的pom依赖
<!-- 添加 akka 的 actor 依赖 -->
<dependency>
    <groupId>com.typesafe.akka</groupId>
    <artifactId>akka-actor_2.12</artifactId>
    <version>2.4.17</version>
</dependency>
<!-- 多进程之间的 Actor 通信 -->
<dependency>
    <groupId>com.typesafe.akka</groupId>
    <artifactId>akka-remote_2.12</artifactId>
    <version>2.4.17</version>
</dependency>
24.3.1 发送给自己
步骤:
1)创建ActorSystem

2)定义处理信息的Actor实现类
class HelleAkka extends Actor{
//接受消息
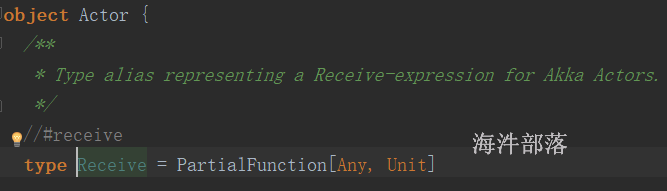
override def receive: Receive = {
//接受消息的处理逻辑
}
}
3)创建目标Actor的ActorRef对象

4)往目标Actor的ActorRef对象发送信息
class MyActor extends Actor{
  override def receive: Receive = {
    case msg => println(s"received ${msg}")
  }
}
object Test {
  def main(args: Array[String]): Unit = {
    val system = ActorSystem.create("iphone13")
    val actor = system.actorOf(Props(new MyActor),"zhangsan")
    actor ! "this is first message"
  }
}
24.3.2 发送给不同的进程
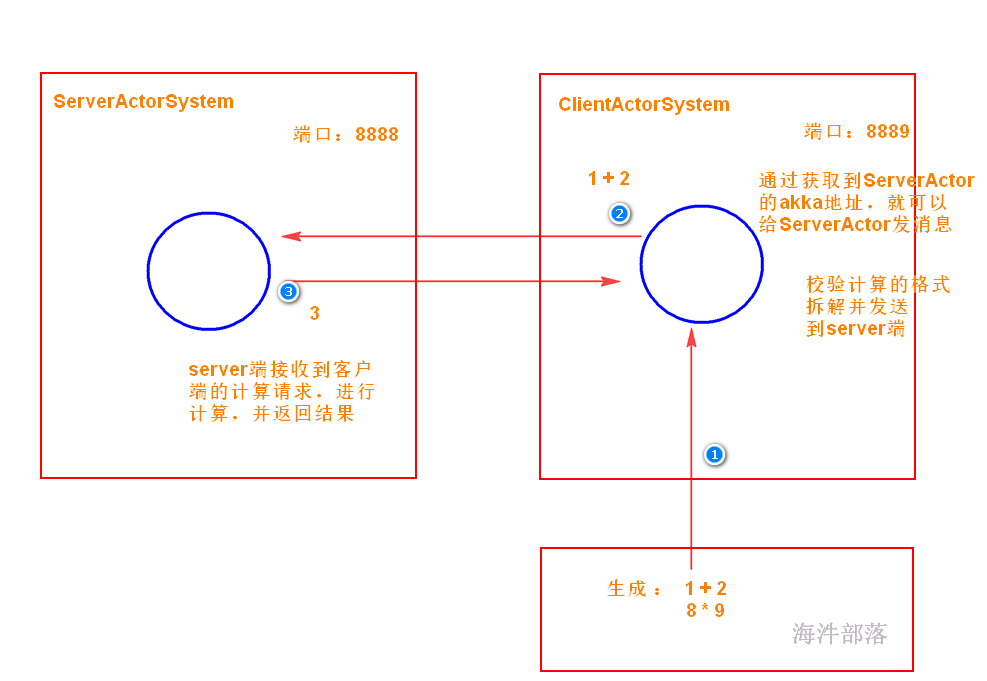
远端actorRef设置参数:
Id name age
akka.actor.provider = akka.remote.RemoteActorRefProvider
akka.remote.netty.tcp.hostname = \$host
akka.remote.netty.tcp.port = \$port
- 创建一个 siri端用于回复消息
siri
package com.hainiu.akka

import akka.actor.{Actor, ActorSystem, Props}
import com.typesafe.config.ConfigFactory

class Siri extends Actor{
  override def receive: Receive = {
    case "hello" => sender() ! "hello"
    case "eat?" => sender() ! "yes"
    case "eat what?" => sender() ! "rice"
    case "teast good?" => sender() ! "very good"
    case "bye" => sender() ! "bye"
    case "learn bigdata?" => sender() ! "ok fine"
    case "come to hainiu" => sender() ! "ok fine"
    case _ => sender() ! "what???"
  }
}
object Siri {
  def main(args: Array[String]): Unit = {
    val conf =
      """
        |akka.actor.provider = akka.remote.RemoteActorRefProvider
        |akka.remote.netty.tcp.hostname = localhost
        |akka.remote.netty.tcp.port = 6666
        |""".stripMargin
    val config = ConfigFactory.parseString(conf)
    val actorSystem = ActorSystem.create("iphone14",config)
    val actor = actorSystem.actorOf(Props(new Siri),"siri")
  }
}
启动后结果:

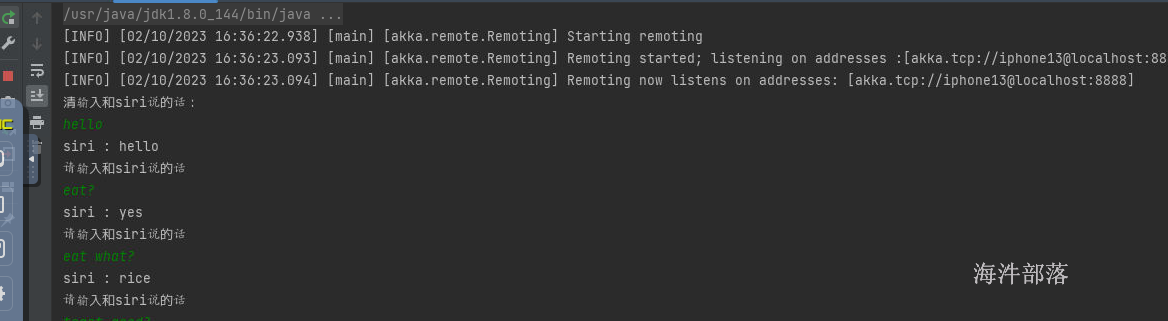
等待客户端发送消息,实现交互
- 创建一个 human端发送消息
human
package com.hainiu.akka
import akka.actor.{Actor, ActorSystem, Props}
import com.typesafe.config.ConfigFactory
import scala.io.StdIn
class Human extends Actor{
override def receive: Receive = {
case msg =>{
println(s"siri : ${msg}")
println("请输入和siri说的话:")
val line = StdIn.readLine()
sender()!line
}
}
override def preStart(): Unit = {
//初始化就执行
println("请输入和siri说的话:")
val line = StdIn.readLine()
val proxy = context.actorSelection("akka.tcp://iphone14@localhost:6666/user/siri")
proxy ! line
}
}
object Human{
def main(args: Array[String]): Unit = {
val conf =
"""
|akka.actor.provider = akka.remote.RemoteActorRefProvider
|akka.remote.netty.tcp.hostname = localhost
|akka.remote.netty.tcp.port = 8888
|""".stripMargin
val config = ConfigFactory.parseString(conf)
val actorSystem = ActorSystem.create("iphone13", config)
actorSystem.actorOf(Props(new Human),"hainiu")
}
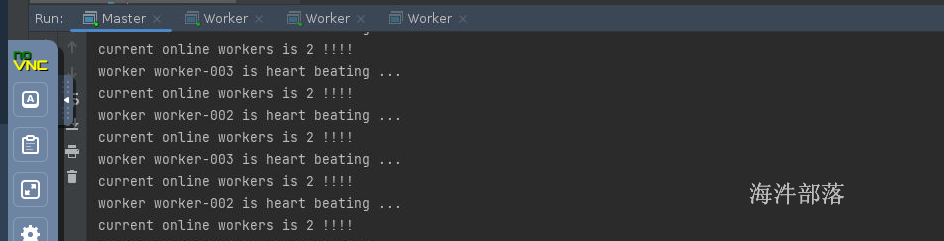
}运行效果:
24.3.3 akka模拟集群运行
worker端代码
package com.hainiu.scala

import akka.actor.{Actor, ActorSystem, Props}
import com.typesafe.config.ConfigFactory

import java.util.concurrent.TimeUnit
import scala.concurrent.duration.Duration

class Worker extends Actor{
  val worker_id = "worker-001"
  val cores = 30
  val memory = "64G"
  override def receive: Receive = {
    case RegistSuccess => {
      println("regist success!!!")
      //start heart beat!!!
      sendHeartBeat
    }
  }
  def sendHeartBeat()={
//    initialDelay: FiniteDuration  3s
//    interval: FiniteDuration  3s
//    receiver: ActorRef  master
//    message: Any
    import context.dispatcher
    context.system.scheduler.schedule(Duration(3,TimeUnit.SECONDS),Duration(3,TimeUnit.SECONDS),sender(),HeartBeat(worker_id))
  }

  override def preStart(): Unit = {
    val regist = RegistClass(worker_id, System.currentTimeMillis(), cores, memory)
    val proxy = context.actorSelection("akka.tcp://nn1@localhost:8888/user/master")
    proxy ! regist
  }
}
object Worker {
  def main(args: Array[String]): Unit = {
    val conf =
      """
        |akka.actor.provider = akka.remote.RemoteActorRefProvider
        |akka.remote.netty.tcp.hostname = localhost
        |akka.remote.netty.tcp.port = 6666
        |""".stripMargin
    val config = ConfigFactory.parseString(conf)
    val actorSystem = ActorSystem.create("nn1",config)
    val actor = actorSystem.actorOf(Props(new Worker),"worker")
  }
}
master端代码
package com.hainiu.scala

import akka.actor.{Actor, ActorSystem, Props}
import com.typesafe.config.ConfigFactory

import java.util.concurrent.TimeUnit
import scala.collection.mutable
import scala.collection.mutable.ListBuffer
import scala.concurrent.duration.Duration

class Master extends Actor{
//  val buffer = ListBuffer[RegistClass]()
  val check_interval = 10
  val timeout = 30000
  var workers = mutable.Map[String,RegistClass]()
  override def receive: Receive = {
    case x:RegistClass =>{
      workers.put(x.workId,x)
      println(s"worker ${x.workId} is  registing... current workers ${workers.size} ")
      sender() ! RegistSuccess
    }
    case HeartBeat(workId) =>{
      workers.get(workId) match {
        case Some(v) =>{
          v.lastUpdateTime = System.currentTimeMillis()
          workers.put(workId,v)
          println(s"worker ${workId} is heart beating ...")
          println(s"current online workers is ${workers.size} !!!!")
        }
        case None =>{
          println(s"worker ${workId} is invalid ....")
        }
      }
    }
    case CheckTimeOut =>{
      if(workers.size>0){
        workers = workers.filter(tp=>{
          val work_id = tp._1
          val registInfo = tp._2
          if(System.currentTimeMillis() - registInfo.lastUpdateTime > timeout){
            println(s"worker ${work_id} is timeout,removed from master!!!!!!!!!!!!!!!!!!!!!!!!!!!!!!!!!!!!!!!!!!!!!!!!")
            false
          }else{
            true
          }
        })
      }
    }
  }

  override def preStart(): Unit = {
    import context.dispatcher
    context.system.scheduler.schedule(
      Duration(check_interval,TimeUnit.SECONDS),
      Duration(check_interval,TimeUnit.SECONDS),
      self,
      CheckTimeOut
    )
  }
}
object Master {
  def main(args: Array[String]): Unit = {
    val conf =
      """
        |akka.actor.provider = akka.remote.RemoteActorRefProvider
        |akka.remote.netty.tcp.hostname = localhost
        |akka.remote.netty.tcp.port = 8888
        |""".stripMargin
    val config = ConfigFactory.parseString(conf)
    val actorSystem = ActorSystem.create("nn1",config)
    val actor = actorSystem.actorOf(Props(new Master),"master")
  }
}
公共类
package com.hainiu.scala

case class RegistClass(val workId:String,var lastUpdateTime:Long,val cores:Int,val memory:String)
case object RegistSuccess
case class HeartBeat(val workId:String)
case object CheckTimeOut
执行结果