Spark的RDD编程01 8 .RDD
8.1 RDD设计背景
在实际应用中,存在许多迭代式计算,这些应用场景的共同之处是,不同计算阶段之间会重用中间结果,即一个阶段的输出结果会作为下一个阶段的输入。但是,目前的MapReduce框架都是把中间结果写入到HDFS中,带来了大量的数据复制、磁盘IO和序列化开销。显然,如果能将结果保存在内存当中,就可以大量减少IO。RDD就是为了满足这种需求而出现的,它提供了一个抽象的数据架构,我们不必担心底层数据的分布式特性,只需将具体的应用逻辑表达为一系列转换处理,不同RDD之间的转换操作形成依赖关系,可以实现管道化,从而避免了中间结果的落地存储,大大降低了数据复制、磁盘IO和序列化开销。
8.2 RDD概念
RDD(Resilient Distributed Datasets,弹性分布式数据集)代表可并行操作元素的不可变分区集合。
一个RDD就是一个分布式对象集合,本质上是一个只读的分区记录集合,每个RDD可以分成多个分区,每个分区就是一个数据集片段(HDFS上的块),并且一个RDD的不同分区可以被保存到集群中不同的节点上,从而可以在集群中的不同节点上进行并行计算。
RDD提供了一种高度受限的共享内存模型,即RDD是只读的记录分区的集合,不能直接修改,只能基于稳定的物理存储中的数据集来创建RDD,或者通过在其他RDD上执行确定的转换操作(如map、join和groupBy)而创建得到新的RDD。
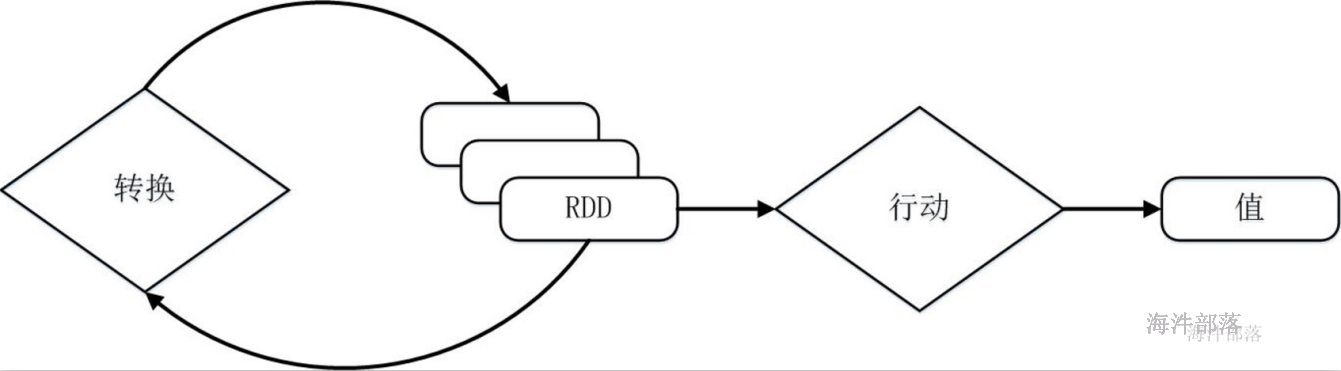
RDD提供了一组丰富的操作以支持常见的数据运算,分为“行动”(Action)和“转换”(Transformation)两种类型,前者用于执行计算并指定输出的形式,后者指定RDD之间的相互依赖关系。两类操作的主要区别是,转换操作(比如map、filter、groupBy、join等)接受RDD并返回RDD,而行动操作(比如count、collect等)接受RDD但是返回非RDD(即输出一个值或结果)。
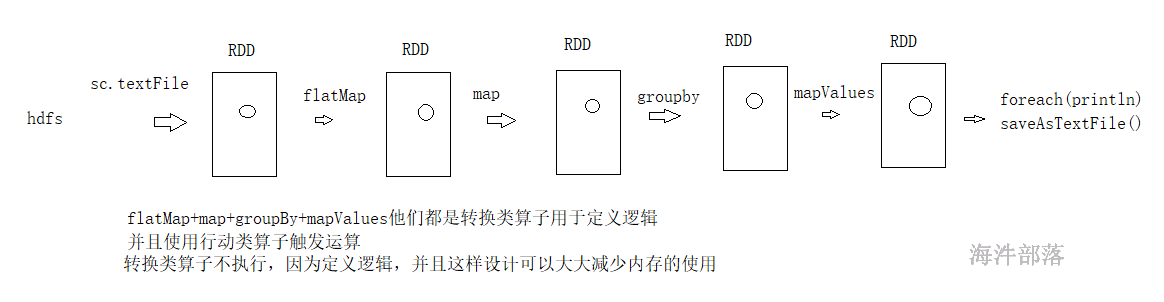
RDD典型的执行过程
Spark用Scala语言实现了RDD的API,程序员可以通过调用API实现对RDD的各种操作。RDD典型的执行过程如下:
1)RDD读入外部数据源(或者内存中的集合)进行创建;
2)RDD经过一系列的“转换”操作,每一次都会产生不同的RDD,供给下一个“转换”使用;
3)最后一个RDD经“行动”操作进行处理,并输出到外部数据源(或者变成Scala/JAVA集合或变量)。
需要说明的是,RDD采用了惰性调用,即在RDD的执行过程中,真正的计算发生在RDD的“行动”操作,对于“行动”之前的所有“转换”操作,Spark只是记录下“转换”操作应用的一些基础数据集以及RDD生成的轨迹,即相互之间的依赖关系,而不会触发真正的计算。
val conf = new SparkConf
val sparkContext = new SparkContext(conf)
val lines :RDD = sparkContext.textFile(logFile)
//lines.filter((a:String) => a.contains("hello world"))
val count = lines.filter(_.contains("hello world")).count()
println(count)
可以看出,一个Spark应用程序,基本是基于RDD的一系列计算操作。
第1行代码用于创建JavaSparkContext对象;
第2行代码从HDFS文件中读取数据创建一个RDD;
第3行代码对fileRDD进行转换操作得到一个新的RDD,即filterRDD;
count()是一个行动操作,用于计算一个RDD集合中包含的元素个数。
这个程序的执行过程如下:
1)创建这个Spark程序的执行上下文,即创建SparkContext对象;
2)从外部数据源(即HDFS文件)中读取数据创建fileRDD对象;
3)构建起fileRDD和filterRDD之间的依赖关系,形成DAG图,这时候并没有发生真正的计算,只是记录转换的轨迹;
4)执行action代码时,count()是一个行动类型的操作,触发真正的计算,开始执行从fileRDD到filterRDD的转换操作,并把结果持久化到内存中,最后计算出filterRDD中包含的元素个数。
8.3 spark任务的执行过程
https://spark.apache.org/docs/3.1.2/rdd-programming-guide.html
官网的概述
At a high level, every Spark application consists of a driver program that runs the user’s main function and executes various parallel operations on a cluster. The main abstraction Spark provides is a resilient distributed dataset (RDD), which is a collection of elements partitioned across the nodes of the cluster that can be operated on in parallel. RDDs are created by starting with a file in the Hadoop file system (or any other Hadoop-supported file system), or an existing Scala collection in the driver program, and transforming it. Users may also ask Spark to persist an RDD in memory, allowing it to be reused efficiently across parallel operations. Finally, RDDs automatically recover from node failures.每一个应用都是由driver端组成的,并且driver端可以解析用户的代码,并且在集群中并行执行,spark给大家提供了一个编程对象,它是一个抽象的,叫做弹性分布式数据集,这个数据集和一堆数据的集合并且是被分区的,因为分区的数据可以被并行的进行操作,rdd的创建方式有两种 1.读取hdfs的文件 2.在driver的一个集合可以转换为rdd,rdd可以被持久化到内存中,并且rdd可以实现更好的失败恢复容错
为什么rdd是抽象的呢?因为rdd并不存在数据,它是虚拟的,我们在定义逻辑的时候要标识一个节点,表示数据在流动到此处的时候要进行什么样的处理,我们可以理解rdd是一个代理对象
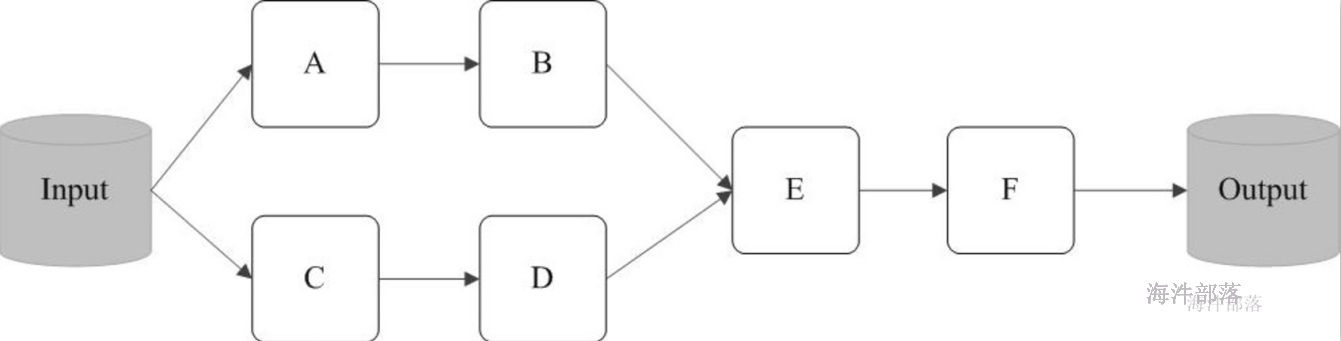
任务的执行和层架关系
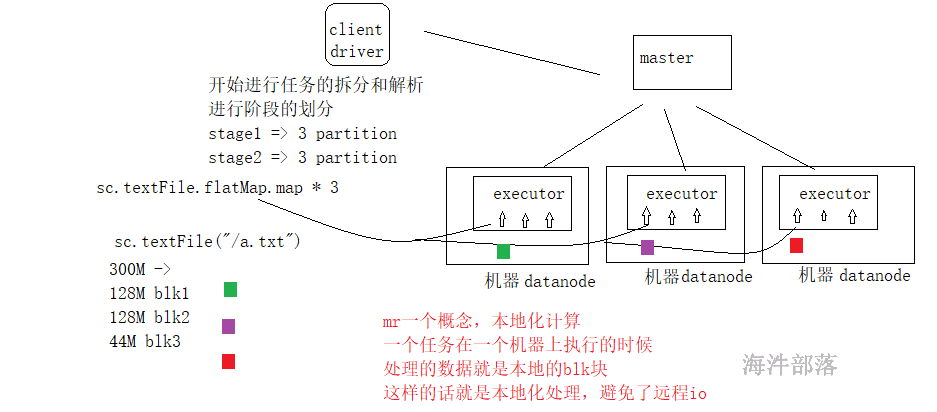
读取hdfs数据的时候映射应该是一个blk块对应一个分区
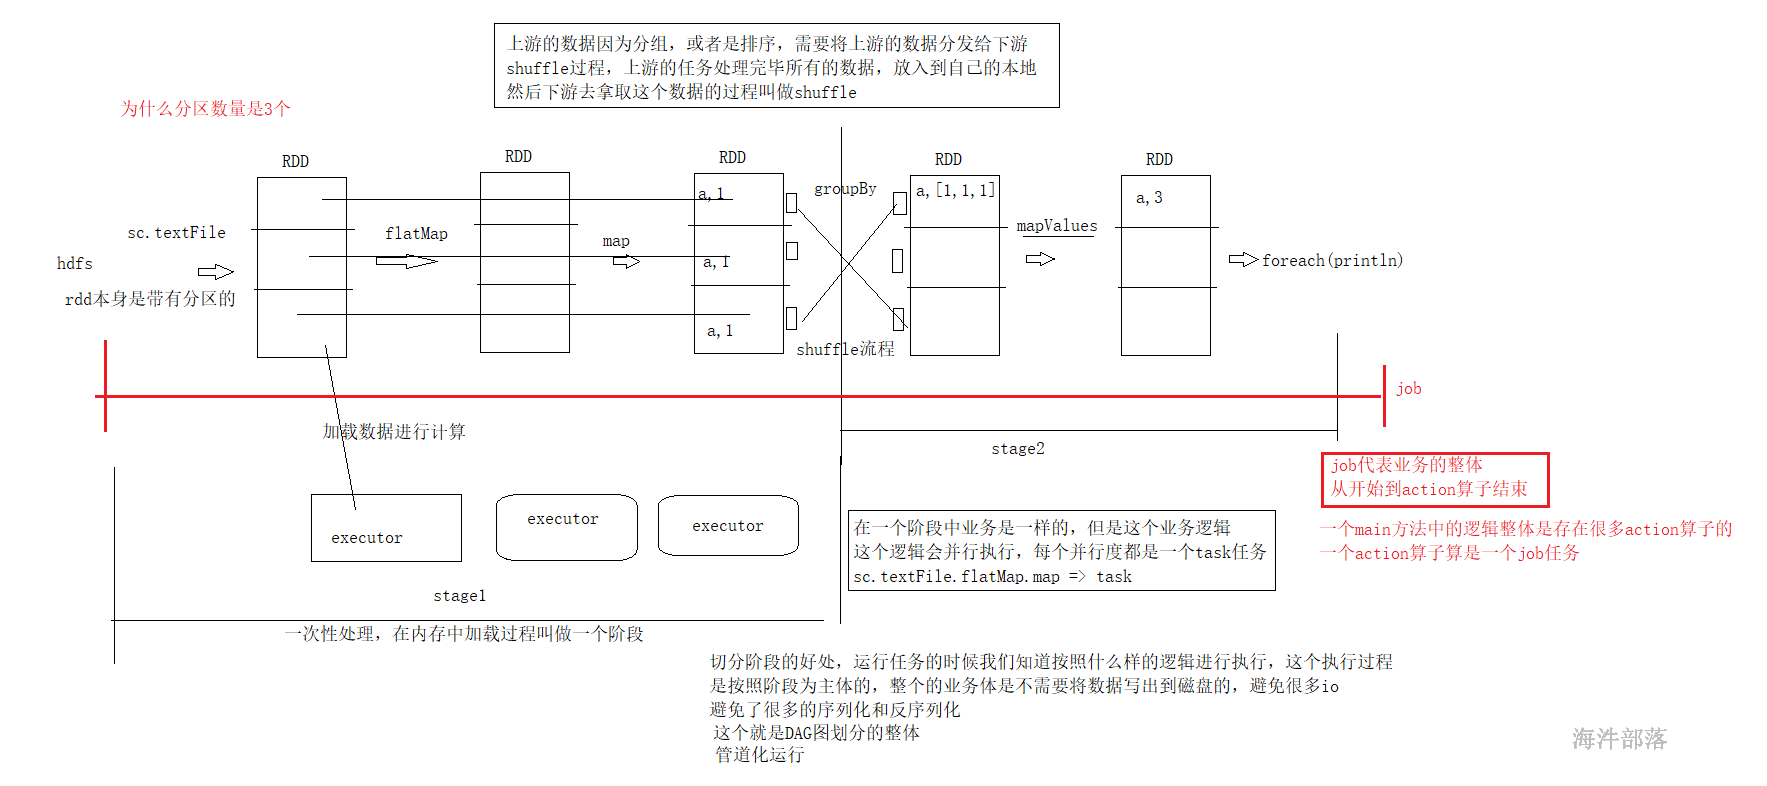
- 在一个任务中,一个action算子会生成一个job
- 在一个job中存在shuffle算子,比如group sort切分阶段,shuffle+1个阶段
- shuffle是任务的划分的重点,前面的任务会将数据放入到自己的本地存储,后续的任务进行数据的拉取
- 在一个stage中任务都是管道形式执行的,避免了io,序列化和反序列化,这个就是dag切分的原理
- 在一个阶段中分区数量就是task任务的数量,task任务就是一堆非shuffle类算子的整体任务链
- 有几个分区就会并行的执行几个task任务
- 有几个分区是根据读取的文件来进行适配的,比如有三个blk那么就会生成三个分区,因为我们可以在每个分区中进行处理数据,实现本地化的处理,避免远程io
9 RDD编程
开启 spark-shell
本地模式:spark-shell
集群模式:spark-shell –master spark://nn1.hadoop:7077, nn2.hadoop:7077 –executor-memory 1G –total-executor-cores 2
9.1 RDD创建
9.1.1 textFile()
:从文件系统加载数据创建RDD
val conf = new SparkConf().setAppName("rddtest").setMaster("lcoal")
val sc: SparkContext = new SparkContext(conf)
val data: RDD[String] = sc.textFile("E:\\tmp\\spark\\input\\f1.txt")
9.1.2 parallelize()|markRDD
:集合并行化,从一个已经存在的集合上创建RDD
val arr = Array(1,2,3,4,5)
val data: RDD[Int] = sc.parallelize(arr)
println(data.count()) // 统计RDD元素个数
parallelize 和makeRDD是一个算子
9.1.3.分区个数
RDD默认带有分区的,那么创建完毕rdd以后他的分区数量是多少?
从hdfs读取文件的方式是最正规的方式,我们通过计算原理可以推出blk的个数和分区数量是一致的,本地化计算
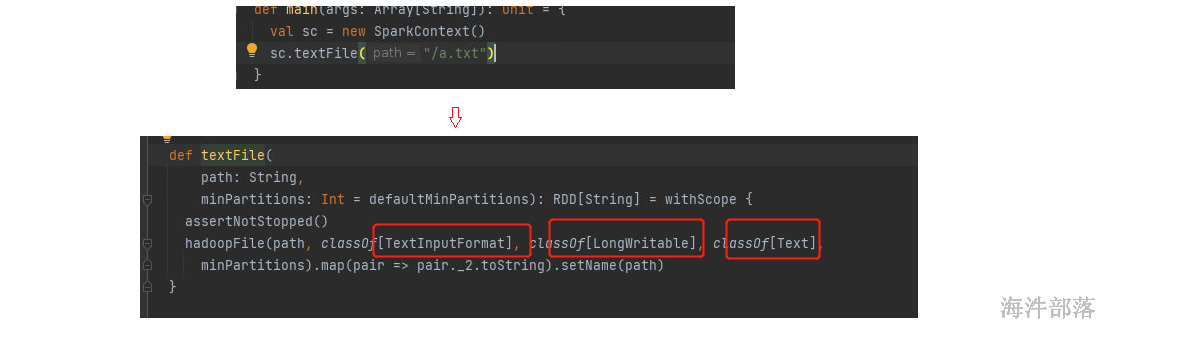
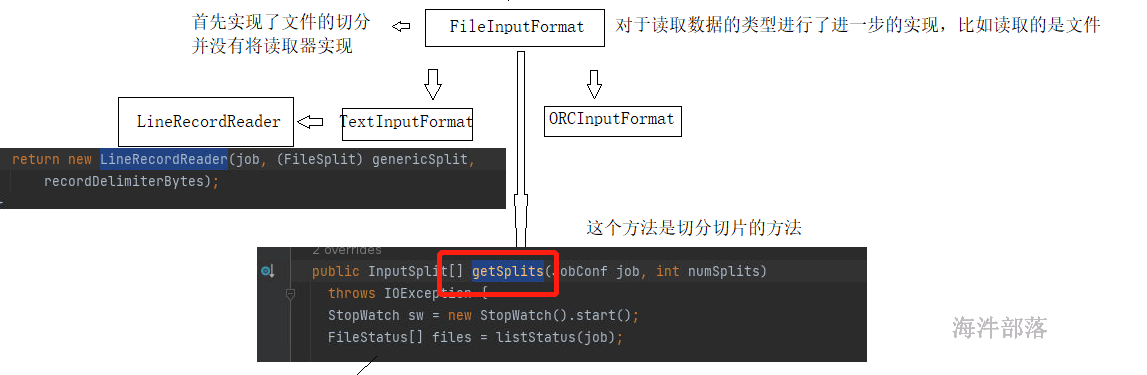
我们可以发现数据的读取使用的是textInputFormat,读取的数据内容是文本
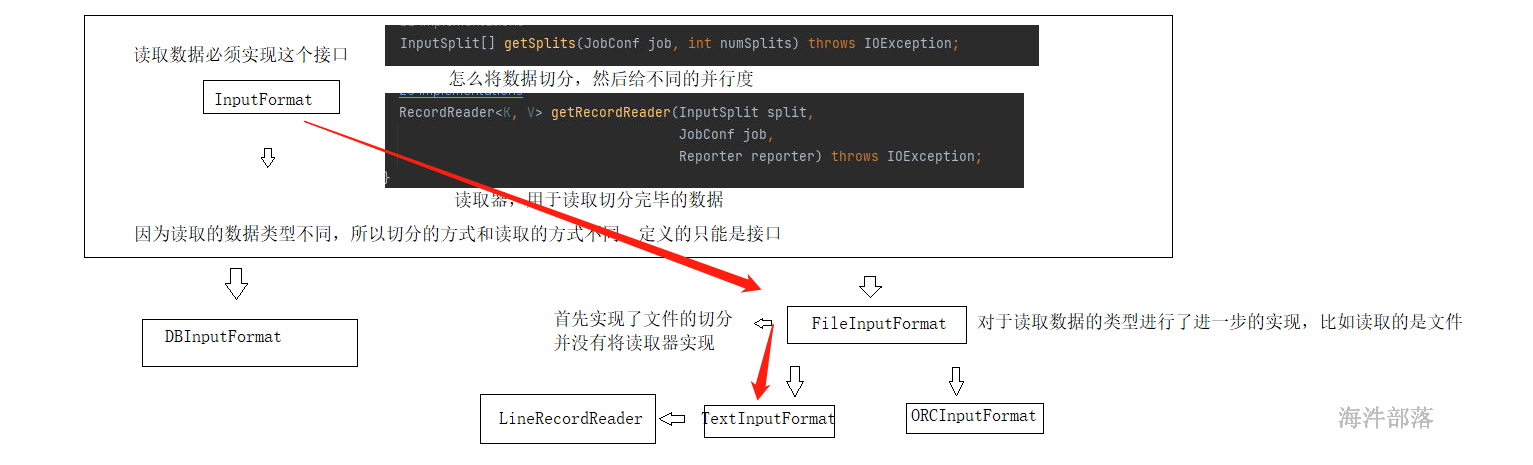
数据结构的实现由上图进行规划
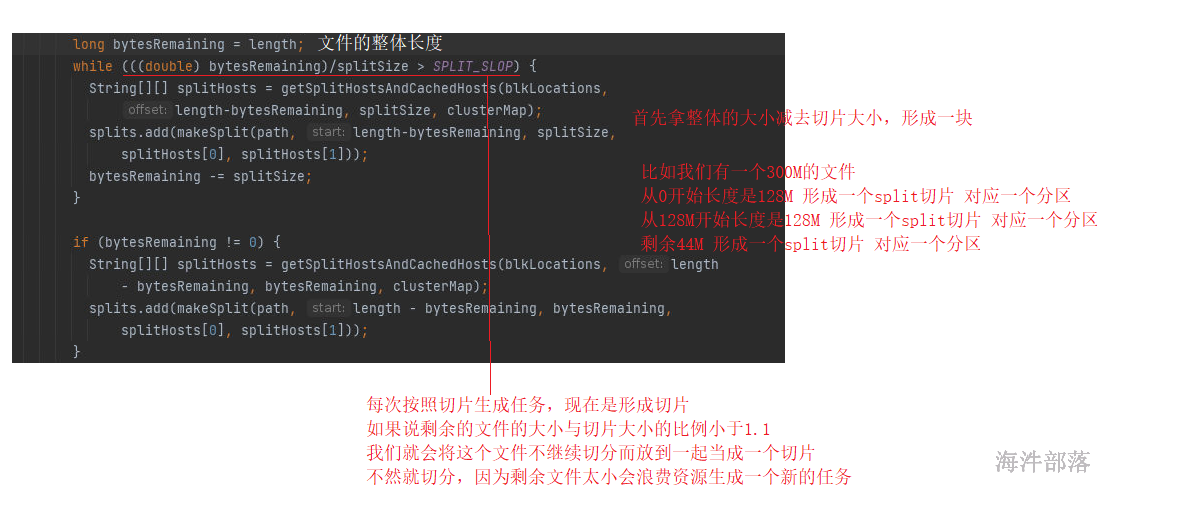
FileInputFormat中对于文件的切分进行了分割,切分几个部分就可以实现分区的个数
文件在hdfs存储的文件在spark中的使用是不同的
存储的时候单位是block块 128M
读取的时候是以spark为主,spark的读取大小叫做split切片
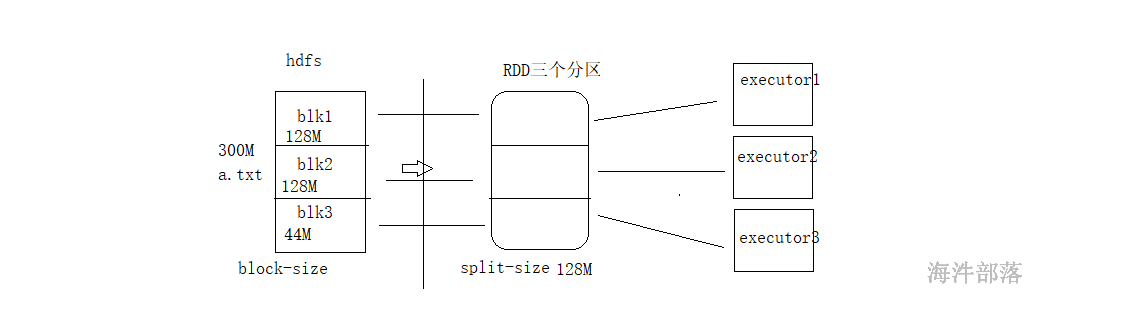
千万要将存储和计算区分开
分区的多少完全看切片是多少,和hdfs的存储无关,但是如果切片大小和block的大小一致的话那么就可以实现本地化计算
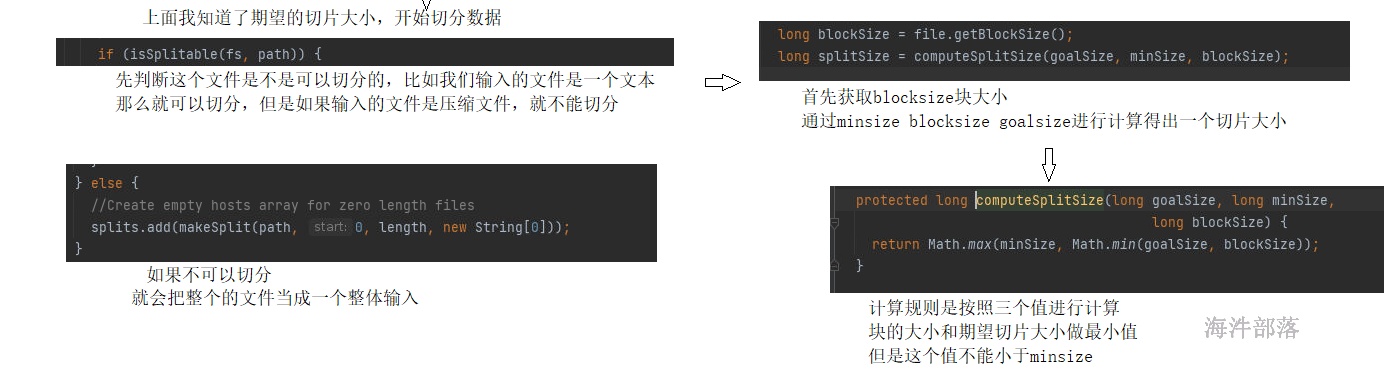
以上是源码逻辑分析
计算规则演示如下:
代码演示如下:
#追加形式增大文件的大小
cat word.txt >> word1.txt
cat word.txt >> word2.txt 
最终形成结果为上图

分区数量为4
然后继续增加文件
cat word.txt >> word3.txt 
结果如上图:

最终分区数量为5
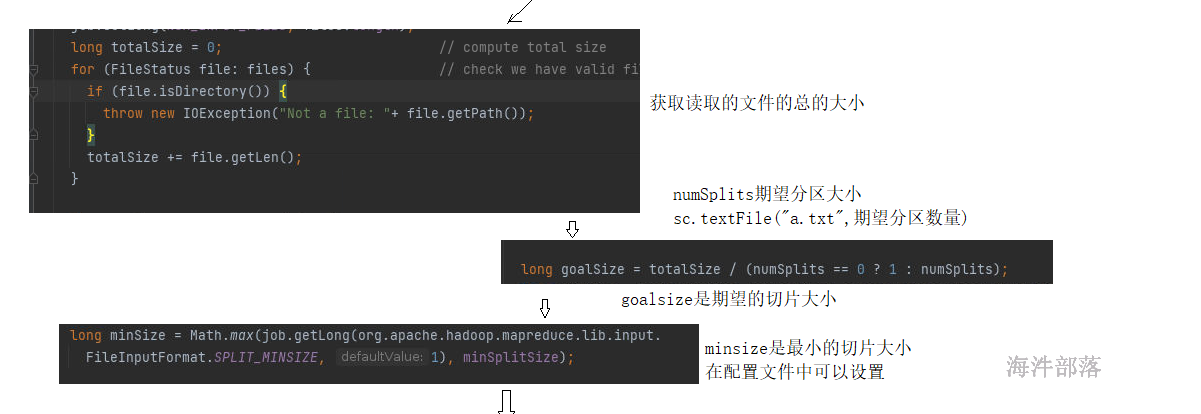
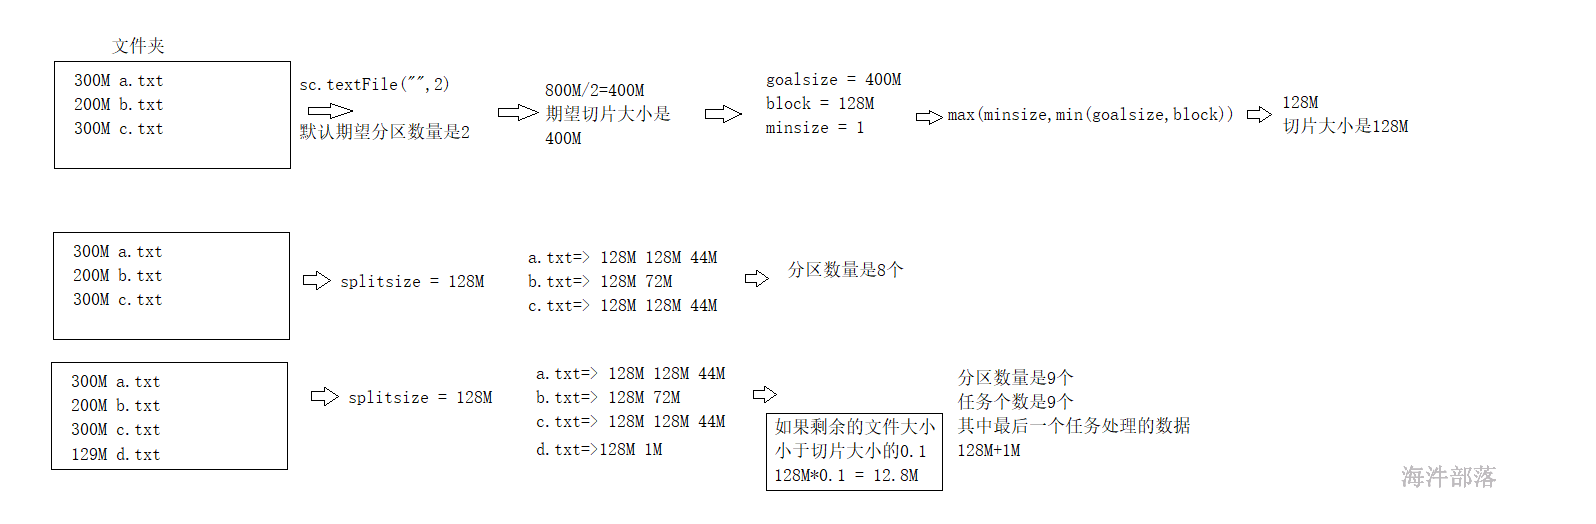
在读取hdfs的文件的时候,一般文件都比较大,所以期望分区在不设定的时候默认值是2,切片大小肯定大于128M,那么以128M为主肯定切片和block的数量是一致的
集合并行化
根据集群中的核数进行适配,启动的时候有几个核,产生分区数量就是几个
因为在计算的过程中,我们是为了做测试,为了达到最大的性能,所以分区数量会自己适配
9.2 RDD操作
RDD操作包括两种类型,即转换(Transformation)操作和行动(Action)操作。
9.2.1 转换操作
对于RDD而言,每一次转换操作都会产生不同的RDD,供给下一个操作使用。RDD的转换过程是惰性求值的,也就是说,整个转换过程只是记录了转换的轨迹,并不会发生真正的计算,值遇到行动操作时,才会触发“从头到尾”的真正的计算。
9.2.1.1 常用转换操作
| 函数 | 说明 | 示例 |
|---|---|---|
| map(func) | 将函数应用于RDD中的每个元素,将返回值构成新的RDD | 假设RDD的元素是{“1 2 3”,“4 5 6”} val rdd1 = rdd.map(s => s.split("“)) rdd1的元素是 {Array(”1“,”2“,”3“),Array(”4“,”5“,”6")} |
| flatMap(func) | 将函数应用于RDD中的每个元素,将返回的迭代器的所有内容构成新的RDD 执行过程:map—> flat(拍扁) | 假设RDD的元素是{“1 2 3”,“4 5 6”} val rdd1 = rdd.flatMap(s => s.split("“)) rdd1的元素是 {”1“,”2“,”3“,”4“,”5“,”6"} |
| filter(func) | 返回一个由通过func函数测试(返回true)的元素组成的RDD | 假设RDD的元素是 {1,2,3,4} val rdd1 = rdd.filter(s => s\<3) rdd1的元素是 {1,2} |
| distinct() | 排重 | |
| mapPartitions() | 先partition,再把每个partition进行map函数 | |
| mapPartitionsWithIndex() | 先partition,再把每个partition进行map函数,并传入partitionid |
map(func)
scala> val arr = Array(1,2,3,4,5,6,7,8,9)
arr: Array[Int] = Array(1, 2, 3, 4, 5, 6, 7, 8, 9)
scala> sc.makeRDD(arr)
res13: org.apache.spark.rdd.RDD[Int] = ParallelCollectionRDD[11] at makeRDD at <console>:27
scala> res13.partitions.size
res14: Int = 9
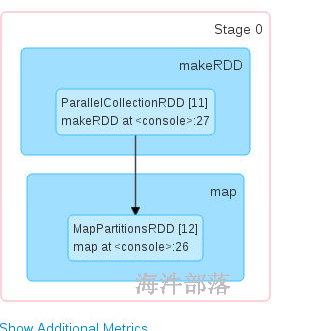
scala> res13.map(_*2)
res15: org.apache.spark.rdd.RDD[Int] = MapPartitionsRDD[12] at map at <console>:26
scala> res15.foreach(println)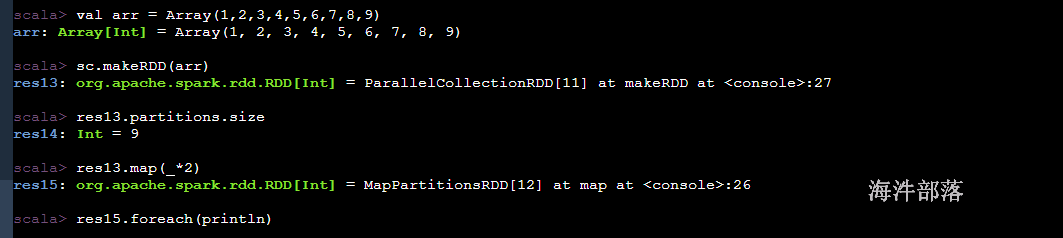
每个任务在不同的executor的线程中进行执行
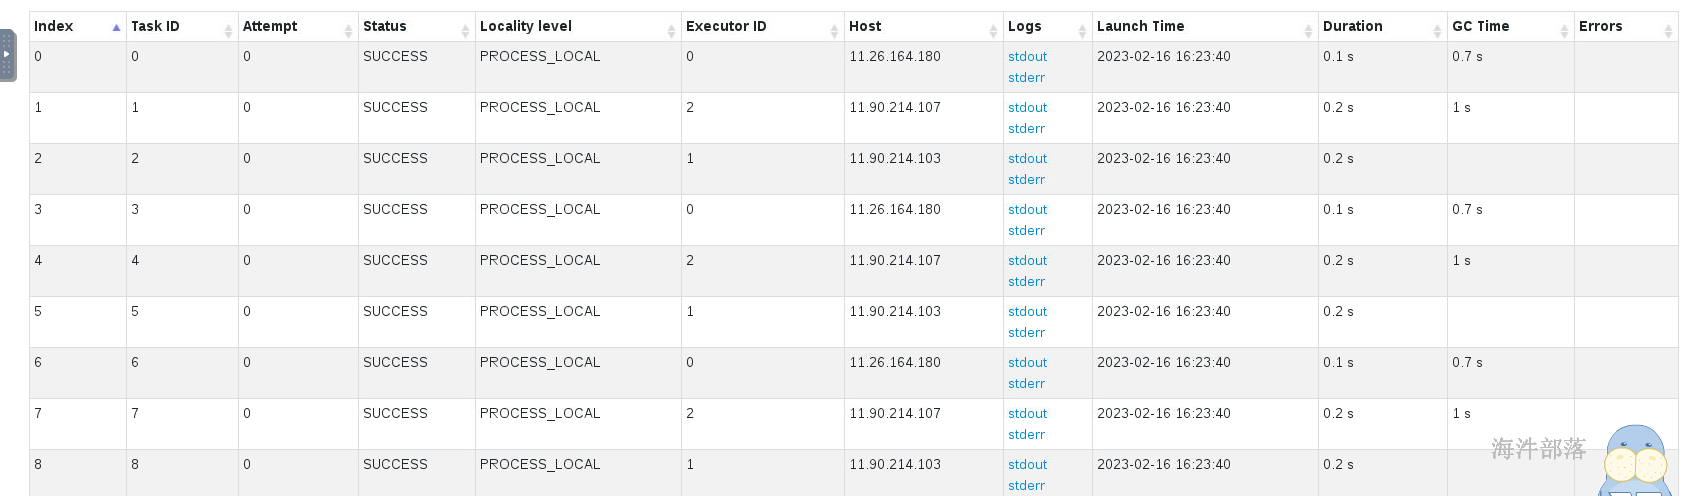
为了能够直观的查看展示的效果,我们使用collect进行数据的收集,收集到driver端进行展示
scala> res15.collect
res17: Array[Int] = Array(2, 4, 6, 8, 10, 12, 14, 16, 18)
小心使用collect,收集回来的数据在driver,rdd是分布式的,但是driver都是放入到内存中,这个数据会造成内存溢出的问题,数据比较小的测试的内容可以收集回来
flatMap(func)
scala> val arr = Array("hello tom","hello jack hello world","tom world")
arr: Array[String] = Array(hello tom, hello jack hello world, tom world)

scala> sc.makeRDD(arr)
res18: org.apache.spark.rdd.RDD[String] = ParallelCollectionRDD[13] at makeRDD at <console>:27

scala> res18.flatMap(_.split(" "))
res19: org.apache.spark.rdd.RDD[String] = MapPartitionsRDD[14] at flatMap at <console>:26

scala> res19.collect
res20: Array[String] = Array(hello, tom, hello, jack, hello, world, tom, world)

scala>

scala> val arr = Array("zhangsan 100 90 98 78","lisi 89 67 78")
arr: Array[String] = Array(zhangsan 100 90 98 78, lisi 89 67 78)

scala> sc.makeRDD(arr)
res21: org.apache.spark.rdd.RDD[String] = ParallelCollectionRDD[15] at makeRDD at <console>:27

scala> res21.flatMap(t=>{
     | val arr = t.split(" ")
     | arr.tail.map((arr.head,_))
     | })
res22: org.apache.spark.rdd.RDD[(String, String)] = MapPartitionsRDD[16] at flatMap at <console>:28

scala> res22.collect
res23: Array[(String, String)] = Array((zhangsan,100), (zhangsan,90), (zhangsan,98), (zhangsan,78), (lisi,89), (lisi,67), (lisi,78))
filter(func)
scala> val arr = Array(1,2,3,4,5,6,7,8,9)
arr: Array[Int] = Array(1, 2, 3, 4, 5, 6, 7, 8, 9)

scala> sc.makeRDD(arr,3)
res24: org.apache.spark.rdd.RDD[Int] = ParallelCollectionRDD[17] at makeRDD at <console>:27

scala> res24.filter(_>3)
res25: org.apache.spark.rdd.RDD[Int] = MapPartitionsRDD[18] at filter at <console>:26

scala> res25.collect
res26: Array[Int] = Array(4, 5, 6, 7, 8, 9)
分区没了还是数据没了

分区在创建rdd的时候就已经存在了,rdd上面是必须存在分区的,因为可以在不同的机器上进行并行执行
在计算过程中我们会发现有的时候分区数量可以过少或者过多
读取的数据要进行机器学习计算,那么一个block里面的128M的数据只能给一个任务处理,这个时候我们需要增加分区
filter在过滤数据的时候将大部分的垃圾数据丢掉了,垃圾数据清除掉,大量的分区中存在的数据量比较少,任务在处理的时候就会浪费资源
这个时候我们需要修改分区的数量
map flatMap filter 等算子他们都是简单的管道形式的算子,加载到内存中直接执行,不会将数据进行分发到别的机器,他们就没有修改分区的能力
只有shuffle类的算子能够修改分区数量,这些算子不仅仅存在自己的功能,比如分组算子groupBy,它的功能是分组但是却可以修改分区
distinct()
scala> val arr = Array(1,1,2,2,3,3,4,4,5,5,6,6)
arr: Array[Int] = Array(1, 1, 2, 2, 3, 3, 4, 4, 5, 5, 6, 6)

scala> val rdd = sc.makeRDD(arr)
rdd: org.apache.spark.rdd.RDD[Int] = ParallelCollectionRDD[19] at makeRDD at <console>:26

scala> rdd.distinct
res29: org.apache.spark.rdd.RDD[Int] = MapPartitionsRDD[22] at distinct at <console>:26

scala> res29.collect
res30: Array[Int] = Array(1, 2, 3, 4, 5, 6)
去重使用方式很简单
但是原理却不简单
思考一下怎么进行数据去重的?
这个同sql和mr是一样,都是分组完毕取出key的值
scala> arr
res31: Array[Int] = Array(1, 1, 2, 2, 3, 3, 4, 4, 5, 5, 6, 6)
scala> sc.makeRDD(arr)
res32: org.apache.spark.rdd.RDD[Int] = ParallelCollectionRDD[23] at makeRDD at <console>:27
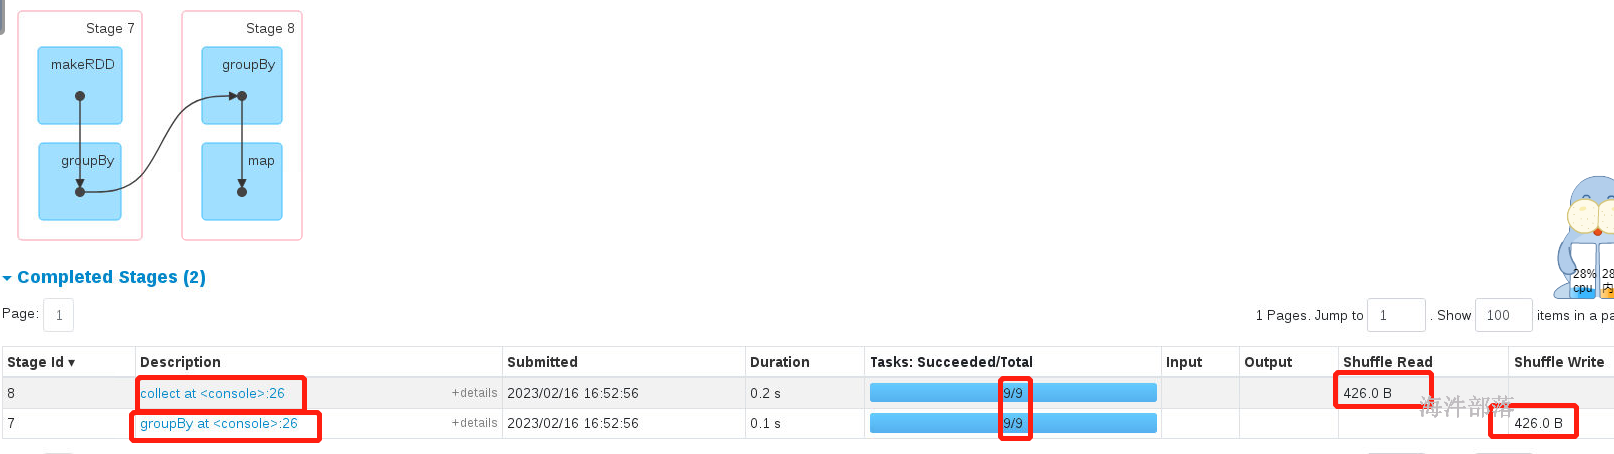
scala> res32.groupBy(t=> t)
res33: org.apache.spark.rdd.RDD[(Int, Iterable[Int])] = ShuffledRDD[25] at groupBy at <console>:26
scala> res33.map(_._1).collect
res34: Array[Int] = Array(1, 2, 3, 4, 5, 6)distinct的底层实现是通过分组实现,分组存在shuffle,所以可以修改分区数量,所以切分阶段
能够修改分区数量的算子必须存在shuffle。但是如果人为不去设定分区数量,下游的分区数量和上游相同
可以修改分区数量
scala> arr
res35: Array[Int] = Array(1, 1, 2, 2, 3, 3, 4, 4, 5, 5, 6, 6)

scala> sc.makeRDD(arr,3)
res36: org.apache.spark.rdd.RDD[Int] = ParallelCollectionRDD[27] at makeRDD at <console>:27

scala> res36.distinct(6)
res37: org.apache.spark.rdd.RDD[Int] = MapPartitionsRDD[30] at distinct at <console>:26

scala> res37.partitions.size
res38: Int = 6

scala> res36.distinct(2)
res39: org.apache.spark.rdd.RDD[Int] = MapPartitionsRDD[33] at distinct at <console>:26

scala> res39.partitions.size
res40: Int = 2
distinct 可以增加也可以减少分区数量
mapPartitions算子
scala> val arr = Array(1,2,3,4,5,6,7,8,9)
arr: Array[Int] = Array(1, 2, 3, 4, 5, 6, 7, 8, 9)

scala> sc.makeRDD(arr)
res41: org.apache.spark.rdd.RDD[Int] = ParallelCollectionRDD[34] at makeRDD at <console>:27

scala> res41.map(_*2)
res42: org.apache.spark.rdd.RDD[Int] = MapPartitionsRDD[35] at map at <console>:26

scala> res41.mapPartitions
mapPartitions   mapPartitionsWithIndex

scala> res41.mapPartitions
   def mapPartitions[U](f: Iterator[Int] => Iterator[U],preservesPartitioning: Boolean)(implicit evidence$6: scala.reflect.ClassTag[U]): org.apache.spark.rdd.RDD[U]

scala> res41.map
map   mapPartitions   mapPartitionsWithIndex

scala> res41.map
   def map[U](f: Int => U)(implicit evidence$3: scala.reflect.ClassTag[U]): org.apache.spark.rdd.RDD[U]

scala> res41.mapPartitions(it=> it.map(_*2))
res43: org.apache.spark.rdd.RDD[Int] = MapPartitionsRDD[36] at mapPartitions at <console>:26

scala> res43.collect
res44: Array[Int] = Array(2, 4, 6, 8, 10, 12, 14, 16, 18)
mappartitions和map几乎一样,只不过mapPartitions是一个分区作为一个整体进行处理的
连接处理的时候需要mapPartitions
# 首先创建data文件夹然后创建order.txt,输入如下内容
# 其中列含义 order_id[订单编号],user_id[用户id],goods_id[商品id],number[数量],price[价格]
001,1,2,5,5000
002,2,3,6,6000
003,3,4,7,7000
004,4,5,8,8000
# 在mysql中创建一个用户表 user
id name age
1 zhangsan 20
2 lisi 30
3 wangwu 40
4 zhaosi 50
初始化mysql
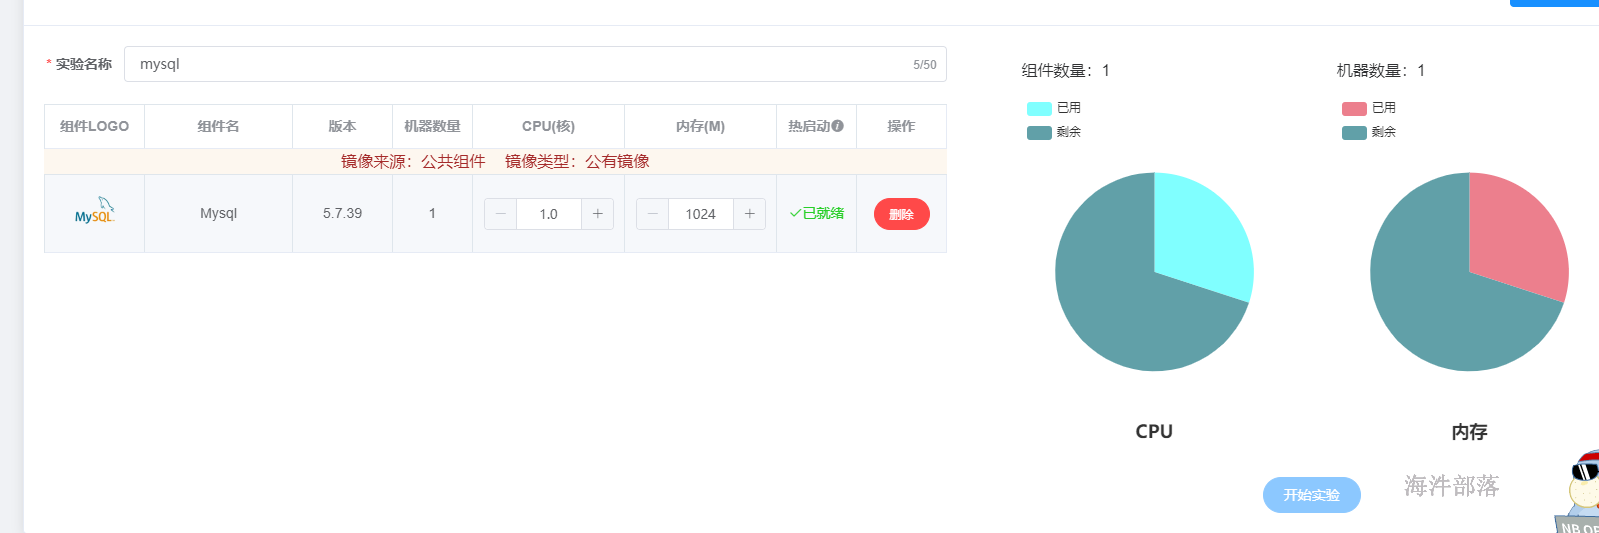
连接完毕以后拿到它的链接地址和用户名以及密码


user:root password:hainiu host:11.237.80.55
原理和思路:
根据order.txt中的订单内容,通过里面的用户id去表中查询用户的名称
# 进入mysql
mysql -uroot -phainiu
# 在mysql中创建表
create database hainiu;
use hainiu;
create table user(id int,name varchar(20),age int,primary key(id));
insert into user(id,name,age)values(1,"zhangsan",20);
insert into user(id,name,age)values(2,"lisi",30);
insert into user(id,name,age)values(3,"wangwu",40);
insert into user(id,name,age)values(4,"zhaosi",50);
在项目中引入mysql的依赖
<dependency>
    <groupId>mysql</groupId>
    <artifactId>mysql-connector-java</artifactId>
    <version>5.1.49</version>
</dependency>
整体查询代码如下:
package com.hainiu.spark

import org.apache.spark.{SparkConf, SparkContext}

import java.sql.DriverManager

object Test {
  def main(args: Array[String]): Unit = {
    val conf = new SparkConf()
    conf.setAppName("test mapPartitions")
    conf.setMaster("local[*]")
    val sc = new SparkContext(conf)
    sc.textFile("data/order.txt")
      .map(t=>{
        val strs = t.split(",")
        (strs(0),strs(1).toInt,strs(2).toInt,strs(3).toInt,strs(4).toDouble)
        //orderId userId goodsId number price
      }).map(t=>{
      val con = DriverManager.getConnection("jdbc:mysql://11.237.80.55:3306/hainiu","root","hainiu")
      val prp = con.prepareStatement("select name from hainiu.user where id = ?")
      val userid = t._2
      prp.setInt(1,userid)
      val result = prp.executeQuery()
      var name:String = null
      while(result.next()){
        name = result.getString("name")
      }
      prp.close()
      con.close()
      (t._1,t._2,name,t._3,t._4,t._5)
    }).foreach(println)
  }
}

以上代码不可以这么使用,因为map中一条元素会和mysql创建一个连接,元素在生产环境中,可能达到几千万,mysql是不支持这么大量的链接,并且每次都创建链接性能非常低下
只有sc调用的代码和rdd调用的代码会在executor中执行,剩余的所有的代码全部都在driver端执行
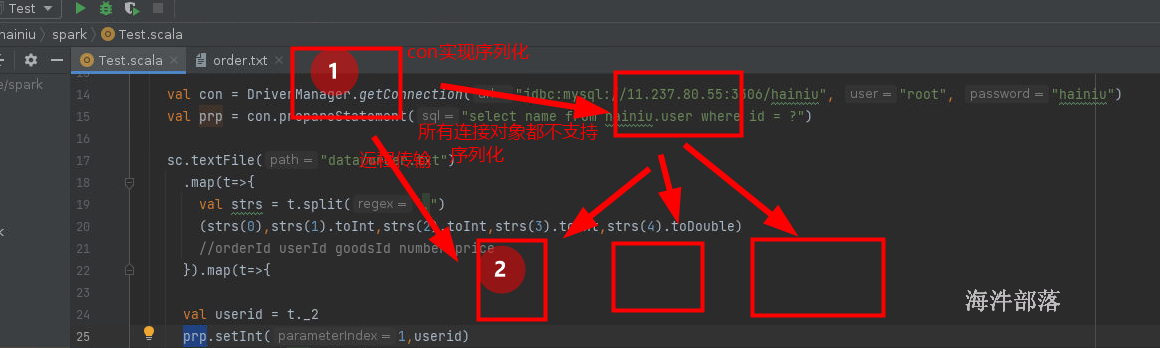
connect对象不能提取到公共变量中,driver端的对象不能再executor中使用,远程使用需要序列化的
改版完毕的代码
package com.hainiu.spark

import org.apache.spark.{SparkConf, SparkContext}

import java.sql.DriverManager
import scala.collection.mutable.ListBuffer

object Test {
  def main(args: Array[String]): Unit = {
    val conf = new SparkConf()
    conf.setAppName("test mapPartitions")
    conf.setMaster("local[*]")
    val sc = new SparkContext(conf)
    sc.textFile("data/order.txt")
      .map(t=>{
        val strs = t.split(",")
        (strs(0),strs(1).toInt,strs(2).toInt,strs(3).toInt,strs(4).toDouble)
        //orderId userId goodsId number price
      }).mapPartitions(it=>{
      val con = DriverManager.getConnection("jdbc:mysql://11.237.80.55:3306/hainiu", "root", "hainiu")
      val prp = con.prepareStatement("select name from hainiu.user where id = ?")
      val buffer = ListBuffer[(String,Int,String,Int,Int,Double)]()
      it.foreach(t=>{
        val userid = t._2
        prp.setInt(1, userid)
        val result = prp.executeQuery()
        var name: String = null
        while (result.next()) {
          name = result.getString("name")
        }
        buffer.append((t._1, t._2, name, t._3, t._4, t._5))
      })
      prp.close()
      con.close()
      buffer.toIterator
    }).foreach(println)
  }
}

一个分区创建一个连接,连接数量减少,并且不涉及到序列化问题
mapPartitionsWithIndex
scala> val arr = Array(1,2,3,4,5,6,7,8,9)
arr: Array[Int] = Array(1, 2, 3, 4, 5, 6, 7, 8, 9)

scala> sc.makeRDD(arr,3)
res45: org.apache.spark.rdd.RDD[Int] = ParallelCollectionRDD[37] at makeRDD at <console>:27

scala> res45.mapPartitionsWithIndex
   def mapPartitionsWithIndex[U](f: (Int, Iterator[Int]) => Iterator[U],preservesPartitioning: Boolean)(implicit evidence$9: scala.reflect.ClassTag[U]): org.apache.spark.rdd.RDD[U]

scala> res45.mapPartitionsWithIndex((index,it)=>{
     | it.map((_,index))
     | })
res46: org.apache.spark.rdd.RDD[(Int, Int)] = MapPartitionsRDD[38] at mapPartitionsWithIndex at <console>:26

scala> res46.collect
res47: Array[(Int, Int)] = Array((1,0), (2,0), (3,0), (4,1), (5,1), (6,1), (7,2), (8,2), (9,2))

scala> res45.filter(_>3)
res48: org.apache.spark.rdd.RDD[Int] = MapPartitionsRDD[39] at filter at <console>:26

scala> res48.mapPartitionsWithIndex((index,it)=>{
     | it.map((_,index))
     | })
res49: org.apache.spark.rdd.RDD[(Int, Int)] = MapPartitionsRDD[40] at mapPartitionsWithIndex at <console>:26

scala> res49.collect
res50: Array[(Int, Int)] = Array((4,1), (5,1), (6,1), (7,2), (8,2), (9,2))
这个算子中存在两个参数的分别是分区下标和分区中整体的元素
通过映射关系查看元素和分区的对应关系
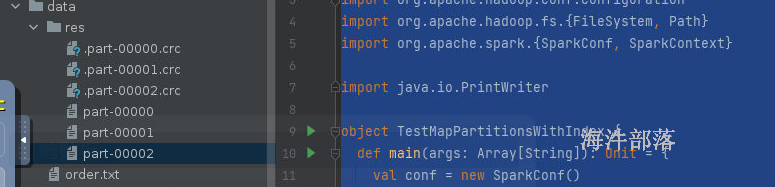
我们之前使用的算子saveAsTextFile,保存数据的算子,会将结果数据存储到hdfs的目录中
使用mapPartitionsWithIndex写出数据到hdfs中
写出数据代码如下:
package com.hainiu.spark

import org.apache.hadoop.conf.Configuration
import org.apache.hadoop.fs.{FileSystem, Path}
import org.apache.spark.{SparkConf, SparkContext}

import java.io.PrintWriter

object TestMapPartitionsWithIndex {
  def main(args: Array[String]): Unit = {
    val conf = new SparkConf()
    conf.setAppName("sink")
    conf.setMaster("local[*]")
    val sc = new SparkContext(conf)
    val arr = Array(1,2,3,4,5,6,7,8,9)
    val sink_dir = "data/res"
    val fs1 = FileSystem.get(new Configuration())
    if(fs1.exists(new Path(sink_dir)))
      throw new Exception("output path already exists!!!")
    else
      fs1.mkdirs(new Path(sink_dir))
    fs1.close()

    sc.makeRDD(arr,3).mapPartitionsWithIndex((index,it)=>{
      val fs = FileSystem.get(new Configuration())
      val out = fs.create(new Path(sink_dir+"/part-0000"+index))
      val pw = new PrintWriter(out, true)
      it.foreach(line => pw.println(line))
      pw.close()
      out.close()
      fs.close()
      Iterator.empty
    }).foreach((t:String)=>{

    })
  }
}